Sawhorses are vital for work that cannot be easily done in a workshop or other workbench-equipped spot.
They’re also useful in many workshops.
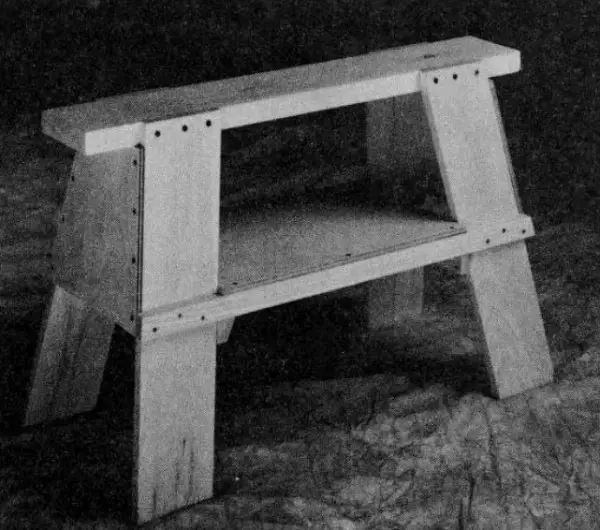
If you want to make sawhorses for your shop, you can use commercially available metal brackets or build a very functional sawhorse such as this one that features a shelf for keeping tools close at hand and off the floor.
This version is stable, sturdy, and reasonably fast to make.
All measurements are for making a pair.
Overall Plans
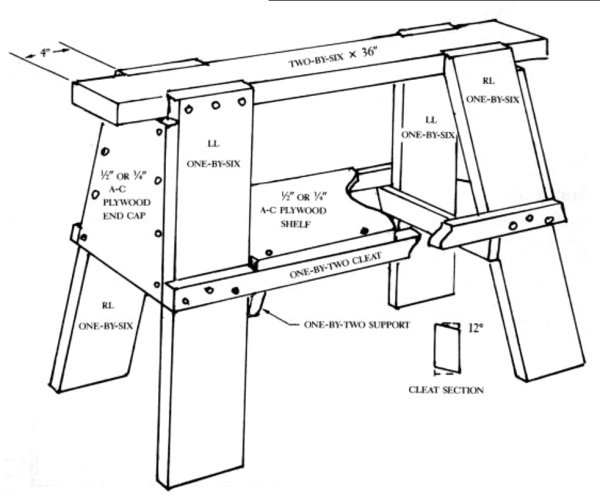
Materials Required
- 2″ x 6” x 8′ (top)
- two 1″ x 6″ x 10’ (legs)
- 1/2″ or 3/4″ A-C plywood, 24″ X 24” or 12” x 48″, scrap or leftovers
- two 1″ X 2″ x 10’ (stretchers)
- two 3/4″ x 13″ X 24″ plywood (shelves)
- No. 8 x 1-1/4″ flathead Phillips screws
- No. 10 x 1-1/2” flathead Phillips screws
Tools Required
- square
- measuring tape
- clutched drill and driver bit
- handsaw
- circular saw
- dovetail or backsaw
- 1” wood chisel
- plane
- hammer
- marking gauge
Make the Top
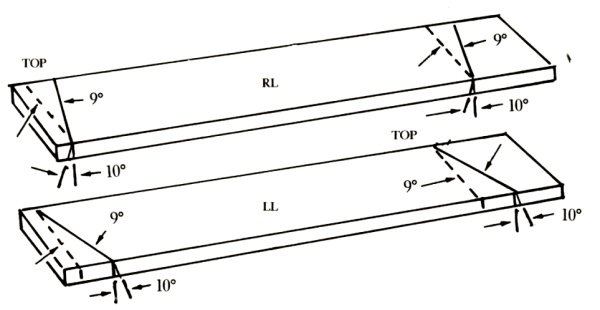
Start by cutting two 36” pieces from the two-by-six stack.
Lay out the tops, measuring in from each end 4” and 9-5/8″.
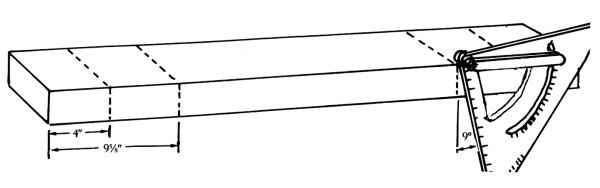
Square lines across tops at both points.
Turn on the edge and mark a nine-degree angle on each line.
Repeat at other ends of the top. Set marking gauge at 5/16” and scribe both sides of top between lines.
Repeat for the second top (we’re making a pair of sawhorses).
Make the Legs
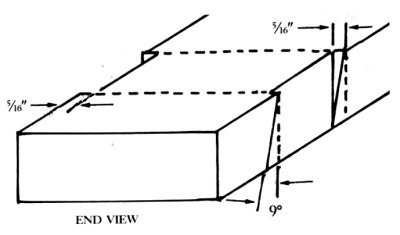
Make cuts for legs with a dovetail or backsaw.
Be sure to hold the proper angle, making the cut from the 5/16″ depth on the top face to no depth at the bottom face.
Make relief cuts every 1/2″ along with the cut, and use a 1″ chisel to remove material and smooth the depression.
Cut four 5′ lengths of one-by-six.
Lay out a nine- degree angle 1/4” from the end of the leg.
Measure and mark 25-5/8” and lay out the second nine-degree angle.
Turn the leg on edge and lay out a 10-degree angle.
Repeat at another end of leg.
The lines intersect with lines from the top surface.
Use a hand saw to cut the compound angle.
The cut forms the bottom of one leg and the top of the next, with all legs cut the same way.
Screw hole placement will differ.
The cut is more easily made if you transfer the angle to a scrap block, and use the scrap block as a saw guide.
Attach the Legs to the Top
Screw four legs to each top piece, scribing a line 3/4” from the top of each leg.
Mark screw locations at l”, 3”, and 4-3/4” along that line, and, with each leg flush with the top, drill and attach with No. 10 X 1-1/2″ flathead Phillips screws.
Make the End Caps
Measure, cut, and attach four end caps.
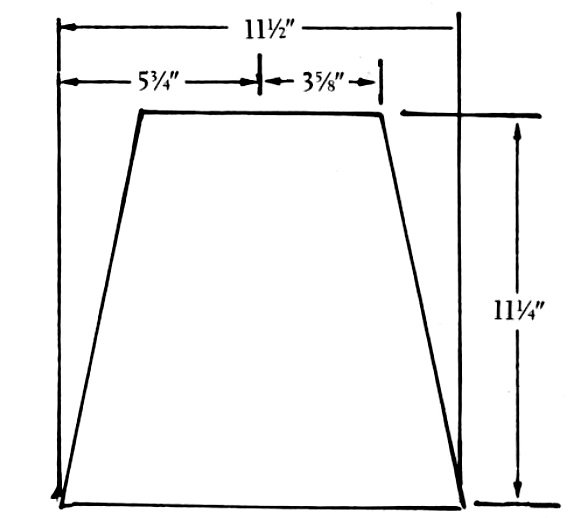
The pieces start at 11-1/2″ wide X 11-1/4″ high, with a centerline marked at 5-3/4″.
Mark off to both sides of the centerline, 3-5/8” to each side and mark at the top.
Draw a line from the bottom edge to the top mark on each side and cut.
This gives the angle.
The finished piece is 7-1/4” across the top, and serves as a pattern for the three other end caps you need.
Attach the End Caps
Screw in place with No. 8 screws, in drilled holes.
The top two screws go in first, after which the legs are spread so they’re flush with the end cap.
The bottom screws go in then, and the center four screws go in last.
Make the Cleats
Cut four pieces of one-by-two to 36” lengths.
Mark each end at 12-degrees on both sides. Y
ou can now clamp in a vise and plane to the angle, or you can set a table saw and rip to the angle.
Little enough material needs to be removed to make hand planing simple.
Attach the Cleats
Fit each piece by placing against the side of the sawhorse, with bevel in the right direction.
Scribe angle on ends, and cut to fit.
Mark 1/2″ from the top and 1/2” up from the bottom.
Mark screw hole locations at 2-3/4″ in on top line, and 1-1/4″ and 4-1/2” on the bottom line.
Drill and screw in place with No- 8 x 1-1/4″ flathead Phillips screws.
Make and Attach Shelves
Cut two 12-1/2” X 20-1/4″ pieces of 1/2″ plywood.
Drill three screw holes, for No. 8 screws, along the side edges of each piece, one 1″ from each end, and one at 10-1/4’.
Attach with No. 8 X 1-1/4” flathead Phillips screws.
Bevel edges with a plane to match the cleat angle.
Make and Attach Support Braces
From one-by-two or one-by-three, cut four 13″ long leg braces.
Mark the center point along one edge (6-1/2”).
Along the same edge, measure and mark 6-1/8” from the center in both directions.
Cut both ends off, cutting between the 6-1/8” and 6-1/2” marks.
The result measures 13″ along the top edge and 12-1/4″ along the bottom end.
Hold the 13″ edge up against the inside of legs on one end.
Drill twice on each end for No. 8 X 1-1/4″ flathead Phillips screws.
Screw those in, sand off any rough edges, and your sawhorses are ready for use.