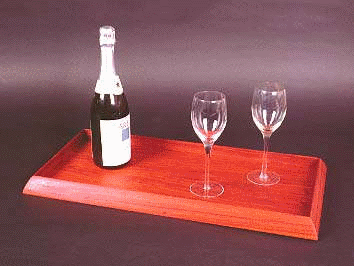
A while back a friend of mine stopped by the shop with a piece of Padauk that she had been keeping for some time, and which she wanted made into a tray.
The piece was a little longer than two feet, and a little less than one, and 3/4″ thick.
At first I told her that I didn’t think there was enough wood there to make the tray she wanted with sides about 1-1/2″ high.
But after looking at it I realized there was just barely enough lumber there, and made this tray for her.
If you have a similar sized piece of wood around, you can do the same. Or perhaps use up some of your smaller scraps to get the parts.
In order to get the wide bottom for the tray, I realized I would have to re-saw part of the board to make two thin pieces. These I could edge glue for a wide bottom.
The part to be re-sawn needed to be at least 5-1/2″ wide.
From the remainder of the board I was able to rip three pieces off for the sides, and still keep a piece wide enough for the bottom.
Two of these rippings made the long sides, the other made both the ends.
Cut List for the serving tray:
2 – 3/4 x 1-1/2 x 24 long sides
2 – 3/4 x 1-1/2 x 11-1/2 ends
1 – 3/4 x 5-1/2 x 24 piece to be re-sawn for the bottom.
1 – Misc. rippings for splines

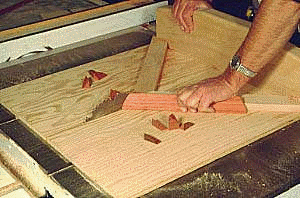
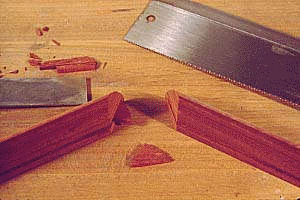
Step 1: Rip out your parts.
Begin your tray by ripping out the parts, be they from one board or many, as in the photo.
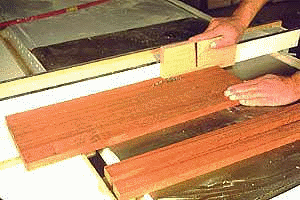
Every woodworker likes a different shape of push stick, but they all do the same thing- keep your fingers away from the blade.
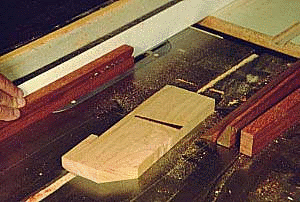
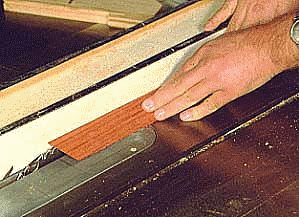
Next set up on the table saw to re-saw the wide piece for the bottom. You can do this re-saw with a 10″ table saw, as shown in photos 2 and 3.
The blade on a ten inch saw will come up above the table almost three inches, which is just enough to saw through half of the board, then flip the board and saw through the other half, splitting it into two.
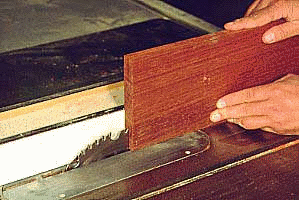
If you try to take the whole cut in one pass the cut can be much harder to control.
But do it in stages. First raise the blade to 1-1/2″ as in photo 2, and make a cut on both sides.
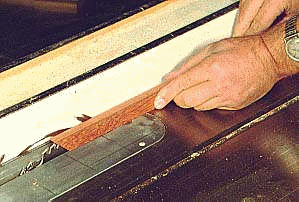
Set the fence so that the blade cuts down the middle along the edge of the board. Then, raise the blade to full height and make the second cut, as in photo 3.
During all of these cuts keep your hands above or in front of the blade. Don’t put your hand onto the face of the wood directly adjacent to the blade.
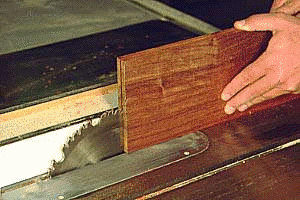
Don’t keep your fingers on the face of the board as shown here as you push the wood through, because if the wood has an unseen fracture in it which shatters as your hand is next to the blade, your fingers will fall into the blade.
Table saw safety means avoiding any remote possibility of your hand falling into the blade when something goes not as planned.
Guide the work in with your hand on the face in front of the blade as in the photo, then remove this hand when the end passes through the blade.
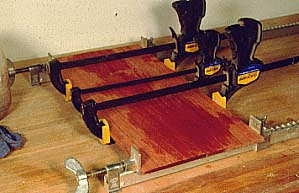
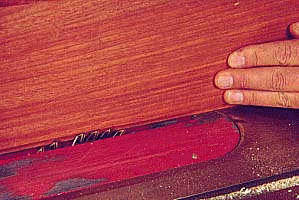
Step 2: Glue your bottom.
Open the now separate parts like the pages of a book and you have a “bookmatched” set of boards.
If they are not straight, make numerous very small cuts on the edges of the boards at the table saw, flipping the board between each cut so the freshly cut edge rides against the fence for the next cut.
This will gradually straighten the edges.
Straighten the two edges at the center of the panel on the table saw or with a jointer, and glue the two together as in photo 4.
Once the bottom is out of clamps, belt sand it smooth, or use a hand plane.
Step 3: Bevel your sides.
Cut a large bevel onto the outer edges of the side pieces to begin the shaping of the rounded surface on each of them.
Push sticks are not a luxury when doing this kind of work on the table saw, they are a safety necessity.
Since the blade on my saw tilts toward the fence when the fence is to its right, I found it best to move the fence to the left of the blade and make the cut as shown in photo 5.
Had I left the fence on the right, the blade would have been tilted very close to the fence, making it harder to complete the cut safely. Always use a push stick on cuts of this kind.
How much of a bevel do you cut off at the saw? Sketch the curved profile that you want to achieve on the end of one of the pieces, and set up the blade to graze the edge of your drawn curve.
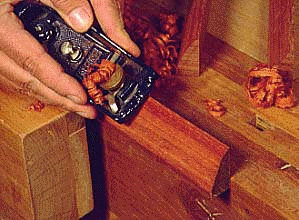
Step 4: Round off your edges.
Now take the parts to your bench and sharpen up your block plane.
If you don’t have a block plane you may choose to leave the pieces with a flat bevel.
Place each piece in the vise as shown in photo 6, and shape the upper portion of the curve taking medium depth cuts with the plane.
Compare all the parts as you cut each one to keep them all similar. It’s not necessary that they all come out with exactly the same curve, but they should be close to each other.
A new block plane out of the box will probably not have the iron sharp enough to cut smoothly.
Having a block plane means having sharpening stones and knowing how to use them.
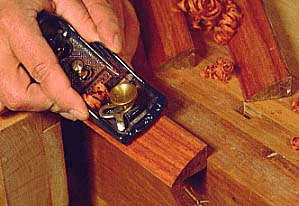
Don’t shape the last 1/16″ of the top edge of the parts. This is so that there is enough of a lip to hold the part in the vise without crushing the edge in the next step.
Place each part in the vise as shown in photo 7, and use the block plane to shape the bottom area of the curve. When you have finished, there should be very little if any of the flat bevel left which was made by your table saw blade.
Step 5: Cut your joints.
Miter the corners of the sides with a special table saw cut-off jig as in photo 8. This jig slides along the table top with runners attached to its bottom that fit in the miter gauge grooves in the table.
Use a flat piece of plywood for the base, and carefully make and fit the runners on the bottom that ride in the miter gauge slots so that the jig slides smoothly with no side to side slop.
Put two fences on the jig, as shown. Set both fences at 45 degrees to the blade, but most importantly, be certain that there is exactly 90 degrees between the two fences.
Use one fence to cut one side of a joint, use the other fence to cut the other side. So long as the fences are at right angles, the joints you get will also be square.
You are also cutting the parts to length with this operation. The exact length of the parts is not critical, but it is important that parallel sides are equal in length. Make the short sides 11-1/2″ long approximately, and the long sides about 24″.
Cut a kerf along the inside, bottom edge of the sides for the bottom to fit into as in photo 9.

Make it the width of a regular combination or rip carbide blade. Locate the lower edge of the kerf 1/4″ from the bottom of the parts, and make it 1/4″ deep. Use a push stick as shown to push the parts through.
You’ll join the corners by deepening the bottom kerf at the corners only, and fitting a spline into the deeper kerf. Leave the fence in place after the last step. Raise the blade to 1/8″ less than the thickness of the sides.
Make a pencil mark on the saw table insert, adjacent to the blade, which shows you where the middle of the cut is. This is where the blade cuts highest. Now take each side, and deepen the groove on one end of each as shown in photo 10.
Push the part in only until the front tip of the part just crosses the pencil line you drew on the table. Then retract the part.
With the saw fence located as it is, you can make only half of the deeper grooves. To make the other half, turn off the saw, and move the fence away from the blade about an inch.
Place one of the parts on the table in front of the blade, and set the fence so that the blade falls into the shallow groove. Now the top of the side is hitting the fence, not the bottom.
Carefully set the fence so that the blade is perfectly aligned with the groove. Remove the piece, turn on the saw, and again cut deeper grooves, only pushing far enough that the tip just crosses the pencil line, then retract, as in photo 11.
Step 6: Prepare for assembly and assemble.
Dry assemble the sides and measure the space inside. Add 3/8″ to each of these dimensions, and use those figures to cut the bottom to size.
Next put a rabbet on the lower edge of the bottom, as in photo 12. Make the rabbet 1/4″ deep, and adjust its location along the thickness of the edge so that the lip that remains is a loose fit in the groove on the sides.
To make splines to fit the grooves in the corners, first rip out thin pieces at the table saw, the thickness of which fits the grooves snugly.
Next use a saw and a chisel to cut out small triangles to fit in the joints, as in photo 13. Make the splines such that the grain of the splines runs perpendicular to the line of the miters, not parallel to it.
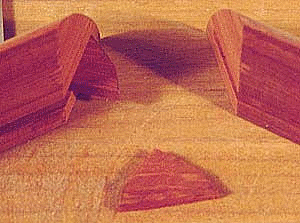
So that there is as much room for the splines in the corners as possible, cut off the corners of the bottom as in photo 15. With those out of the way, you can make the splines wider for a stronger joint.
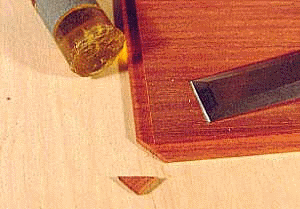
Photo 15- You’ll need to chop off the corners of the bottom to make way for the splines.
Rub a little wax on the corners after they are cut and you have dry fitted the tray, to be sure that the glue will not grab the bottom corners.
The bottom needs to be able to move with moisture variations, so can’t be glued in place.
Dry fit each of the joints to be sure that the splines are not so large that they prevent the joint from coming together, and trim them as necessary. Glue up the tray as in photo 16.
Don’t use metal clamps- use thin nylon string. Bar clamps will dent the lower edge of the sides, and you can’t place them onto the curve of the sides to close up the joints at the top.
By wrapping string around the piece as shown, the tops of the joints will come together. More loops equals more pressure, but you only need enough to make the joints meet.
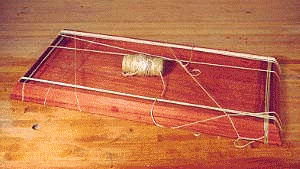
Several wrappings should be enough to pull the joints together.
After the string is on, shift the joints by hand for best alignment, then leave it to dry.
Once out of clamps sand the sides smooth and round the joints a bit.
A wipe-on oil finish looks very nice on a small article like this, but doesn’t provide much protection against moisture. If you plan to get the tray wet with a lot of bubbly, use a satin polyurethane varnish to protect it well.