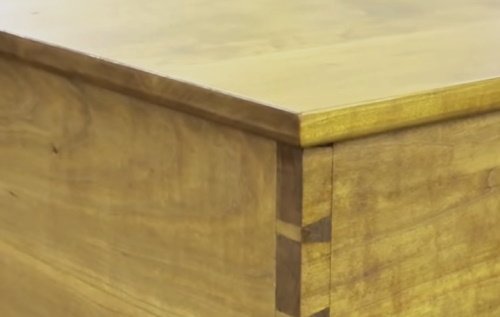
The following is a method for cutting dovetail joints by hand.
Contents
- Required Tools:
- Step 1: Scribe All Your Pieces
- Step 2: Mark Your Tails
- Step 3: Draw Your Angles for the Tails
- Step 4: Cut Your Tails
- Step 5: Deepen Your Scribed Line for the Tails
- Step 6: Pare Out Your Tails
- Step 7: Use Your Tails to Mark Your Pins
- Step 8: Cut Your Pins
- Step 9: Deepen Your Scribed Line for the Pins
- Step 10: Pare Out the Pins
- Step 11: Test Fit the Joint
- Step 12: Glue the Joint Together If You Wish
- Step 13: Sand the Excess Off
Required Tools:
- A sharp, thin kerf, back saw.
- A marking gauge or scribe.
- A dovetail marking template or a bevel gauge.
- A small Engineers Square.
- A razor knife.
- A sharp pencil.
- A 1/4″ and a 1/2″ Paring Chisel
- Lots of scrap wood to practice on.
Step 1: Scribe All Your Pieces
Set your marking gauge to the thickness of the wood to be joined.
Note: When joining two pieces of wood that are not of equal thickness, be sure to set the gauge to the thicker board and use that setting to mark the thinner board.
Then set the gauge to the thickness of the thinner board and scribe the thick board with that setting.
Take care to mark the face sides and face edges with their appropriate marks, and be sure the FSs are flat and out-of-wind.
If you are using a gauge across the show faces, the wood will need to be a little thicker than the intended finished size.
This is to allow for cleaning up and removal of the gauge lines (except for drawer sides when it seems to be a tradition in some quarters to leave them on).
Step 2: Mark Your Tails
Measure out the spacing you are going to use on the top edge of your piece.
I prefer to use a 7/16″ spacing for my tails but use whatever you like.
Step 3: Draw Your Angles for the Tails
I prefer to use a scratch awl (But, some people prefer to use a pencil since it is less likely to follow the grain and also is often easier to see) and an expensive (ca. $20.00) German made brass template.
A bevel gauge set to the appropriate angle (20 degrees. I think) works just as well.
Note: I found it best to “X-out” the areas you are removing.
Step 4: Cut Your Tails
I use a thin kerf pull saw (I prefer the Eberle Plus, Slitting Saw) to do this.
Pay attention to which side of the line you are cutting on.
(The “X’s” help here.)
If a pencil is used, it is essential to leave the entire line showing, but nothing beyond it.
Step 5: Deepen Your Scribed Line for the Tails
Using a razor knife deepen the scribed line(back cut) at the base of the tails. On soft wood you can almost cut the tails out completely.
Step 6: Pare Out Your Tails
When paring on the scribe line, hold the chisel slightly angled in.
This will produce a slightly “dished” surface that is helpful in making a tight fit later.
Some people like to use a fretsaw or coping saw to remove most of the waste, then pare down to the line.
These /can/ cause problems when cleaning-up, especially if the wood is slightly thicker than the intended finished size.
Since this is an end-grain to face-grain joint, the adhesive will be fairly ineffectual, so some undercutting does little harm in this situation.
Why not start undercutting at about a quarter of the way inwards, i.e., the outermost area of the socket floors being at right-angles and only the central half a little undercut?
Of course there is some primitive satisfaction in not undercutting at all, but then some people have to be able to find the wherewithal to put food on the table.
Now check that the pin sockets are parallel and at right angles to the face side.
Rectify if not. It is vital that you get this part right at this stage, since you have to use the wrong (from the point of view of appearance when assembled) face of the job as template.
To grasp this idea, consider what would happen if the pin sockets happened to be cut so that they got wider as they ran across the thickness towards the outer face.
Pins marked from such tails would be too slender.
If you are really crafty and in full control of the saw, one dodge is to introduce the slightest hint of the merest suspicion of taper in the other direction so that the pins tighten slightly as the joint closes. Easier said than done.
This is playing with fire.
Step 7: Use Your Tails to Mark Your Pins
Place the piece that will have the pins into a vice.
Lay the tail piece at a 90 Degrees. angle over the edge of the tail piece and use your tails to lay out your pins.
Using a small engineer square transfer the layout lines from the top to the sides.
Again, it is helpful at this point to “X-out” the portions to be removed.
I’ve screwed up and removed the wrong sections more than once.
Make sure that the face side of this part faces the face side of its mate.
The alignment of the face-side is critical.
It can help to lightly clamp a rule against the face side of the pin-bearer, with its edge dead in line with the tail socket floor, (or if you want to be really crafty, just a micro-whisker above them).
This helps to stop it drifting under pressure from your scribe. I generally prefer a pencil again, but with delicately formed sockets, it can be difficult to get one into the narrow space.
This is one argument for cutting the pin’s first, but no religious wars please!
Step 8: Cut Your Pins
Cut dead to the waste side of the line. Courage mon vieux!
The saw is the best tool for the job and fiddling about with a chisel is harder than making a good saw cut in the first place.
Step 9: Deepen Your Scribed Line for the Pins
Using a razor knife deepen the scribed line at the base of the pins. Be careful not to go too deep when cutting the “fat side” of the pins.
Step 10: Pare Out the Pins
I found it is best to pare the wide side first the narrow side.
The narrow side will add support while paring the wide side.
Again…When paring on the scribe line, hold the chisel slightly angled in.
This will produce a slightly “dished” surface that is helpful in making a tight fit later.
Step 11: Test Fit the Joint
It should be tight and the tails and pins should slightly extend over the mating pieces face.
When the joint does not fit, trim the pins not the tails.
To figure out which pins to trim: slightly force the wood together.
You will be left w/ an indentation in the wood that you can use a guide when you trim the pins.
If the joint is sloppy, Get a new piece of wood and repeat steps 7 through 11 till you get it right. (Or shim the gaps w/ shims made from plane shavings.)
It can help assembly if you make a small chamfer on the two sloping inside arises of the pin sockets (not on the socket floor arises).
The chamfer starts at zero width just below the top of the socket and increases a little as it runs downwards.
Don’t get it wrong and do the other side!
If the pins are accurately cut, and the only problem is general tightness, try planing a whisker or two off the face side of the pin-bearer.
Use a hammer and batten to spread the force when closing the joint.
If you just hammer, it is quite possible for the part under the hammer to move and the rest of the job stay where it is, the result being a split.
Step 12: Glue the Joint Together If You Wish
It is amazing what the glue washing-off water can do for the final appearance of a good joint.
Unfortunately it will do little for a poor one.
There is one technique, somewhat more subtle than shaving shims or glue and dust mixtures or even veneer, involving the pane of a warrington hammer
But one must not sully a pure-minded group such as this with descriptions of such obscenities.
Step 13: Sand the Excess Off
If you are aiming at fine quality woodworking, this is where it would be better to use a plane for cleaning up.
Since this will be on the visible faces of a job, a well-tuned smoother with a flat sole, fine mouth and very sharp blade will be advisable unless you are working with a very docile and featureless wood.
If the wood is prepared a little oversize in thickness, you will need to clean up until the ends of the pins/tails are just touched.
Working this way means that the ends of the pins and tails are sunken slightly below the surface, making cramping up a real job much easier than the alternative that has the pins and tail-end projecting.
However, you do need to be able to start a saw confidently for this technique to work.
I imagine that this would also be a good idea for dovetail jig users, assuming that the cutter produces work with immaculate arises on the end-grain.
