“A good start deserves a good finish!”
If you apply a good finish, your work will carry the mark of the fine craftsman.
Don’t ruin your project by applying the wrong finish, or by putting on the right finish carelessly.
Wood Finishing Supplies
Wood finishing is one of the most important steps in the completion of attractive and beautiful projects.
In fact, the one thing about handmade articles that is often far inferior to commercially made ones is the finish.
An important part of securing a good finish in woodworking is to have the proper finishing supplies in good condition.
Brushes
A variety of sizes should be available for all different types of finishes.
Most brushes used for painting, varnishing, and enameling should be made from Chinese or Russian boar bristles set in rubber.
Brushes you will need should vary in size from 1 to 4 inches.
It is a wise practice to have a different brush with individual container for each different type of finishing material.
A poor finish usually results when you use a shellac brush for varnish, for example.
Caring for Brushes
Whenever brushes are not in use, they should be suspended in a solvent suited to the material used on the brush.
Some means should be provided to hold the brushes so that the bristles will not be bent on the bottom of the container or pick up the impurities that settle on the bottom of the container.
The proper solvents for finishing materials are:
| Solvent | Use (Finishing Material) |
|---|---|
| Turpentine | Oil Stain Filler for varnish Filler for Shellac Finish Varnish Enamel Paint |
| Linseed Oil | Paint |
| Alcohol | Shellac |
| Lacquer Thinner | Filler for Lacquer Finish Lacquer |
Other Common Finishing Supplies
Turpentine is made from the resin drippings of pine trees.
These drippings are distilled by boiling in large copper vats and then running the solution through a condensing coil to a collection barrel.
Turpentine rises to the surface and is drained off.
Linseed Oil is made from flax-seed. The oil is obtained by compressing the seed under high pressure to squeeze out the oil.
The oil is used either in its raw state or is boiled to improve its drying qualities.
Boiled linseed oil does not have the flexibility of raw oil but dries much faster.
Many times linseed oil is used by itself to finish certain types of furniture.
The oil is applied with a rag and then rubbed into the surface.
Several coats are applied in this manner.
After the oil is dry a paste wax is applied and rubbed to a high polish.
Alcohol. The best alcohol for mixing shellac is made from grain.
This, however, is not always available.
A good substitute is a mix of alcohol called “Formula Special No. 1 Denatured Alcohol,” which is composed of ethyl alcohol and wood alcohol, 5 gallons of wood alcohol to 1000 gallons of ethyl alcohol.
Benzine, used as a solvent and a cleaning fluid, is made from coal tar.
Waxes, are either liquid or paste for use in the wood shop.
Both are made from a base of beeswax, paraffin, carnauba wax, and turpentine.
Wax always provides a good water proof surface that can be renewed periodically.
Steel Wool is made of thin metal shavings.
It comes in pads or rolls and can be purchased in grades from 000, very fine, to 3, coarse.
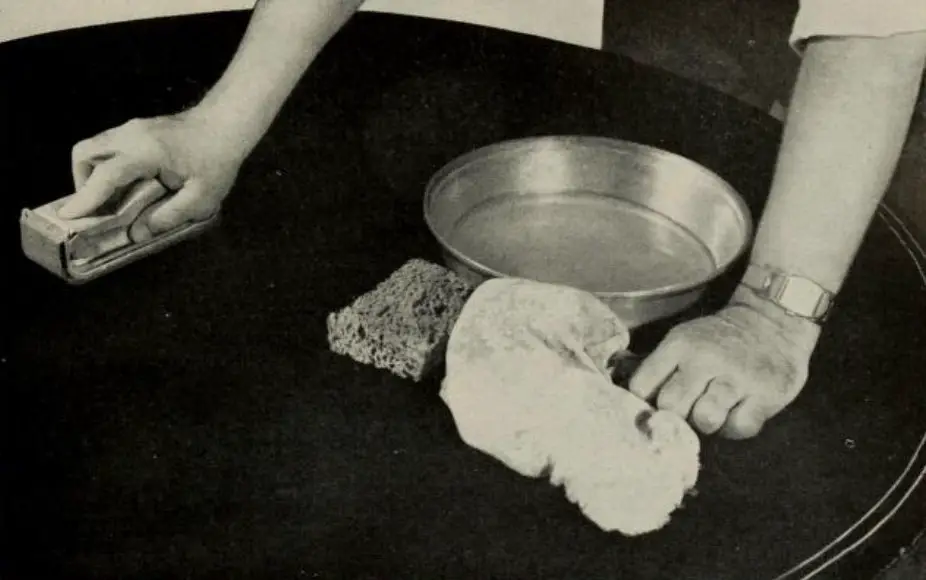
Pumice is a white-colored powder made from lava.
It is available in several grades, but the most commonly used for woodworking fishing is FF and FFF.
It is combined with water or oil to rub down the finish.
Rottenstone is a reddish brown or grayish black substance that is obtained from the decomposition of shale.
It is much finer than pumice and is used with water or oil to produce a smoother finish after the surface has been rubbed with pumice.
Oil used for rubbing should be either petroleum or paraffin oil.
If oil refined from petroleum is used, be sure of the grade.
Sandpapers needed are garnet finish papers in grade No. 4/0 and No. 6/0.
No 4/0 is used for sanding after staining and after applying first coat of shellac and before applying the filler coat.
No. 6/0 is used for final smoothing after shellac coats or other finish.
These grades may be used dry or with oil.
Waterproof Abrasive Paper in grades of 240 and 320 grit are used with water for hand sanding between lacquer coats or for rubbing enamel or lacquer.
Applying Stains
Stain is transparent color that is applied to the surface of wood to improve its appearance, to bring out the grain, to preserve the wood, and sometimes to imitate the more expensive woods.
There are three kinds of stains: oil, water, and spirit.
Only the oil and water stains are commonly used.
What is Oil Stain?
Oil stain is coloring that has been mixed in an oil base.
You can mix your own oil stain by adding such pigments as raw and burnt umber, raw and burnt sienna, Venetian red, black drop, and Vandyke brown to linseed oil and turpentine.
However, it is much simpler and easier to buy commercially prepared oil stains.
They are available in all ranges of colors: walnut, light, medium, and dark oak, various shades of mahogany, cherry, rose-wood, and many others.
What is Water Stain?
A water stain is made by mixing aniline dye in hot water.
The dye usually comes in a powdered form and it is possible for you to mix it yourself.
The strength of the stain can be changed by increasing or decreasing the amount of dye.
Water stains are also available in ready-mixed form.
Water stain has the advantage of being cheaper than other stains, having a more uniform color, and being less likely to fade.
It has the disadvantage of raising the surface of the wood.
Stains are usually applied with a brush, sponge, or rag and then wiped off with a clean piece of cheesecloth or pad of cotton waste.
It is easiest to use a 1-1/2 to 2 inch brush set in rubber, especially for applying water stains.
Before applying the stain to the finished project, a small scrap piece of the same kind of wood should be stained first.
If you are closely matching the color of another piece of furniture, it is necessary to complete the entire finishing process on the scrap piece to make sure that you have duplicated the finish you water.
However, if matching is not important, you can get a very good idea of the stain merely by applying a little to a scrap piece and letting it dry.
Applying Oil Stain
Select the color stain you want and test it on a scrap piece.
When you find the color you want, mix up enough to complete the whole job.
For example, it will take about one pint of stain to cover about 25 square feet of porous wood such as oak.
Pour out about one third cup into a porcelain, glass, or enamel container.
Use a good-grade brush.
A rag or sponge can be substituted, although they are not so easy to use.
End grain of wood absorbs stain much more readily than the surface grain and therefore appears darker.
To prevent this, soak a rag in some linseed oil and rub the end grain before applying the stain.
Now you are ready to apply the stain to the surface.
If it is possible, try to apply the strain with the wood held in a horizontal position.
Always stain the lower surfaces first, beginning at the corner and working out.
To stain a large, flat surface, dip about one third of the brush into the liquid, wipe off the excess stain on the side of the jar, and begin at the center of the surface.
With light strokes, work out toward the edges, brushing on the stain evenly.
With each new brush-full of stain, begin on the unfinished surface and stroke toward the stained surface.
As you near the edges and ends of the wood, brush carefully to keep from spattering the stain.
Apply the stain to one small area at a time, wiping off the excess with a clean, dry cloth.
One reason oil stains are so satisfactory to use is that they are slow in drying.
Make sure that you cover and wipe off the total surface evenly.
Allow the work to dry from twelve to twenty-four hours before proceeding with the rest of the finishing operation.
Applying Water Stain
Before applying a water stain, sponge the surface of the wood lightly with water.
After the surface is dry, sand with No. 2/0 sandpaper.
This will help the stain to flow on evenly and to achieve a clear, transparent color.
Apply the water stain in the same general manner as the oil stain, wiping off the excess with a cloth.
After it has dried from twelve to twenty-four hours, use a small piece of No. 2/0 sandpaper to sand the surface lightly, removing the high surfaces of the wood. Then proceed.
Applying Wood Filler
Fillers are used to seal the pores of wood and to add beauty to the finish.
On open-grained woods such as oak, walnut, and mahogany, a paste filler is usually best.
While on closed-grained woods like birch, fur, and pine, the most suitable filler is a liquid type such as shellac.
Paste filler is made primarily from ground silicon, linseed oil, turpentine, drier, and coloring.
You can buy paste filler in cans in either natural color or in various colors to match wood stains.
The paste is thinned with turpentine to the right consistency.
If fillers are used under lacquer finishes, the filler must be thinned with a lacquer thinner.
On modern bleach finishes, white lead or pure zinc paste sometimes is the filler.
Either of these can be colorized to match any desired finish by adding some burnt umber, raw sienna, or other pigment.
In preparing for use, add turpentine until the paste becomes a thin cream in consistency.
The filler should be of a heavier consistency on woods that have larger pores such as oak, elm, or chestnut.
If the filler is to be applied over a stained surface, a wash coat of shellac (1 part shellac to 10 parts alcohol) should be applied over the stain to prevent any bleeding of the finishes.
Then then surface should be sanded with No. 4/0 paper before applying the filler.
Apply the paste filler with a stiff brush, thoroughly covering the surface.
Brush first with the grain, then across it.
Do not cover too large an area at one time, as the filler dries very rapidly.
Rub in the paste filler with the palm of your hand, going over the entire surface in a circular motion.
Allow the filler to dry until the surface loses its glossy appearance.
This will take anywhere from two to five minutes.
Then use a piece of burlap or rough cloth to wipe across the grain to remove the excess filler.
After most of the filler has been removed, you can use a thin, clean cloth (cheesecloth or cotton) to go over the surface lightly with the grain to remove the remainder of the surface filler.
Do not press too hard, though, or you will rub out some of the filler from the pores.
If necessary, you can add another coat of filler in the same way as the first one.
After the filler has dried from six to eight hours, proceed with a shellac, lacquer, or varnish finish.
Shellac Finish
Shellac is a good finish for many projects because it is easy to apply, dries quickly, and produces a hard surface.
It is not desirable , however, if the wood is to be exposed to moisture, since shellac will turn a cloudy color under such conditions.
Shellac is frequently used as a finish by itself, or it is sometimes used as a sealer over a stain or filler coat before varnish is applied.
What is Shellac?
The shellac itself is a resinous substance which is the product of the lac bug.
Most of our supply comes from India and Thailand, where these bugs feed on resinous material and deposit the lac on trees.
This is removed twice yearly and heated, purified, and laid out in strips to dry.
The lac is then ground and held in solution by mixing it in denatured alcohol.
The standard shellac is a mixture of four pounds to a gallon of alcohol and is called a four-pound cut.
The natural shellac is yellow in color and is a good, tough finish.
However, on many of the lighter woods, this natural shellac produces an unattractive yellowish cast.
Shellac is therefore also available in a bleached form, called white shellac.
This is more satisfactory for general use, especially for work with lighter wood finishes.
Applying Shellac (The First Coat)
The wood must first be clean and dry.
The surface should be wiped clean with a lint-free cloth that has been dipped in alcohol.
Pour a small amount of shellac into a glass or porcelain container and add an equal amount of alcohol to thin it.
It is far better to apply several thin coats than fewer, heavier coats.
The thinned shellac can penetrate the surface of the wood better, providing a smoother finish.
Use a clean brush that is about 1-1/2 to 3 inches wide with bristles set in rubber.
To apply the shellac, dip the brush about one third of the brush length into the shellac, wipe off the sides of the brush on the container, and being at the center of a flat surface or near the top of a vertical surface to work out toward the edges.
Work quickly and evenly, taking light, long strokes.
Do not attempt to brush over the same surface several times as shellac dries very rapidly and becomes sticky.
The tendency for a beginner is to put shellac on thick, producing a yellowish cast.
On the edges of your project, be careful to keep the shellac from piling up and running.
After the entire surface has been covered, soak the brush in pure alcohol and allow the project to dry from two to four hours.
Applying the Second Coat of Shellac
After the surface is dry, go over it with steel wool or 6/0 sandpaper.
Rub with the grain of the wood.
Steel wool has the advantage of following the wood better and covering better both the high and low spots.
If you use sandpaper, do not use a sanding block but hold the paper in your fingers.
Wipe the surface with a clean rag to remove all dust and dirt before applying the second coat.
This coat is applied in the same way as the first coat but may have only about 40% alcohol.
Again go over the surface with steel wool or sandpaper.
The Third Coat of Shellac
Then apply a third coat with even less alcohol added, perhaps 25%.
After the last coat, rub the surface lightly with sandpaper or, to produce and even smoother surface, mix some ground pumice in oil and rub down the surface with a felt pad.
After this, a still smoother surface can be produced by mixing rottenstone with oil and rubbing the surface with it.
Clean off the surface with a clean cloth dipped in benzine.
Allow it to dry about one-half hour.
Then apply a good coat of wax to the surface and allow it to dry thoroughly.
Rub briskly with a soft cloth for a good polish.
The shellac brush should be cleaned with alcohol.
Finishing Wood with Varnish
Varnish is a very fine finish and if done correctly will produce the most desirable and practical surface.
However, it is difficult to obtain a good varnish finish anywhere but in a dust-free room.
The objection to using varnish in the small shop is that it dries so slowly that the surface becomes marred with tiny dust particles.
What is Wood Varnish?
Varnish is a liquid that can be spread on a surface in a thin film, giving the wood an even, transparent coating.
It protects the surface of the wood and adds brilliance to the color of the stain.
Varnishes are made by mixing various gum resins with vegetable oils that are combined through heating and by adding the necessary thinners and driers.
Natural varnish takes from twenty-four to forty-eight hours to dry and therefore has the disadvantage of giving the dust extra time to collect and mar the surface.
Quick-drying varnishes are available which dry overnight and are dust free in two hours after applying.
For most uses, one should select a quick-drying varnish, as it is easier to apply and gives a better chance for a satisfactory finish.
For outside finishes subject to moisture and for the tops of tables, cabinets, and other pieces that will have hard wear, the best type of varnish is spar varnish.
This is made by adding China wood oil to varnish, making it water repellent and heat resistant.
In the small shop, it is a wise practice to buy varnish in small cans, since, once the can has been opened, a skin forms on the surface which is difficult to prevent and hard to remove and interferes with a good finish.
If necessary, the varnish can be strained through a silk or fine muslin cloth to remove any skin.
Applying a Varnish
Find a dust-free place.
If no finishing room is available, wait to do your varnishing until no wood-working machines or tools have been used for some time.
Then sprinkle the floor with water to settle the dust.
Also, do not varnish anything on cold and damp or hot and humid days.
Make sure that the temperature is between 70 and 80 degrees.
Open a small can of quick-drying (synthetic-resin) varnish and pour some into a porcelain or glass container.
For a first coat, add about 25% turpentine.
Select a 2 to 3 inch brush with long bristles.
Wipe the surface with a clean cloth dipped in benzine.
Dip the brush in the varnish to about one third the length of the brush but do not overload it.
Do not wipe the brush on the side of the can.
Begin to apply the varnish with long, easy strokes.
Brush first with the grain and then across the grain.
After the brush is empty, brush out the varnish with the grain, using only the tip of the brush.
You can do more brushing out of varnish than you can of shellac.
Continue to work from the center toward the outside edges.
As you near the edges, use very little varnish on the brush to keep it from running over the edges or from piling up along the arrises.
Never put your brush down where it may pick up dust.
After applying the first coat, dip the brush immediately in a can of turpentine.
Also, cover the varnish left in the can to keep the skin from forming.
Allow the varnish to dry about twelve to twenty-four hours or until the “tackiness” has gone.
After it’s dry, rub the surface with the grain, using No. 6/0 sandpaper.
The Second Varnish Coat
Make sure that the varnish is perfectly dry before applying another coat.
Most of the trouble that can arise when applying a varnish finish comes from being too quick to apply the second and third coats.
When applying the second coat, use the varnish in its regular consistency.
Observe the same brushing techniques as for the first coat.
Allow it to dry and rub down the surface with No. 6/0 sandpaper.
If you want a dull, rubbed appearance, you can either apply a dull finish varnish as a third coat or rub down the regular varnish with pumice and oil and rottenstone and oil.
Varnish Stains
A simple finish to use on many projects is a varnish stain which will provide the desired color and finish in one coat.
This finish is especially satisfactory for simple woodworking projects on which the time and energy cannot be given to applying many coats of regular varnish.
Varnish stains can be purchased in different colors and are applied the same as standard varnish, and dry in two to eight hours.
Finishing Wood with Lacquer
Lacquer is a chemical composition of nitrocellulose, resins, and solvents.
Lacquers have come into common use in recent years in both clear and colored forms for wood surfaces because they dry quickly and produce a hard finish.
While most commercial lacquer finishes are applied by spraying, the brush finish is usually done in small shops.
Because lacquer contains substances that are similar to paint and varnish remover, it is not possible to lacquer directly over painted or varnished surfaces.
Applying a Clear Lacquer Finish
Apply the stain and filler coat as with shellac and lacquer finishes.
It is better to use a water stain than an oil stain in a lacquer finish, since this does not “bleed” as much.
In any case it is wise to apply a thin coat of shellac as a sealer before applying the lacquer.
Open a can of clear brushing lacquer and stir it thoroughly.
Ordinarily, lacquer does not have to be thinned but, if it does, use a commercial lacquer thinner.
Also use this for cleaning the brushes after applying the lacquer.
Select a brush with soft bristles, such as a camel-hair brush.
Dip the brush about one third of the way into the lacquer but do not wipe any off on the side of the container.
Flow on the lacquer with long, easy strokes but do not attempt to brush it in as you would a paint or varnish.
Lacquer dries very quickly and gives a smooth, tough surface.
Allow the lacquer to dry about two hours.
Then go over the surface lightly with No. 6/0 sandpaper.
Apply a second and third coat in the same manner.
After the third coat is dry, the surface can be rubbed with rottenstone, and pumice stone and oil.
Applying Colored Lacquer Finish
Sand the surface of the wood with No. 2/0 sandpaper.
Then apply a thin coat of shellac to the wood to provide a base for the lacquer.
Apply two or three coats of the colored lacquer in the same way as clear lacquer is applied.
To finish the surface, rub it down with rottenstone and oil after lacquer is dry.
Finishing Wood with Enamel
An enamel is a colored varnish that differs from a paint in that it does not have an oil base, and contains varnish to give a gloss finish.
Enamel is also only semi-opaque, and therefore the primer coat must be opaque to be suitable.
Enamels dry with either a high gloss or semi-gloss, depending on the percentage of varnish.
It is an extremely satisfactory type of finish for small projects on which a colored finish is desired.
Applying Enamel Finish
Sand the surface of the wood with No. 2/0 sandpaper.
Cover all knots and sap streaks with a coat of thin shellac.
Select a can of enamel undercoat and mix it thoroughly.
Use a 2 to 3 inch brush and apply the undercoat in the same manner use to apply varnish.
In other words, do not brush in the enamel as you would paint.
After the surface has thoroughly dried, sand lightly with No. 2/0 sandpaper.
Then apply a second undercoat.
Select quick-drying finish enamel of the desired color and apply one or two coats of this enamel the same way as the undercoat.
If a dull finish is desired, allow the final coat to dry for a day or two and then rub down the surface with pumice stone and water.
Finishing Wood with Paint
Painting is a good way to finish inexpensive pieces of furniture and cabinetwork.
Paints are usually made from oxides, linseed oil, turpentine, drier, and coloring.
Paints are available either in outside or inside type.
In applying paint to a surface, usually three coats are given: the primer, the undercoat, and the finishing coat.
Applying a Paint Finish
Sand the surface of the wood with No. 1 or No. 0 sandpaper.
Apply a light coat of shellac to wood that is porous or that contains knots and sap streaks.
Open a can of the primer paint and pour off the light liquid on top into a second container.
Thoroughly stir the primer and then gradually add the liquid until it is mixed.
For the first coat, it is wise to add some turpentine and/or linseed oil to thin it.
Sometimes a small amount of yellow ochre is added to provide a better coverage for the primer coat.
Use a good brush of the right size for the project and apply a thin coat of the primer.
When applying paint, use a small amount on the brush and brush it into the surface.
The difficulty for beginners is that they apply paint too thick and do not brush it in thoroughly.
Allow the paint to dry from twelve to twenty-four hours and then go over the surface with No. 1 sandpaper.
Then apply the undercoat of the color desired.
This coat should be thinned somewhat with turpentine.
Go over the surface thoroughly, covering all parts of the project.
Apply the final coat in the same consistency as it comes from the can and thoroughly brush the paint in, making sure that a smooth, even coat is applied.