In this article we’ll discuss a method for sharpening planer blades using primarily a steel plate (with silicon carbide powder) and waterstones.
Flattening the Blade Back
I like sharp tools. Actually, I should rephrase that slightly. I like to sharpen tools.
I enjoy the sharpening process and the rewards of creating a truly fine edge.
Yet, over the years, one of the most important things I’ve learned about sharpening is that there are a lot of ways to approach it.
In fact, I’ve changed my entire approach several times trying to find ways to make it easier and still produce what I consider a very sharp edge.
Although the techniques and equipment might have changed, one thing remains true.
The only way to get a sharp edge is to have two flat, smooth surfaces intersect. The key here is that there are two surfaces.
All too often the sharpening process concentrates on the bevel of the chisel or plane blade.
But no matter how flat and smooth the bevel is, the second surface – the back of the chisel or plane blade – must be of equal smoothness.
In fact, that’s where the whole process begins.
When I get ready to sharpen a new (or old, for that matter) plane blade, I concentrate on flattening and smoothing the back first.
Although it may seem smooth, the backs of most plane blades are usually covered with a swirl of grinding marks, see photo below.
If these grooves were to remain, the ridges and valleys would create a “saw tooth” cutting edge.
So, the first step is to remove all these marks and get the back truly smooth and flat.
To get the back flat and smooth, the first step is what might be called “grinding”, but you don’t use a grinding wheel.
Instead, this involves using a coarse abrasive surface to quickly flatten the back and smooth off all the ridges left by the factory grinding.
Grinding the Back
I’ve found two methods that work well: diamond stones and steel plate.
Diamond Stones
I’ve been using diamond stones to flatten the backs of plane blades for about four years and find them tough to beat.
A diamond stone is actually a plastic base with a flat steel surface.
On top of this flat surface is a layer of diamond dust that’s embedded in a layer of nickel.
The only problem with diamond stones is the cost — $40 to $90 for stones in the sizes necessary to work on plane blades.
There’s one other problem I should mention.
Lately we’ve had trouble finding flat diamond stones.
Because of a change in the manufacturing process, the surface of the diamond stone is not always flat.
Steel Plate
An alternative to the modern technology of a diamond stone is a method the Japanese have used for centuries.
It’s just a soft steel plate that’s sprinkled with silicon carbide powder.
To use the steel plate to flatten the back of a plane blade, wet the surface so it has a thin, even film of water on it.
Then sprinkle a pinch of 220-grit silicon carbide powder on the plate.
Add a drop or two of water and swirl the back of the plane blade over this mixture to even it out on the steel plate.
Now you have to work.
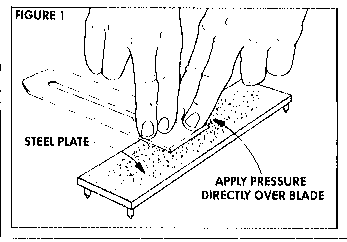
Place the back of the plane blade flat on the steel plate and press down directly behind the bevel with both hands, see Fig. 1.
Press down hard and stroke the blade from one end of the plate to the other.
Really bear down. The idea is to cut the steel, not just make grating noises.
The Secret
But if you’re pushing down so hard, why doesn’t the silicon carbide just hollow out the steel plate?
This seems like a logical question because the plate is much softer than the blade.
But the softness of the plate is what makes the whole system work.
What happens is that the sharp points of the silicon carbide become embedded in the relatively soft surface of the plate.
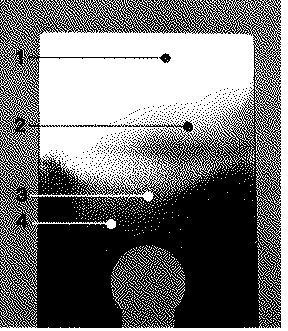
They stay in position just like the diamond particles embedded in the surface on the diamond stone, see Fig. 2.

Check Progress
As grinding progresses, a shiny surface will begin to grow across the back of the blade, see photo.
When this surface extends from one edge of the blade to the other, the back is flat.
Kill Corners
Before moving on to smooth this surface, there’s one more little step I do at this point.
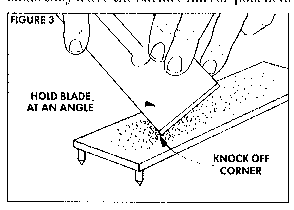
I “kill” the corners to minimize the tiny ridges that always seem to appear on a piece of wood where the planing strokes overlap.
To kill the corners, hold the blade at about a 45-degree angle to the surface, and drag the corner over the surface, see Fig. 3.
The idea is to eliminate the sharp point, not create a really visible chamfer.
Just a few strokes on each corner is enough.
Polish the Back
After the back has been “ground” flat, the Japanese continue working the blade in the silicon carbide paste until it’s almost dry.
What happens is that the particles breakdown smaller and smaller.
Finally, they’re so small they leave the surface mirror polished.
I don’t go to this much effort.
When I can see the back is flat, I move on to a 1000-grit Japanese waterstone.
Once again, this is a change from the way I used to work.
I used to use Arkansas (oil) stones. But I’ve become a champion of waterstones.
Waterstones
After using waterstones for more than four years, I can’t imagine going back to using oilstones for sharpening plane blades and chisels.
Why do I like waterstones?
First, they cut faster.
This is mostly because there’s almost no chance for the surface to glaze as oilstones do.
The binder that holds the abrasive particles together in waterstones gives way at just the right rate to always yield a fresh surface.
Another reason I like waterstones is that they come in grades finer than oilstones (up to 8000 grit) that give an incredibly smooth surface.
Smooth the Back
Now back to smoothing the back of the plane blade. I do this in two steps on waterstones.
First I refine the surface on a 1000-grit waterstone.
Here I repeat the stroking action used when grinding, but don’t bear down quite as hard.
As you start on this stone, continue to sprinkle water on the surface to thin out the “slurry” that builds up on the surface.
(I use a spray bottle.)
The object here is to keep rubbing the back on a fresh cutting surface of the waterstone until the surface takes on an even patina.
Then look carefully at the surface to make certain all the grinding scratches are gone.
This is important because each scratch left will become a microscopic nick where it meets the edge.
When the surface is free of all scratches, I begin to refine in by allowing the “slurry” to build up and dry out a bit.
(Keep it just moist enough so it doesn’t “chunk” up.)
The slurry is actually broken fragments of the waterstone that get finer and finer as they’re rubbed.
The finer they get, the smoother the surface gets.
Polishing
For a truly smooth surface, I use a 6000-grit waterstone with the same procedure as on the 1000-grit stone.
It’s easy to tell when you’re done.
The back will have a mirror finish. Don’t accept any waviness.
If you see any scratches or waviness in the reflection, go back to the 1000-grit stone and flatten it out again.
This sounds like a lot of work but the whole process is necessary only once in the life of the blade. It’s worth doing right.
Honing the Bevel
The Secret is Stability.
Sharpening a plane blade is pretty easy, at least in principle.
There are two basic steps.
First, the back is flattened and smoothed.
Then the beveled edge is ground to the cutting angle you want and it’s honed smooth.
Working the back smooth and flat is relatively straight-forward , although it does require some elbow grease, see above.
But forming and honing the bevel is another story.
The problem is that through the entire process of grinding the angle and then honing it smooth, the blade must be kept at exactly the same angle — on every stroke.
No matter what technique is used, the goal is the same: to remove metal to produce a smooth, flat surface on the bevel that intersects with the smooth, flat surface of the back.
Grinding the Bevel
This whole procedure starts with grinding the bevel to the cutting angle you want.
I usually use a grinding wheel to establish the sharpening angle and hollow grind the bevel on chisels and planes blades.
When the bevel is hollow-ground, I find it easy to hold the blade (without a jig) so just the toe and the heel contact the stone.
With just these two points resting on the stone, the blade won’t rock during honing, so the sharpening (bevel) angle can be maintained on each stroke.
But, what if you don’t have a grinder to hollow-grind the bevel?
No problem.
By using a honing jig the plane blade can be kept at the same angle through the entire process of shaping and honing on a series of stones.
Note: I like to use a series of three stones for this process.
- A coarse or extra-coarse diamond stone. (This can be replaced with a steel plate and silicon carbide powder, as used to flatten the back, see above.)
- A 1000-grit Japanese waterstone for the initial honing. And
- a 6000-grit waterstone to form and polish the microbevel.
Also, I like to use the Eclipse 35 honing guide.
But the Stanley and Lee Valley jigs can be used the same way.
Set the Sharpness Angle
The first step in forming the bevel is to decide what the bevel angle should be.
While this can be a topic for endless discussion, I’ve found that the exact angle is not all that critical.
I usually grind and hone the bevel to about 25-degrees, and then add a micro-bevel at about 30-degrees.
Setting the Angle
Setting up the honing guide to this angle is the first problem.
Basically, the angle is determined by the distance the blade projects from the front on the jig, see Fig.1.
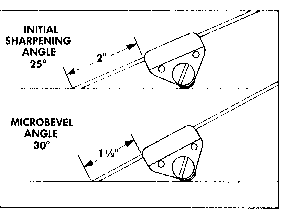
Fig.1: The bevel angle is controlled by the distance the blade projects from the jig. A longer distance sets sharpening angle; a shorter distance sets microbevel
On the Eclipse jig, if the blade projects 2″ from the front of the jig the angle will be 25 degrees.
Resetting the blade so the projection is 1 1/2″ establishes the microbevel angle of 30 degrees.
So every 1/10″ change means a 1 degree change in the angle.
For the Stanley, the blade must project 1″ for a 25 degree angle, and 1/2″ for a 30 degree.
For the Lee Valley jig an accessory is available for setting the angle.
(But if you want to measure, use 1 1/2″ for 25 degrees and 1″ for a 30 degree angle.)
Blade Setting Jig
It would be nice if you could set the angle once and not worry about it during the whole process of shaping and honing the bevel.
But something always seems to happen — the blade slips or you need to take it out to check if it’s square.
To make certain I can return to the same angle each time, I use a simple blade setting jig, see Fig.2.
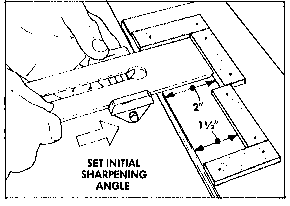
Fig.2: A simple jig makes setting (and resetting) the sharpening and microbevel angles simple. Masonite strips control blade projection and align blade square.
To make this jig, glue two strips of Masonite at 90 degree angles to each other to a piece of scrap plywood, see Fig.2.
The strip parallel to the edge of the scrap acts as a positive “stop” so the blade will always be reset to the same projection.
The strip perpendicular to the edge aligns the blade in the honing jig so the cutting edge will be ground square.
For the Eclipse jig, the distance between the edge of the plywood and the strip is 2″ for a 25 degrees angle.
(I added another pair of strips to set the blade 1 1/2″ for a 30 degrees microbevel.)
Grinding the Bevel
After the blade is locked at the correct angle, the bevel can be formed.
One of the fastest ways to “grind” this angle is on a coarse or extra-coarse diamond stone.
Or you can use the steel plate and silicon carbide powder used to flatten the back (above).
There are a few tips for using the honing guide for grinding the bevel.
For maximum control, I place my thumbs behind the jig and press my fingertips down on the back of the blade right over the edge, see Fig.3. (Don’t press down over the wheel.)
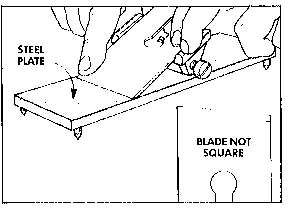
Fig.3: To square a skewed edge, concentrate grinding pressure on the “long” corner. When edge is square, continue grinding until bevel surface is flat and straight.
When “grinding” on the diamond stone or steel plate, I apply pressure on the forward stroke only, releasing pressure while backing up.
I try to imagine I’m peeling a label off the stone to get the cutting action that works best.
Check for Square
As the bevel is ground, the edge must be square.
In order to check for square, you might have to take the blade out of the jig.
(Resetting it after it’s checked is when the blade setting jig shown in Fig.2 comes in handy.)
If the blade is being ground out of square, press harder on the “long” corner, see Fig.3.
Keep grinding until there’s an even matte surface from heel to toe of the bevel.
This means you’re getting the surface flat.
To make sure the cutting edge has been ground straight, check for an even burr on the back (flat side).
This burr is formed as the surface of the bevel is ground down and intersects with the surface of the back.
As these two surfaces meet, a thin “flake” of metal curls up on the back edge to form a burr.
Use the pad of your finger to feel for the burr along the back of the blade.
Don’t pull your finger along the edge.
Instead, pull it at 90 degrees to the edge, see Fig.5.
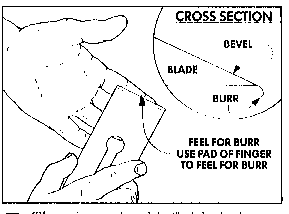
Fig.5: The primary bevel is finished when an even burr extends the full length of the edge. To feel for burr, draw the blade lightly across the pad of a finger.
Your know if the edge is out of square if the burr is heavier on one end than the other.
Keep “grinding” until the burr is even across the back of the blade.
Remove Burr
Then the burr must be removed. Don’t try to pull or break the burr off.
As it “tears” loose, it will leave a ragged edge on the edge of the blade.
Instead, rub the burr off.
I use only the finishing (6000-grit) waterstone to rub off the burr, see Fig.6.
(The back has already been polished to a mirror finish, so you don’t want to go down to a coarser stone at this point just to remove the burr. )
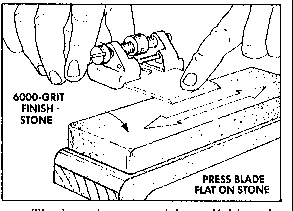
Fig.6: The burr is removed by polishing the back on the finish stone. Press back flat on stone and stroke parallel to the blade edge until the burr disappears.
To rub off the burr, place the back of the blade flat on the finishing stone.
Now apply pressure directly over the edge and stroke the blade back and forth so the cutting edge remains parallel to the sides of the stone.
The burr will come off in five or six strokes.
(It will look like fragments of a very thin wire on the top of the stone.)
Smooth the Bevel
After the bevel is ground and the burr removed, the honing process can begin to smooth the surface of the bevel.
Here, I use a two-step process on a 1000-grit stone.
Initial Smoothing
First, I go through a process of initial smoothing to remove the scratches left by “grinding”, see Fig.4.
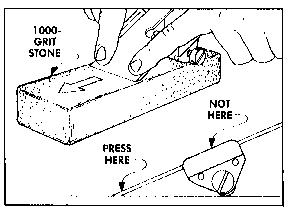
Fig.4: When honing the bevel on the 1000-grit stone, apply pressure on the forward stroke only. Concentrate pressure over the blade edge — not the jig roller.
To remove the scratches quickly, use lots of water on the 1000-grit waterstone to rinse away the “slurry” frequently.
This keeps the bevel in contact with the fresh abrasive particles on the surface.
Hone until the bevel has a uniform dullness (that looks like pewter), and feel for an even burr on the back.
Then remove the burr on the finishing stone.
Final Smoothing
The second part of this process is to do a final smoothing on the 1000-grit stone.
This is the same as the first step, just don’t rinse the stone.
Instead, let a “slurry” of particles collect on the surface of the stone as you hone.
This “slurry” is sort of a mud made up of broken fragments from the waterstone.
Since these fragments are small, they produce a finer finish than working on a clean, freshly-rinsed waterstone.
Shop Note: As the slurry builds up on the surface, it may stick to the wheel on the honing jig.
Check it every once in a while and wipe it off.
When there is a thin, even burr from edge to edge on the back of the blade, remove it by again polishing the back on the 6000-grit stone.
The Microbevel
At this point, the blade is sharp enough for almost any purpose.
But if you want a superkeen edge, you can add a microbevel.
A microbevel is just what the name implies.
It’s a tiny, secondary bevel that starts out no wider that a hair on the edge of the main bevel.
Set for Microbevel
To set the jig for the microbevel, loosen the clamping mechanism on the jig.
Next press the blade edge against the Masonite strip that’s closer to the edge of the plywood base, see Figs. 1 and 2.
Then slide the honing jig along the blade until it contacts the plywood base and tighten the clamping mechanism.
This increases the angle to about 30 degrees. (On the Eclipse jig, this means reducing the amount the blade projects to 1 1/2″.)
Hone the Microbevel
Honing the microbevel is the quickest and most satisfying part of the whole process.
Sprinkle some water on a 6000-grit finish stone and place the blade on top.
Now bear down on the leading edge of the blade and make five or six forward strokes. Then look at the edge.
The edge should have a shiny hairline strip at the end of the bevel.
If this strip extends from edge to edge, the microbevel is finished.
If it’s not quite complete, give the blade one or two more strokes.
The secret to making a microbevel is knowing when to quit.
If it’s any wider than “micro”, you’re getting good exercise removing metal, but you’re not improving the edge.
And it will make honing the microbevel harder the next time.
Remove the Burr
When the microbevel is complete from edge to edge, it will have left an almost invisible burr.
Remove this burr by placing the back down on the finishing stone and concentrate on giving the back one last polish.
Rehoning the Microbevel
A microbevel becomes appreciated when the blade looses its fine edge.
Rehoning to that ultimate edge takes just a few moments because only a microscopic amount of metal needs to be removed.
The secret is not to let the blade get dull before rehoning.
For information on putting together adjusting your plane, check out our Assembling and Adjusting a Hand Plane article.
One thought on “How to Sharpen Planer Blades”