Exposed joinery has its own aesthetic appeal, but you can achieve an entirely different- and equally valid- effect by striving to hide all evidence of how the piece fits together.
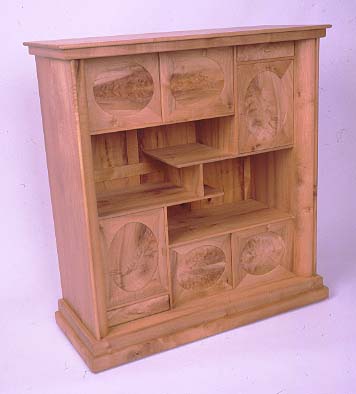
Such is the case with this small cabinet, the design of which is intended to showcase the beauty of the wood used in its construction rather than the construction itself.
Wood Used
The wood is California bay.
The wonderful figure of this unusual wood is here accentuated by bookmatching pieces together, an aesthetic device with a practical plus; wide boards were needed and since I had to edge glue, it made sense to resaw and bookmatch.
Oriental Cabinet Plans
Oriental Cabinet Cutout List
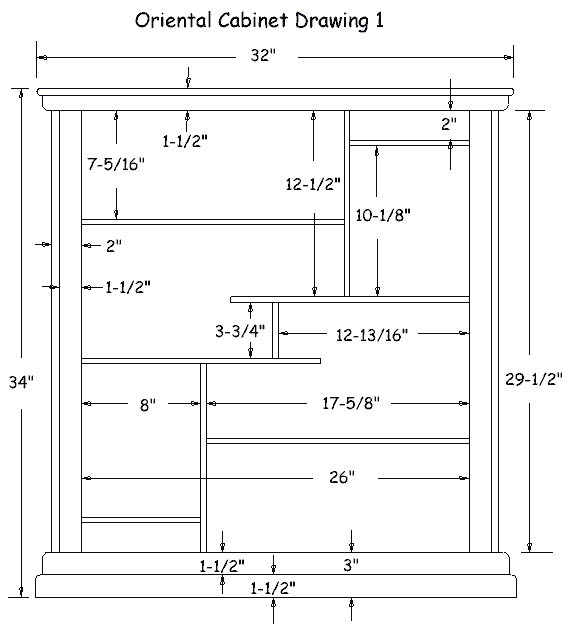
Main Carcass
1- 1/2 x 13 x 32 top
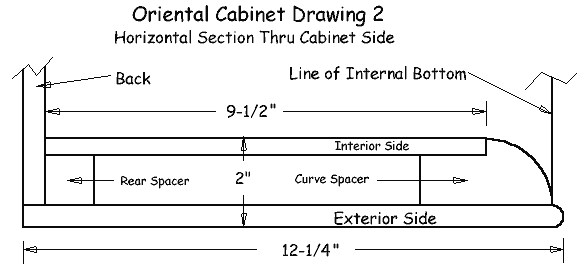
2- 1/2 x 12-1/4 x 31-1/2 exterior sides
2- 3/8 x 11-1/2 x 29-3/8 internal top and bottom
2- 3/8 x 9-1/2 x 29-7/8 internal sides
2- 3/8 x 9-1/2 x 18 slider shelves
2- 3/8 x 9-1/2 x 16 central shelves
2- 3/8 x 9-1/2 x 12-7/8 door dividers
2- 3/8 x 9-1/2 x 8-3/8 drawer dividers
1- 3/8 x 9-1/2 x 4-1/8 central shelf connector
1- 5/8 x 1 x 31-1/4 top mold-cut to length when you miter
2- 5/8 x 1 x 12-1/2 top mold-cut to length when you miter
1- 3/4 x 3 x 31-1/4 plinth-cut to length when you miter
2- 3/4 x 3 x 31-1/4 plinth-cut to length when you miter
1- 1/2 x 1-1/2 x 32-1/4 plinth mold-cut to length when you miter
2- 1/2 x 1-1/2 x 13 plinth mold- cut to length when you miter
2- 1-1/2 x 3 x 29-1/2 curve spacers
2- 1-1/8 x 1-1/8 x 29-1/2 rear spacers
Back
2- 1/2 x 2-1/2 x 31-1/2 stiles
2- 1/2 x 2 x 29 top and bottom rails
1- 1/2 x 1-1/2 x 25 midrail
4- 1/2 x 1-1/2 x 14 mullions
6- 1/2 x 7-1/4 x 13-1/2 panels
Doors (widths approx.)
4- 3/8 x 2-1/2 x 10-1/8 hinged-door stiles
4- 3/8 x 2-1/2 x 8 hinged-door rails
8- 3/8 x 2-1/2 x 9 slider rails
8- 3/8 x 2-1/2 x 7-1/2 slider stiles
6- to fit panels
Drawers
4- 3/8 x 2 x 9-1/2 sides
4- 3/8 x 2 x 7-1/2 fronts and rears
2- 3/8 x 2 x 8 veneer fronts
miscellaneous glue blocks etc.
Making the Joints
Though oriental craftsmen often made their joints more complicated in order to hide the joinery involved, such is not the case here.
This cabinet uses a router-made sliding dovetail to join shelves and side parts together, a simple joint to make that is very strong and mechanically secure whether glued or not.
Other joints for the doors, drawers, and rear panel are easily and quickly cut out with different table saw setups.
Overall, then, this project has minimal tooling requirements.
But it is necessary to ensure that the shelves and sides are at a very consistent thickness in order to make the sliding dovetails work well, thus the use of a planer or a cabinet shop’s wide belt sander is important.
Getting Thin Stock
You must resaw thicker lumber to get the thin stock required for this project, or simply plane down 3/4″ thick stock.
To resaw lumber you need a band saw and a vertical fence so that you can slice the wood down its thickness.
Use a wide blade and cut test pieces to verify that your setup accurately cuts off pieces of uniform thickness.
Cut the pieces out at about 1/8″ over the final thickness you need, because you must plane them to remove the band saw blade marks.
Using a jointer before and after you resaw stock helps a great deal to ensure flatness.
Be sure to keep the thickness of your stock at 3/8″ or over.
This is because the minimum diameter dovetail bit for a router is 3/8″, which means that the minimum width dovetail groove that you can make is 3/8″.
Stock less than 3/8″ thick will be too thin to make a dovetail tenon to fit the slot.
Sliding Dovetails

With your stock at thickness, rip the pieces for the sides and shelves to width and cut them to length.
Note that the lengths for some parts depend upon the thicknesses of others.
This is because of how the various parts fit together, and the fact that the various dimensions are interdependent in order for all to fit together correctly.
If your stock is at a different thickness than that listed, you will have to adjust shelf lengths accordingly.
Cut the dovetail slots in two passes. Make the first cut with a 1/8″ straight flute bit.
This cut hogs out the waste from the slot, so that when you make the second cut with the dovetail bit, that bit has less work to do.
This way the cut is more controllable and can be made faster to avoid burning.
If you have two routers, set up one with each bit so both cuts can be made with the same fence setup.
If you have only one router, first make all the straight flute cuts on all pieces, then change the router bit and set up again to cut with the dovetail bit.
Once the dovetail bit is set in the router, don’t change that setup between parts so that you are sure all the dovetail grooves are the same.
Make the grooves 3/16″ deep.
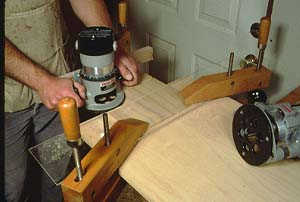
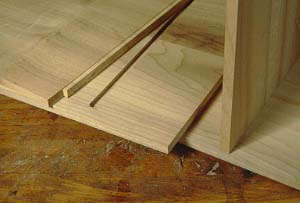
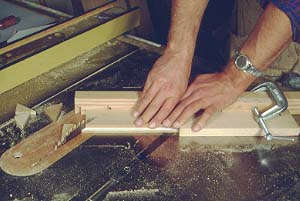
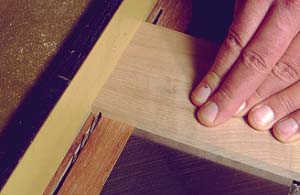
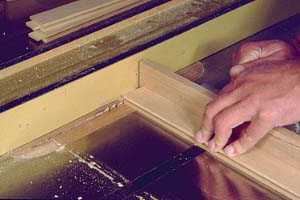
Locate the position of the grooves with a fence that rubs against the edge of your router base, as in photos 1+2. Do test cuts to determine the exact distance from the center of the bit to the edge of the router base.
Carefully mark a line at this distance from the center of your desired slot location, and clamp the fence along this line.
Push the router along the fence, making sure that the base contacts the fence throughout the entire cut.
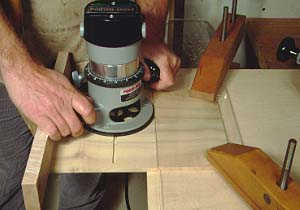
Note in the photograph that the board being routed is itself lying on another board, a piece of plywood that is very long and is clamped onto the bench out of the picture.
The reason for doing the setup on this board rather than on the bench itself is that it is necessary to locate the clamps behind the fence so that they don’t get in the way of the router as it is pushed along the fence.
Also notice the 1×2 board clamped on the other end of the stock being routed.
The purpose of this 1×2 is to flatten the stock, which was slightly cupped, to guarantee that the router base lies flat against the face of the stock.
Test each piece with a straight edge before you rout it to be sure it is flat.
Stop each groove at 1/2″ from the front edge of the part. On the internal top and bottom make that 2-1/2″.
The corresponding tenons will be notched to fit over this stopped cut (photo 7 ) so that the sliding dovetail will be hidden.
If you wish to cut through so that the joint is exposed, you must guard against tearout when the bit comes through.
To do so, rip the parts over width by 1/4″ before you cut the grooves, then rip off the leading edge afterwards to remove torn areas.
On half the stopped cuts you will push the router from left to right, on the other half right to left.
When going right to left, the direction of cut of the bit tends to push the router away from the fence.
Here it is very important to hold the router firmly against the fence.
The straight flute groove made before the dovetail groove helps reduce this tendency to pull away because the bit has to deal with less wood.
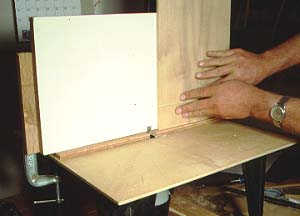
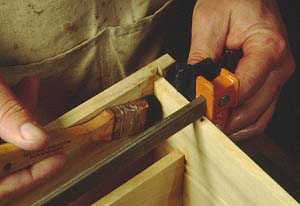
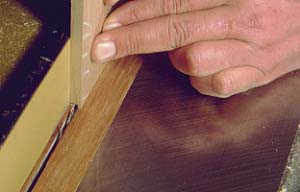
Once the grooves are done, set up the router with the dovetail bit in a router table as in photos 3+4 to cut the dovetail tenons.
For uniform tenons it is very important that the fence be flat, as well as the table surface.
Because my table was not flat, I placed a piece of plywood beneath the fence for the stock edge to contact, and shimmed the plywood from below with layers of paper until it was flat.

Make test cuts, adjusting both the height of the bit and the position of the fence until you get tenons that slide into the grooves with a minimum of resistance.
Despite your best efforts to make all grooves and tenons uniform, there will be some variation in the fit between grooves and tenons.
For this reason it is best to adjust the fit of the tenons a hair on the loose side to guarantee that they will go together.
Test each tenon in several grooves to guarantee a good fit.
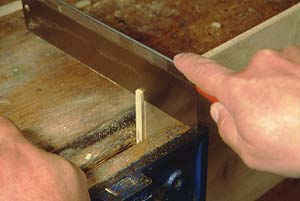
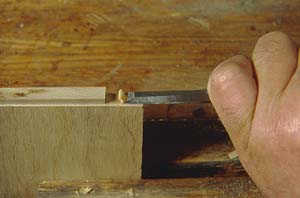
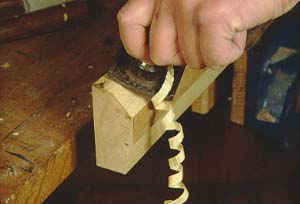
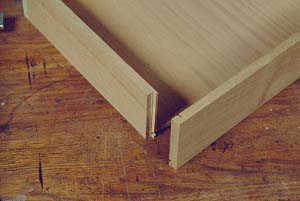
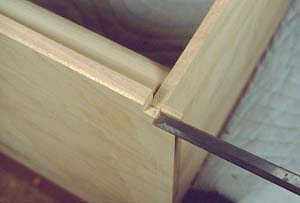
Notch the ends of tenons that must fit over the stopped grooves.
First cut the tenon back with a handsaw as in photo 5, then trim the area flat to the tenon shoulder with a chisel as in photo 6.
The finished joints will appear as in photo 7.
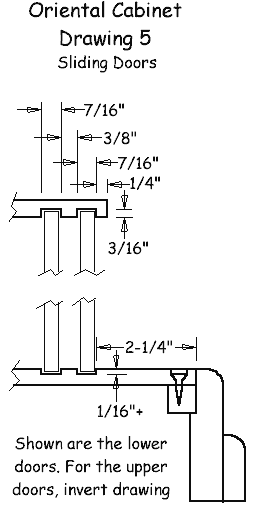
Make grooved tracks for the sliding doors in the parts above and below them. Make these at the table saw with a dado set.
Make the grooves below the doors 1/16″ deep, and those above the doors 3/16″ deep.
These deeper grooves above provide the clearance necessary for installing the doors into the tracks.
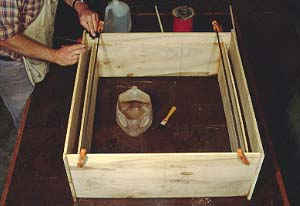
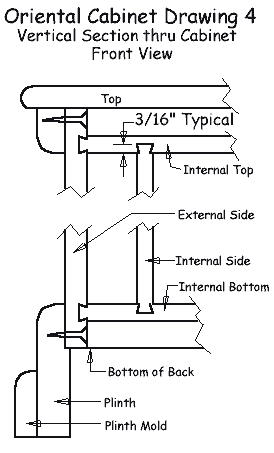
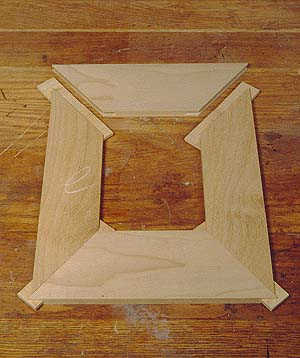
Glue together the internal and external sides with the internal top and bottom as in photo 8.
Flush the rear edges of the internal sides with those of the top and bottom, but extend the rear edges of the external sides 1/2″ beyond the internal parts.
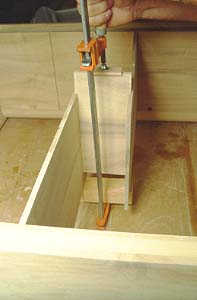
Square the carcass and clean the glue out of exposed corners (photo 9). Don’t glue in the internal shelves and dividers yet, because it will be easier to glue in the spacers and bore for hardware with them out of the way.
Spacers and Hardware
The solid rounded spacers between the internal and external sides give the cabinet more strength as well as a substantial appearance to contrast with the thin dimensions of the shelves and sides.
Cut out a rabbet on these spacers to fit over the internal sides, and scribe the roundover on both ends of each piece with a compass.
Cut away the bulk of the waste from the roundover with angled cuts at the table saw, then use a handplane to bring the curve to the scribed lines (photo 10).
Scrape and sand the curve smooth, then glue in place between the sides.
Make and glue in square profile spacers between the sides at the rear too, aligned flush with the rear of the internal sides.
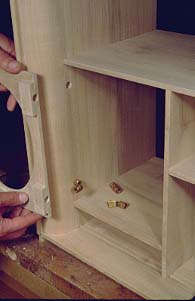
The clean look of bare wood on this piece would be interrupted by hardware, so hidden hinges are best for the doors (photo 11).
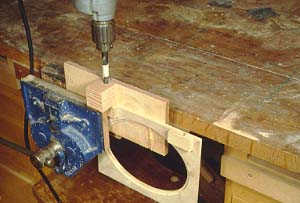
Barrel cylinder hinges are just right for this kind of situation, and are easy to install with a few well-located holes.
To guarantee that the holes are well-located, use shop-made guides to bore them.
Before you make your drilling guides, get your hinges and get a bit which makes the correct hole for your particular hinges.
Then use this bit to bore a hole in a thicker piece of scrap, preferably with a drill press so you know it is well aligned.
Attach this piece to scrap plywood as shown in photo 12, and you have a shop-made drilling guide.
Align this guide to bore the holes right where you want them, and clamp it to the cabinet as shown.
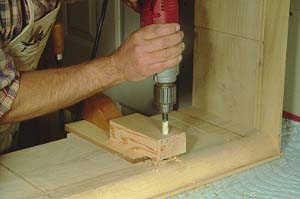
One way to refer this is to measure how far from the plywood the hole is, or better yet, locate the plywood from the hole at specific increments that are easy to measure and remember.
Shelves and Dividers
Install the shelves and dividers in this order: first the central shelves; then the door dividers; lastly the drawer dividers, slider shelves and central shelf connector.
If you tried to install the door dividers first you wouldn’t be able to fit the central shelves over the door divider tenons because of the stopped grooves.
You don’t need to glue these internal parts because the dovetails will hold them together.
If any of the parts are a bit tough to assemble, they can be persuaded with clamps or a rubber mallet (photo 13).
If the joint is not going to be glued, put some wax on it to help things along, but don’t get any on bare exposed wood because it will inhibit the finish.
Doors
The elliptical shape inside the doors adds a curved touch to the squareness of the rest of the cabinet.
Make templates by scribing an ellipse onto plywood stock as in photo 14.
First draw the outside rectangle of the door on the plywood, and scribe horizontal and vertical center lines inside.
Then experiment with different nail locations and string lengths until you get an ellipse that is pleasing to your eye.
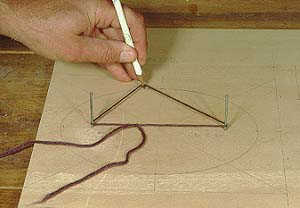
Cut out the ellipse with a scroll saw or hand coping saw, and sand it smooth.
Cut out the template along the outside door dimensions that you drew in. Draw 45 degree miters from the template corners to the middle.
From these lines you will be able to tell how wide your door frame parts must be.
Get out your door frame parts, and cut them to length.
Set up on the table saw with your miter gauge as in photo 15 to cut the miters on the frame parts.
Attach an extension fence to the miter gauge, and clamp a stop block to this fence to hold the parts in place as they are cut.
Prevent tearout on the bottom of the cut by placing a backup piece below the cut.
Cut a groove in the ends of these miter cuts for splines on the table saw. Make splines to fit the grooves.
The grain of the splines should run perpendicular to the miter joints, not along them.
Your frames should now appear as in photo 16. Glue them up, clamp together with bar clamps, then put C-clamps on the joints as in photo 17.
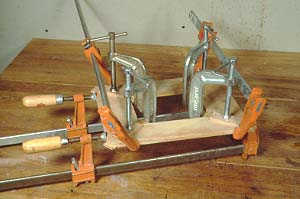
Once the bar clamps have the parts aligned, use C-clamps as shown to pull the grooves onto the splines. Wax the clamp blocks you use with the C-clamps so they won’t stick.
When out of clamps, attach the ellipse template to each door with small nails driven through the template and into the backside of the door.
Flush trim the inside of the door to the template as in photo 18.
Then set up on the router table again with a 1/4″ bearing guided rabbeting bit and cut a rabbet half way through the thickness of the doors for the panels.

Avoid tearout when cutting against the grain by climbing the cut. Keep your fingers as far away from the bit as possible.
For panels look for highly figured stock.
Scribe the shape of the panels onto your stock directly from the door rabbets and cut them out. Attach the panels to the doors with small wood tabs glued onto the rear of the door face.
Note that there is minimal clearance between the sliding doors, so the front panel and its holding tabs must be thin enough to clear the back door.
The two hung doors are not thick enough to take the cylinder of the Soss hinges, so glue extra pieces on the rear of the doors to give the necessary thickness.
Make a boring guide to bore holes in the doors as in photo 19.
Place the door in the cabinet next to the holes bored in the cabinet side for the hinges, and scribe onto the door edge the location of the holes.
Use these marks to align the boring guide to the door, and clamp in a vise as shown.
Drawers
Though dovetails are the strongest of drawer joints, the extra strength they offer isn’t necessary on very small drawers like these, and you can save a lot of time by making a locking joint on the table saw.
I used a thin kerf blade to do this but you could also use a regular blade.
Cut a groove in the drawer sides as in photo 20, then a small tenon on the front and back pieces as in photo 21.
Use 1/8″ plywood for the shelf bottoms. Cut appropriately sized grooves along the inside bottom edges of the drawer parts to fit the bottoms.
The completed drawer joinery will appear as in photo 22. After you glue the drawers together, glue thin pieces of figured stock onto the fronts of the drawers, and once these are out of clamps, round over the edges.
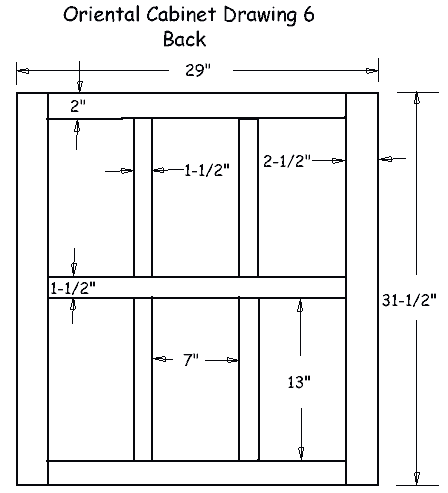
Back
The back consists of six equal sized panels held within a frame.
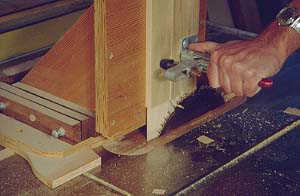
The four main corner joints on the frame are open mortise and tenons. Cut these joints with a tenoning jig on the table saw, as in photo 23.
After the main joints are cut, make grooves along all inside edges of the parts for the panel tongues.
Next cut tenons on the internal frame parts to fit within the grooves. Cut these tenons on the table saw with the miter gauge as in photo 24.
Dry fit the frame parts together, and measure the exact sizes of the holes for the panels, including the groove depths .
Make the panels 1/16″ less in width than the hole size you measure for them, to allow for expansion when humidity strikes. Cut 1/8″ tongues around the edges of all the panels to fit the grooves.
When you glue up the panel, use C-clamps to squeeze together the four main joints after pulling the whole thing together with bar clamps and squaring it up.
The back butts against the rear edges of the internal sides, top and bottom, and fits between the inside faces of the external sides.
Screw it to the rear spacers that are glued between the internal and external sides.
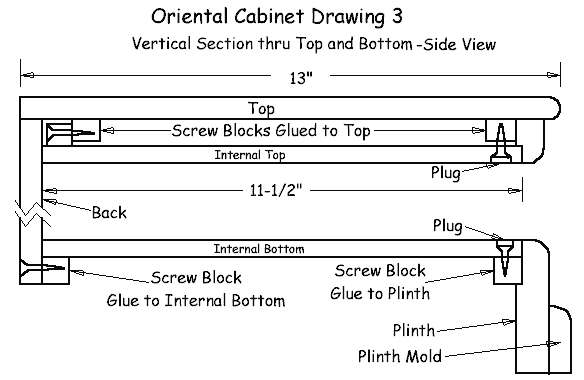
Top and Bottom
The top and bottom are largely a matter of cutting mitered molding and plinth, then gluing and screwing in place with various glue blocks.
There are just a couple of tricks.
First, cut a step into the lead edge of the external sides at the top and bottom for the molding and plinth to fit in (photo 25).
Both the plinth and molding will come flush to the faces of the internal top and bottom, so the shoulders of the steps must be on the plane of these faces.
Note that the molding and plinth pieces cannot be simply glued onto place on the external sides because this is a cross-grain gluing situation.
To allow for movement, glue the pieces at the front of the sides only (so the miters won’t open up), and attach them with screws at the middle and rear.
You must use a special screw hole to allow the screw itself to move as the cabinet side shrinks and expands. Clamp the molding or plinth in place, and bore screw holes.
Then remove the molding, and widen the hole on the face of the cabinet side that contacts the molding, with a countersink or larger bit.
Then replace the molding with glue (at the front only) and screw together.
This wider screw shank hole lets the screw move as the wood does.
Cut a 1/8″ x 1″ rabbet on the inside of the side plinth pieces, and butt the shoulder of this rabbet against the bottom of the cabinet side.
This way the weight of the cabinet is supported directly by wood, rather than only the screws that secure the plinth to the side.
Use a long glue block behind the front plinth piece and front top molding to attach them to the bottom and top cabinet pieces.
The easiest way to attach the top would be to screw directly down from above, and then plugging the holes.
But you can always see those plugs and in a high visibility spot like this they would be ugly.
Secure the top by gluing strips onto it for screws to reach it from below and behind.
A strip glued along the front of the top takes screws placed along the underside of the internal top, which are then plugged off.
On the rear, glue a piece both onto the bottom of the top, and to the top of the internal top, and screw from behind through one into the other.
Finish
A wipe-on oil finish like Watco is a good choice for a piece like this that will not receive hard use, and that is intended to show off the figure and texture of the wood.
A little wax in the sliding tracks will help them move nicely, too.