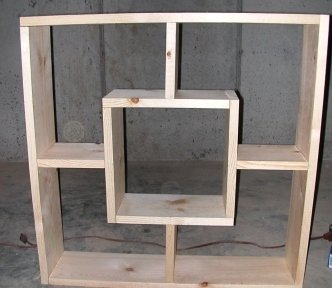
This modern-looking, square, floating wall shelf is easy to make and interesting to hang on your wall or give as a gift.
This easy project only requires straight cuts and nail assembly, so it’s great for beginners.
The finished size is about 25 x 25 inches.
You will need two 8-foot boards of 1 x 6 lumber.
I used inexpensive pine for this example, but you could use a nicer grade of maple or oak if you’d prefer.
The important thing is that the lumber be fairly straight and free of knots.
1. Measure and Cut Your Boards
Using a table saw or compound miter saw, measure and cut the following pieces from your 1 x 6 lumber:
- four 24-3/4-inch pieces
- four 10-3/4-inch pieces
- four 6-1/4-inch pieces
If the board edges are very rough or splintery after cutting, you can sand them lightly.
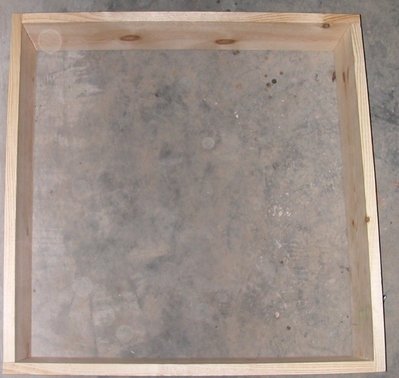
1. Assemble the Inner and Outer Squares
Begin with two of the 24-3/4-inch boards.
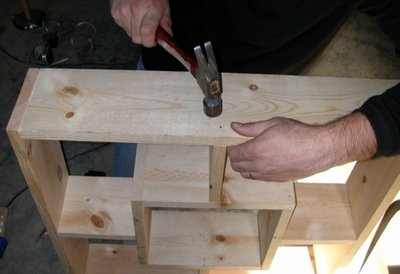
Place the boards at a 90-degree angle to form the first of the butt joints that will hold the shelf together.
Drive three 1-1/2-inch nails into the top wood piece, about 3/8-inch in from the edge.
After the nails are in, use a nail set to tap the nail head just below the wood surface for a cleaner look.
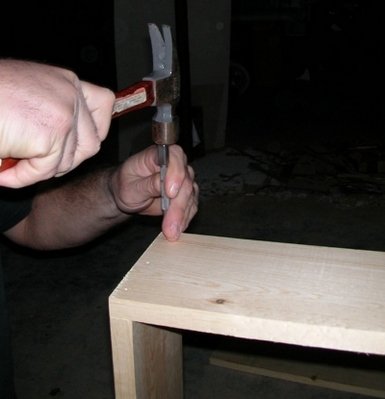
Continue aligning butt joints with the remaining 24-3/4-inch wood pieces and nail them together as shown in the picture.
When the outer square is complete, use the four 10-3/4-inch pieces to repeat the process and complete the inner wood square.
2. Attach Supports to the Inner Square
Measure and mark the center of each side of the inner wood square, marking the centers on the inside and outside of the square.
Put a 6-1/4-inch piece on the outside center of the square’s sides, lining it up with the center markings.
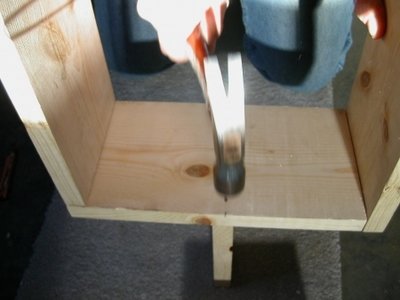
Drive three nails from the inside of the square to hold the smaller piece to the outside of the square.
Tap the nail heads in with a nail punch. Complete this step for each of the smaller square’s sides
3. Attach the Inner Assembly to the Outer Square
Slide the inner square, with supports attached on all sides, into the outer square.
Measure to the center of each of the outer square’s sides.
Mark the centers on the top and on each side.
As you drive nails through the outer square into the supports, you will need to push on the supports and hold them steady to keep them lined up with the center of the outer square’s sides.
Use three nails on each side to hold the outer square to the supports. Tap the nail heads to just below the wood surface with a nail punch.
4. Apply A Stain or Sealer
The modern square wall shelf is all put together now, so it’s time to decide how you want to finish your project.
You can opt for a clear coat of polyurethane, a wood stain in one of many colors or a simple coat of paint to match your home decor.
The sky’s the limit on project finishes, so have fun with this step!
5. Attach Hanging Hardware
Be sure you’ve waited the appropriate amount of time for your finish to dry before attaching hardware to avoid marring the finish or your walls.
Hanging or mounting hardware varies by what kind of walls you have and by how much weight you expect the shelf to bear.
I chose D-ring mounting hardware, which is suitable for most mid-weight items.
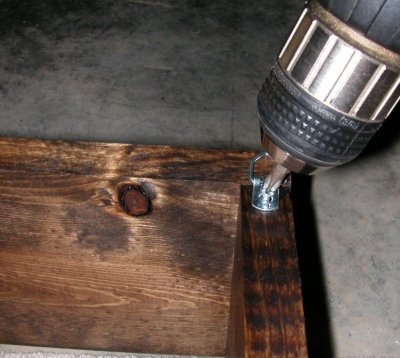
Because the D-rings are somewhat long, I attached them to the shelf just below the upper corners, so they won’t show when the shelf is on the wall.
If you plan to put heavier items on your shelf, attach the hanging hardware 16 inches apart so you can mount the shelf over wall studs for extra support.
Most wall studs are 16 inches apart, but you can measure your own walls to be sure using a stud finder.
6. Hang Her Up!
Measure and mark the correct places to insert picture hooks or other hanging hardware in the wall.
Use a level to make sure the shelf will hang straight on the hooks.
Place your shelf on the hooks, and it’s ready to be filled with your treasures!
