The first surface that you choose to plane should be the best flat surface of the piece.
It should be free of imperfections and should be the side with the most interesting grain, since it will the an exposed surface.
Contents
- Inspecting the Surface for Warp and Wind
- Fastening a Board in the Vise
- Planing the Surface True and Smooth
- Removing Wind from a Board
- Checking the Surface
- Hand Planing Review Questions
- Planing Stock to Width and Thickness
- Selecting and Checking the Face or Joint Edge
- Selecting the Proper Plane
- Fastening the Work in the Vise
- Holding the Plane
- Planing the Edge
- Setting the Marking Gauge
- Marking the Stock to Width
- Planing the Second Edge
- Marking the Stock to Thickness
- Planing the Thickness
- Planing Stock to Width and Thickness Review Questions
Inspecting the Surface for Warp and Wind
A woodworker with experience can tell if a board is warped by sighting along it.
A beginner can check warpage with a straight edge or the blade of a try or framing square.
Wind in a board indicated that the board is twisted throughout its length.
One way to check this is to lay the board on a level surface to see if it rocks on two corners.
Another method is to place two parallel pieces of wood across the grain, one on either end of the board.
Then sight along the top of the first parallel.
If you can see one end of the second parallel, you know that the board has a wind.
With a pencil, mark the high points of the board if it is warped or has a wind, because ore stock must be removed at these points.
Fastening a Board in the Vise
If the wood is rough, you may need to take a few cuts with the plane before the direction of the grain becomes apparent.
Planing against the grain roughens the surface.
Lock the board between the dog of the vice and the bench stop, or lay the board on top of the bench with one end supported against the bench stop.
Never lock a board cross-grain, as this tends to warp it.
Planing the Surface True and Smooth
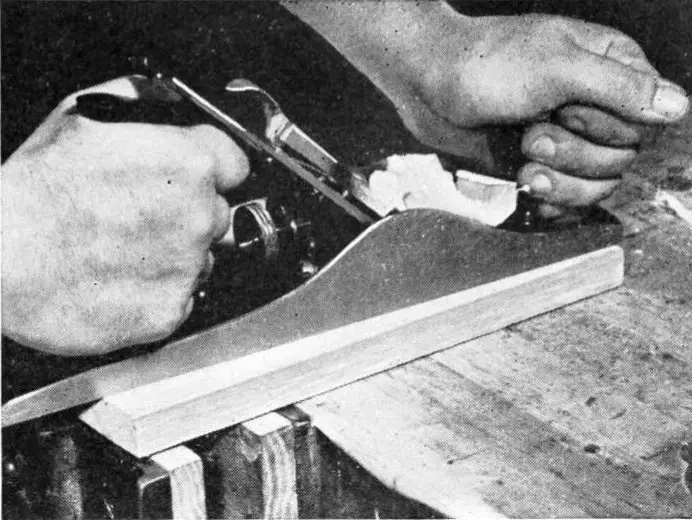
Grasp the knob of the plane in your left hand and the handle in your right hand.
Take a position just back of the work with your left foot forward, so you can swing your body like a pendulum as you plane and at the same time use a forward motion with your arms.
Place the toe or front of the plane on the board.
Apply pressure to the knob at the start of the stroke.
As the whole base comes in contact with the wood, apply even pressure to the knob and handle.
Then, as the plane begins to leave the surface, apply more pressure to the handle.
This way, you won’t cut a convex curve in the board.
Lift the plane off the board on the return stroke.
Don’t drag the plane back to the starting position.
Sometimes the plane will cut more easily if you take a shearing cut rather than a straight cut.
Work across the board gradually.
If you have marked any high points, these will take more planing than other areas.
Removing Wind from a Board
If there is a wind in the board which requires taking a partial cut at either the beginning or end of the board, it can be done as follows:
To take a partial cut at the beginning of the board, begin the stroke as before.
Then, as you plane along the board as far as you think necessary, slowly lift the handle to finish the cut.
To take the wind out of the end of the board, start the partial cut at some point in the center of the board.
Begin with the handle held away from the surface and gradually lower it as you begin the forward motion.
Checking the Surface
After the surface begins to appear smooth, check it with a straightedge to make sure that it is true.
Light will show through where there are low spots on the board or the straightedge will touch the high points.
It is smart to check the total length every few inches and diagonally across the corners, using a pencil to mark the high points.
Sometimes one plane stroke will remove these.
This first surface which has been planed true and smooth is called the face surface or face side and is the basis for squaring up stock.
Hand Planing Review Questions
Here are some questions to help review hand planing.
- Which surface of the board is the first to be planed?
- Can you see if a board is warped? How is this checked?
- What are the two ways of checking wind in a board?
- Why does planing against grain roughen the board?
- What is likely to happen if the plane is dragged rather than lifted back to the starting position?
- How would you go about removing wind from a board?
- What is the surface called that is planed first?
Planing Stock to Width and Thickness
Most of the pieces for a project must be planed to width and thickness to make the surfaces smooth and true and to bring the stock down to the finished sized.
In performing these steps, you will have constant use for a marking gauge.
This tool is used for making thickness and width on small pieces of stock.
In planing to thickness and width, all measurements should be taken from the face surface or side which you will already have planed true and smooth.
This surface should be marked with the number “1” or some small mark near the first edge that you are going to plane.
Selecting and Checking the Face or Joint Edge
Select the edge that is truest and freest from irregularities. With the try square held against the face surface, test the edge at several points along the stock for squareness.
Also check with a straightedge along the length.
Mark with a pencil the high points where you must do most of the planing.
Selecting the Proper Plane
For shorter pieces, the jack plane will be very satisfactory.
In planing an edge, however, especially a long one, it is better to use a plane with a longer base such as the fore or jointer plane.
The jointer plane tends to straighten the edge while the shorter plane will follow any curve that may be in the edge.
Fastening the Work in the Vise
Lock the stock in the vise with the edge protruding above the surface.
If it is a long piece of stock, the front end should be supported by the vise and the back held in place with a hand screw.
Sometimes the work is held against a V block on top of the bench.
Holding the Plane
Adjust the plane to take a very fine cut.
In planing an edge you may hold the handle of the plane the same way as you did for surface planing.
Sometimes to use the second method, place the thumb around the back of the knob with the other fingers curled under the bottom of the plane.
In this way you can use your fingers to guide the plane along the face side to help in keeping the plane at right angles.
Planing the Edge
Plane with the grain. First remove any high spots that you have marked.
Then take long, continuous strokes to remove a thin chip all along the edge.
Be sure to apply pressure on the knob in starting the stroke and on the handle when finishing it.
The idea in planing this first edge is not to remove stock but to get this edge square with the face surface and straight along its entire length as rapidly and with as little effort as possible.
Check with the try square and straightedge frequently.
Mark this edge with two light pencil lines to indicate that it is the face or joint edge.
Setting the Marking Gauge
Check on the drawing the width of the stock needed and then set the marking gauge to this width.
As you have notices, the marking gauge has a scale along one surface.
This scale, however, will usually be inaccurate, since, in sharpening the small spur to wedge shape by filing, the starting point of the scale becomes incorrect.
However, set the head of the scale to the correct distance and then lightly turn the thumbscrew.
Then hold the marking gauge upside down in your left hand and use the rule to check the distance from the head to the point of the spurt.
If the measurement is slightly incorrect, tap the head a bit one way or the other to correct it and then tighten the thumbscrew.
Always recheck the measurement before using the marking gauge.
Marking the Stock to Width
Hold the stock to be marked with the face surface up and the face or joint edge to your right.
Place the head of the marking gauge firmly against this joint edge, and then tip the marking gauge forward with a slight twist of your wrist until the spur just touches the surface of the wood.
Beginning at the end toward you, push the marking gauge forward, applying pressure.
Sometimes when widths greater than the capacity of the gauge must be marked, it will be necessary to mark the width at several points and then hold a straightedge along these points, marking a fine line with a knife.
Planing the Second Edge
If there is considerable excess stock to be removed, the board should be ripped to within 1/8 to 3/16 of and inch of the finished line.
Lock the stock in the vise as described above and begin to plane the second edge.
As the plane approaches the layout line, use the try square frequently to check the edge for squareness with the face surface and a straightedge to check the length.
Take special care as you approach the finished line to take light, even shavings that are the total width and length of the edge.
The last cut you take should just split the indentation made by the marking gauge.
Marking the Stock to Thickness
Check the thickness of the stock needed and then set the marking gauge to this measurement.
Hold the head of the marking gauge against the face surface and mark a line on both edges to indicate the proper thickness.
Planing the Thickness
Observe the lines that indicate thickness and see if there are any areas that are higher than the remainder of the board and require extra planing.
Lock the stock between the dog of the vise and the bench stop and plane these areas first.
Then begin to plane the total length of the stock, working fro one side to the other to bring it down to its proper thickness.
The actual procedure of planing to thickness will be the same as that for planing the first surface, except that you must constantly observe the two lines indicating thickness.
When the stock is planed to thickness you should be able to hold the handle of the try square against this second surface and find that the edges are square, as they were with the face surface.
Planing Stock to Width and Thickness Review Questions
- When is a fore or jointer plane used?
- The first planing should be done on which edge?
- How can a piece of long stock be supported for planing along one ege?
- Describe the two ways of holding the knob of the plane in planing an edge.
- What should be accomplished by planing this first edge? Should a large amount of stock be removed?
- Describe a marking gauge and name its parts.
- Should you depend on the marking gauge scale for setting the tool to width?
- Should the mark made by the marking gauge be heavy and deep?
- How would you remove considerable stock to bring the stock to width?
- Would you completely remove the marking gauge line when you planed the second edge?
- What are the characteristics of a piece of stock that has been squared to thickness and width?
One thought on “How to Hand Plane a Surface”