Spalted wood is wood which has gained desirable coloration due to fungal growth.
Many turners are taking on the challenge of turning spalted wood and, without some knowledge and advice on the subject, this can be a very disappointing experience.
On the other hand a well-executed spalted turning can be a very attractive work of art with its diversity of color and variable patterns.
Types of fungal rot.
There are usually three types of fungus rot that can invade decaying wood and it’s the damaging brown and white rot that produce the softer punky wood that tears out so easily.
The less damaging soft rot will leave wood quite workable without impregnating the wood with some sort of resin, epoxy or glue.
Keep your tools sharp and use the right tool for the job.
When attempting to turn spalted wood you can minimize the tearout but keeping your tools extremely sharp as using slicing/shearing cuts as much as possible.
Fine light cuts are needed as you approach the final profile.
Hollow forms can be hollowed with scrapers or a boring bar using smaller tips.
Wider tips can be used very lightly to take out the bumps on the final inside profile.
Apply CA glue for spot treatment.
When within 1/8 inch of the final surface you may need to use a product that will support the fibers at the softer areas as manifested by small tear outs that cannot be eliminated by the tool.
If some spot treatment is all that is needed then I use gap-filling CA glue with the accelerant.
Caution must be used when turning the lathe back on. If the CA glue is not completely cured it can spray.
I have also use white carpenter’s glue diluted with some water.
You may wish to experiment long before you get within 1/8 ” of your finished profile.
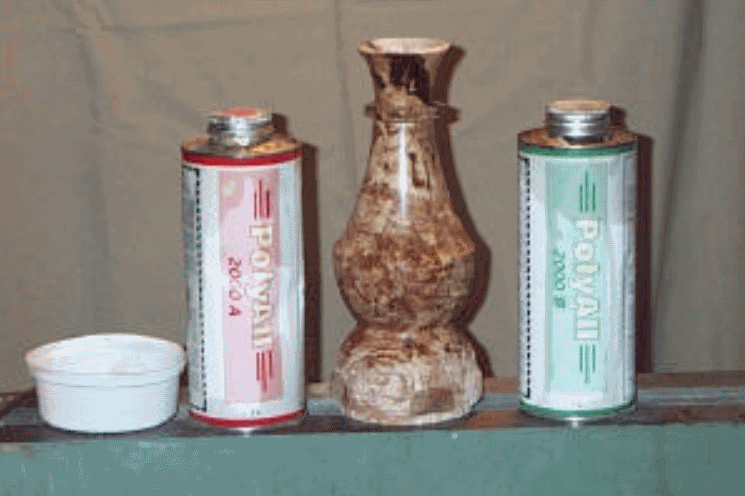
Apply epoxy for heavier treatment.
If the piece needs more than just a spot treatment then a product I have successfully used is Polyall 2000.
This is a two-part epoxy, the consistency of water that when mixed together cures in approximately one minute and soaks into the wood approximately 1/16″.
You then turn down the 1/16″ and reapply. Then turn down again with out cutting through fortified layer.
I usually reapply a third coating prior to sanding to ensure soft spots are protected from the sanding process.
You can apply the product with home made “brushes” made of small strips of cloth attached to a heavy wire.
Use latex gloves and dust mask when applying and sanding this product.
Dealing with voids and bark inclusions.
Now a word about voids and bark inclusions.
Some hate them others love them.
Those who love them incorporate them into the design of the form.
As long as the voids and bark inclusions do not create a tension in the aesthetic balance of the object. they can be quite attractive.
Tear-outs in bark inclusions can be filled with a paste made of white glue and walnut sanding dust.
There is no doubt that dealing with these features adds a new level of risk to the process as they are reveled in the turning process.
For the risk taker this is is not a show stopper.
Finish the piece as you would any other turning.
