A few of my projects have been made from plans, which I’ve purchased from one of the fine organizations which supply great designs and plans.
But more often than not, my needs were too specific, to the point where the plans available, just would not meet my requirements.
What do you do then?
Well, you have to make your own. What a scary thought!
But I’m here to tell you that if you think it through carefully, critiquing and being the devil’s advocate at every step, you can come up with great custom plans, for exactly what you want.
The Basics and Pre-Planning
You’ve got to do a bit of homework first:
- you’ve got to learn a few basic woodworking techniques & joints, and see how they work & where
- you need to practice these techniques, and making these joints
- you should do a bit of trial and error work with scraps, to see how these techniques are going to work in different applications, but after you do these things – THERE IS GOOD NEWS AT THE END OF THE LINE BECAUSE IT WORKS!
Once you can do these basics, and if you’ve got just a bit of creativity, you’re on your way to being able to make, within reason, just about whatever you want.
The basics are pretty easy, and all you have to do is practice on some scrap wood a few times, and you’ll be amazed at what you can do.
All the mystery of rabbeted joints and dados flies out the window with a bit of learning and you’ll soon see which joint is right for your job.
You practice it a few times and perfect it (believe me it’s not that hard) and you’re ready to incorporate that joint into your own plans and resulting project – that spice rack to fill that non-standard space in your kitchen, or that step stool your wife asked you about.
Although joints incorporating dados and rabbets can be made either with a router or table saw, in most cases I prefer to use my Sears Craftsman router.
General Practices for Plan-Making
The first consideration of plan-making is – to ascertain the size your project will be – the space available for your project – the user of the project ie: if the person is a smaller person like a child for example, can they reach to the top shelf?
As an example, I’m currently designing a spice rack for our kitchen.
I have some nice oak veneer plywood which I would like to use for the back of the piece.
However if I use it, it is only wide enough for 6 spice bottles, so I would have to make it taller to accommodate say 3 or 4 shelves – 6 bottles per shelf.
After checking our kitchen space, I found that would be just fine, so that’s how I’m drawing up my plan.
Sketch your plan as carefully as you can, noting the dimensions clearly, showing both the front and side views.
If a particular type of joinery is to be used, make note of it where it is going to be employed.
This is important because if the sides are going to fit into rabbets which have been cut from the insides of the top and bottom, this will need to be accounted for, when deciding upon the overall height.
It’s not difficult to calculate.
If the side pieces are going to be say 15″ long and will fit into a rabbet cut 3/16″ deep in a 3/8″ piece of oak top & bottom, the overall height of the unit will be 3/16″ left on the bottom + 15″ side piece + 3/16″ left on the top for an overall height of 15 3/8″.
Dealing With Curved Shapes
Your Own Free Helpers – Can’t draw a perfect symmetrical curve?
No Problem!
How many things laying around your house are perfect symmetrical curves?
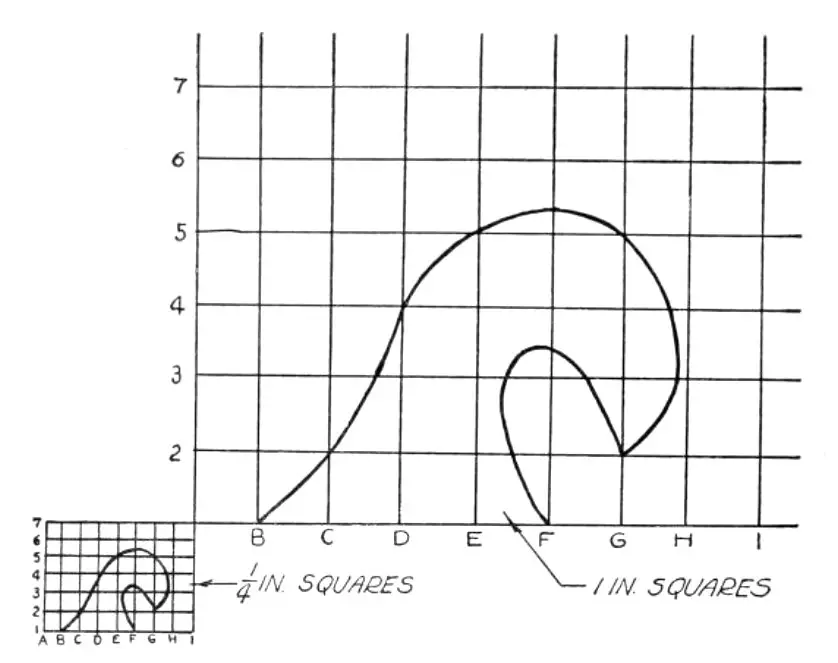
All sorts of them.
I made a nice little foot stool with portions of circular shapes cut from the edges of the ends, which were drawn by placing the appropriate size round margarine container where I wanted the cutout on the edge of the end piece, and then simply running a pencil around the part of the circumference I wanted.
French Curves
There is also a drawing aide you can buy, at a good art supplies store, for only a couple of bucks.
They’re called a set of French Curves. They usually come in sets of 3 pieces of plastic with curved edges.
They are curved differently on each of their different sides, and by using portions of any of the different curves, you can draw just about any curving shape you want.
Conclusion
Careful planning will work every time.
The feeling of accomplishment that you get from making your own plan and then building your project, is really satisfying – and remember I had never done any woodworking in my life until about 5 or 6 years ago.
So like I always say, if I can do it….anybody can!
And I can’t draw to save my life!
I encourage you to try. You’ll love it!