Please note this is how I woodturn bowls, there are many other ways, perhaps better, to turn and many people are much more proficient than I am in turning.
Getting the Wood
After a recent hurricane, we had more raw bowl stock than we would ever need. Most of it went in the chipper for mulch.
(We also have more mulch than we will ever need, but that is another story!)
We can easily get basic hardwood logs at any time of year where we live in the South.
This is a booming area with a huge amount of building and tree services are always full of logs and happy to give them away.
Starting Out
When I get a log, I normally will cut basic bowl blanks out.
I first cut a length equal to the diameter of the log, and then cut it down the middle. This gives me two bowl blanks from the round log.
I will orient the bowl with the grain running from side to side most of the time.
Sometimes I will have a bowl with the grain running from top to bottom, but very rarely.
I also normally have the bottom of the bowl at the outside (bark side) of the blank since this will give me the largest bowl from the log.
This is not a fast rule though and you will learn to read the grain to get the best looking bowl from your log.
Remember that the part that will eventually show in the finished bowl, is somewhat difficult to see until you get rid of all that wood!
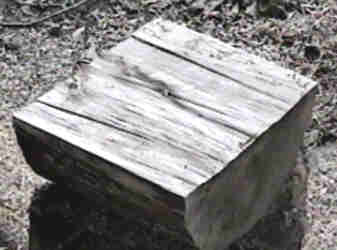
Squaring Off the Rough Wood
The next thing I do is cut off a little of the edges with the grain since I won’t use all the width anyway. (I will just have to turn it away on the lathe if I don’t cut it off.)
In the photo, I have already cut off on of the sides and am cutting off the other.
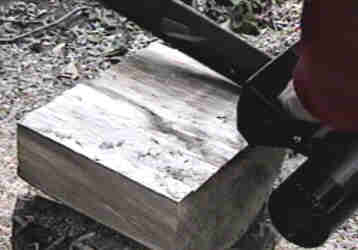
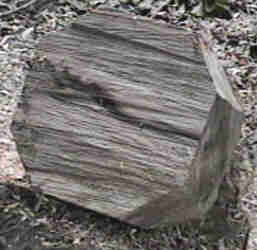
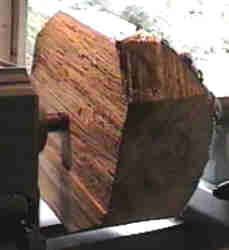
Cutting the Corners
Next, I cut off the corners so the bowl blank will turn on my lathe.
I have a template of the largest octagon that will turn on my lathe and I use it to make sure that I don’t have to fool around with chopping off corners with a chisel so it will turn.
This is an obvious thing to do, but I prepared bowl blanks for a while without it before I forced myself to measure.
I always thought I could Eyeball the blank to fit okay and spent time chopping away bits instead of turning.
Many turners use a band saw to cut out a circle at this point, but I find it just as easy and less time consuming to do it this way.
(Plus, I don’t own a band saw!)
Mount the Blank
The next step is to mount the blank between centers and turn it by hand to make sure that it is balanced and that the blank will miss the bed of the lathe.
A large bowl blank can make a significant noise if it hits the bed when you turn on the lathe!
Many turners will first sink a two-pronged drive center into the blank before mounting it on the lathe, but I normally don’t.
I rarely have a blank come off the lathe due to the drive center not being seated properly.
The reason I don’t seat it is that I fool around with the blank between centers to get the orientation just the way I want it before I power on the lathe.
I find that the drive center seats okay on most woods without pounding away with the mallet.
NOTE: on very hard woods, I do sink the center with a mallet.
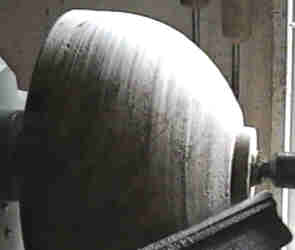
Turning the Basic Shape of the Bowl
I turn a basic shape of the outside of the bowl between centers.
Note that I have turned a spigot for my chuck at this point.
My goal in this step is to get the darn wood off the blank and not to be super creative.
I just want to get it into a basic shape.
Soapbox on. I have seen some beginning turners spend hours at this point refining the shape of a green bowl when it is going to warp anyway.
This is fine if you are going to turn the bowl to finished thickness and let it warp, but it you are going to turn it thick and then return it after drying, why are you worried about refining it at this point?
Just get the shape and get on with it! Soapbox off.
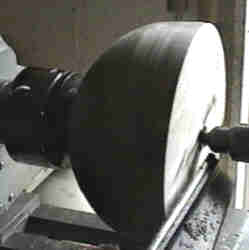
Turn the Blank Around
The next step is to turn the blank around and mount it in a chuck.
You can just as easily use a face plate, but I don’t know why anyone would with the wonderful chucks available.
I almost never cone out the center of the blanks unless it is a very wonderful log.
The size of cones I get from my bowls are too small to do much with anyway.
If you are turning 18 inch bowls it might be worth it to cone out the center.
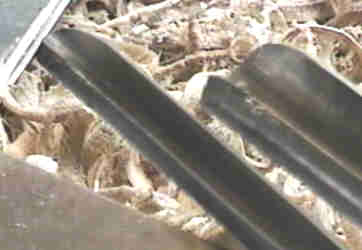
Sometimes I hog out the interior using a bit tool like the Stewart System, but most of the time I use my side-ground gouge to peel away large amounts of curly-cues.
It seems to be therapeutic to me. When I hog out the interior I use the tail stock.
When I use the gouge, I won’t use it, unless the blank is scary. You can try it both ways until you get comfortable.
The big problem can be the spigot that is in the chuck or how well the screws in the faceplate are holding.
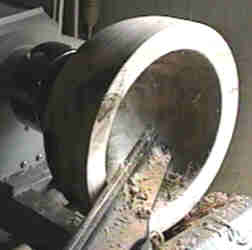
Turning the Bowl to the Desired Thickness
I turn down to about 1 inch (2.5 cm) thickness on the soft maple blanks.
I could go a little thinner, but I am not in much of a hurry since I try to rough out bowls a few times a year and keep them on hand.
I use a big 1 inch deep fluted bowl gouge to get rid of the wood fast in the bottom of the bowl.
I try for a consistent thickness so the drying is consistent.
These are two of my main weapons in the fight for a bowl blank.
I use a 5/8ths inch deep fluted gouge with a thumbnail grind and the big’un 1 inch bowl gouge with a modified regular grind to get rid of the wood.
I won’t begin to try to put into words how I grind the tools.
It would take all the bytes that the server gives me and you probably wouldn’t get much out of it.
I would suggest you check out the John Jordan and/or David Ellsworth video tapes (or take a course) if you want instruction on grinding these shapes.
Conclusion
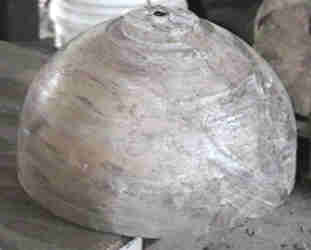
The finished product coated with a sealer.
Drying the blanks is another article, but I normally let the blanks dry uncoated for a week or so if they are from very wet logs.
I will pile shavings around them in the shop.
After the initial drying, I will either bring them in the house where it is drier or coat them with Sealtite and bring them in.
It depends on the log and type of wood. With Maple, the wood is very forgiving and doesn’t crack too bad.
With fruitwoods like apple or cherry, I take much more care and dry them much slower.
These woods will crack as soon as you turn your back.