The following is a description of the different types of marking gauge and what each type is commonly used for.
What Are the Common Types of Marking Gauge?
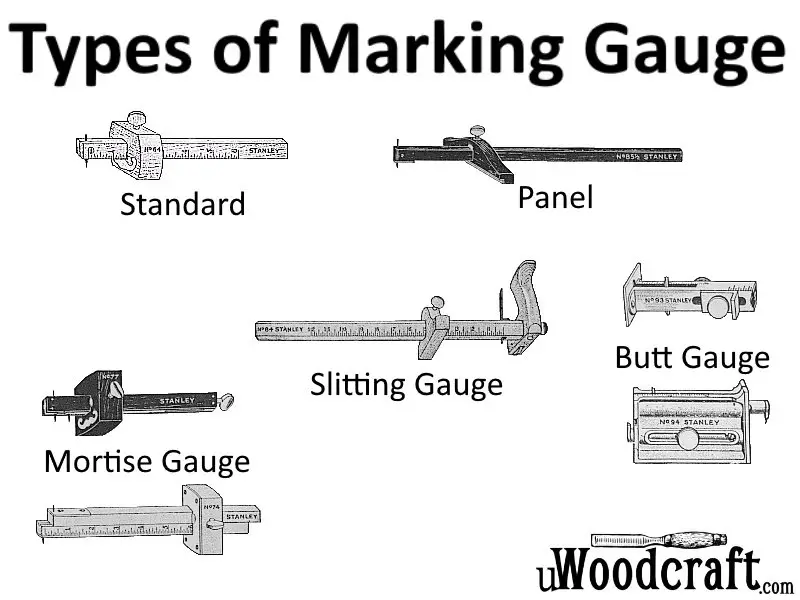
The most common types of marking gauge include standard marking gauges, panel gauges, mortise gauges, butt gauges, and slitting gauges.
Each type has different properties and is designed to perform a specific task.
Standard Marking Gauges

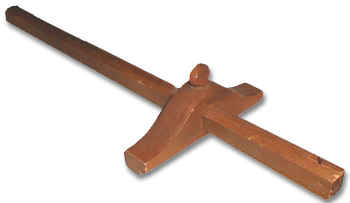
The most basic form of gauge is the simple marking gauge.
These gauges have a single point, and so will mark a single line parallel to the reference edge.
The gauge shown above (a Stanley #64) is fairly typical of the genre– it has a graduated arm approximately 8″ long, and a head about 2″ square.
The arm can be locked in place by a thumbscrew, and there is brass plating on the head to provide extra wear protection.
Lower-end marking gauges are usually made of beech, while the premium tools were made rosewood, boxwood, or other exotics (the British were quite fond of ebony and mahogany).
The heads on these gauges come in in two basic varieties: elliptical (easier to hold), or rectangular (won’t roll off the bench).
Many commercial gauges were offered in both configurations.
Panel Gauges

Related to the marking gauges are the panel gauges.
These are really nothing more than marking gauges with extremely long arms, designed for marking off wide panels for ripping.
The gauge shown above (a Stanley #85-1/2) shows most of the commonly found features on a panel gauge.
Note that the head on these gauges is quite wide (typically 6″-8″), and is often shaped like a flattened out bell.
The arm is usually 18″-30″ long, and is very rarely graduated.
Another feature unique to panel gauges is the rabbeted head.
This allows the gauge to rest on the edge of the board, keeping the arm relatively level (an important consideration for a gauge of this size).
Commercial panel gauges are almost always found in either beech or rosewood, but craftsman-made versions can be found in many different kinds of wood.
Mortise Gauges
Mortise gauges are a specialization of the standard marking gauge which have two marking points.
They can mark a pair of parallel lines, and are thus very useful for laying out mortise and tenon joints.
They come in two distinct varieties: single-arm gauges and multi-arm gauges.

The gauge shown above (a Stanley #77) is typical of a single-arm mortise gauge.
It has one fixed point on the end of the arm, and a second point which can be moved by adjusting the thumbscrew on the end of the arm.
The thumbscrew activated point is fairly common on commercial gauges, but you will also see some that use wood or metal sliding sections that are locked by the head thumbscrew.
To mark a mortise with one of these gauges, the points are adjusted to the proper distance apart (typically measured directly from the chisel you will use to cut the mortise), and the head is adjusted to set the proper distance from the mortise to the edge.
A different solution to mortising is shown by the multi-arm gauge shown above (a Stanley #74). In these gauges each arm can be individually moved and locked, so you can mark a mortise by making one pass with each point.
In use, however, this practice is somewhat problematic. Since the points are on different sides of the arm, it is impossible to set them directly from the chisel– you need to measure each side independently.
A point in the multi-arm gauges’ favor, however, is that they can be set up to take the place of two marking gauges, which the single-arm gauge cannot.
Butt Gauges
The butt gauge is a specialization of the marking gauge which is designed for marking mortises for butt hinges.
This is a surprisingly complicated job with little room for error– if the hinges are not properly placed, the door may not work properly (or at all).
There are two common situations encountered in butt mortising– one in which the door is being fitted into a rabbeted jamb, and one in which the strike for the door is nailed on.
In each situation, the marking job is slightly different.
In the case of a rabbeted jamb, the most important thing is to mark the hinges such that a small gap (usually 1/16″) exists between the face of the door and the back of the rabbet.
If this gap is not present, the door will bind. Butt gauges designed for this situation will mark a specific distance from the corner of the rabbet, and a corresponding distance (minus the desired gap) from the face of the door.

The Stanley #93 (shown above) is designed for marking these types of butt mortises.
The points move together so that if the jamb is marked referencing the outside of the endplate of the gauge and the door referencing the inside, a small gap (the thickness of the plate) will automatically be left.
The third point (on the side of the gauge) is used to mark the hinge depth.
In the case of a nailed-on strike, the job is much simpler. Since the strike is added later, there is no need to account for the gap between the strike and the door.
In this situation the hinge depth is marked referencing the outside of the jamb and the corresponding side of the door, so the door will be flush with the jamb.
A normal marking gauge could be used for this operation, if not for one problem– the door casing.
In typical door construction, the casing is attached such that only a small portion of the jamb edge is visible, which is normally much too small for a marking gauge to reference off of.
The Stanley #94 (shown above) is designed to handle this marking. It uses a small lip on the edge of the head as a reference surface, so it can mark off a ledge as narrow as 1/8″.
The door can reference off the same point, assuring perfect alignment.
The second arm on this gauge is once again used to mark the hinge depth.
Slitting Gauges
Slitting gauges are very similar to marking gauges in that they have a single arm and point, but the difference comes in the design of the point.
Whereas the points on a marking gauge are designed to mark, on a slitting gauge the point is designed to cut.
The gauge shown above (a Stanley #84) is a typical handled slitting gauge.
It is similar in shape and form to a panel gauge but has a large handle on the end of the bar to allow more pressure to be exerted at the cutting edge.
The point on this gauge has been replaced by a knife blade, capable of cutting stock up to about 1/8″ thick.
Slitting gauges are commonly used in veneering work to even up flitches for book matching and for marking the edges for inlaid banding.
Smaller versions (more like in size to a marking gauge) are also available, which are handy for making veneer strips.
What is a Marking Gauge Used For?
Marking Gauge Description – A marking gauge is a simple layout tool designed to make one or more marks parallel to the edge of a workpiece.
The basic configuration is that of a long arm which holds a marking or cutting point, attached to a movable fence (commonly called the “head” of the gauge) which rides against the reference edge.
By adjusting the distance between the fence and the point, you can control the width of the marked piece.
