In this post, we’ll be doing a deep dive into everything and anything you’ve ever wanted to know about the woodworking hand saw.
This includes a rundown of the different types of hand saws, hand saw buying, jigs, and a glossary of common hand saw terms.
In Praise of Old Saws
There are many reasons to rescue an old hand saw from the flea market and put it back to use in your shop. The steel in an old saw is far superior to anything used today and will hold an edge for a long time.
The handles are made of real wood instead of plywood or plastic and are so comfortably shaped that you can use the saw all day without fear of a blister or cramp. These are high-quality tools designed for long-term use, and it shows.
In short, Craftsmen made these saws to be used by Craftsmen.
Along with the obvious aesthetic and ergonomic considerations, there are other reasons to use these tools:
- Cost. A set of top-quality old saws can be had for less than the cost of a single high-quality blade for a table saw.
- Efficiency. In a small-shop environment where you are not doing production runs, a handsaw will often be finished with a cut before a power saw can be set up to make the same cut. The speed advantage of power tools is often only realized in repetitive operations.
- Noise. No hearing protection is required when using a handsaw.
- Exercise. You can cancel your health club membership if you make a habit out of ripping 8/4 maple! In all seriousness, handsawing is an excellent zero-impact aerobic exercise that requires little strength.
Types of Handsaws
Handsaws come in many shapes and sizes, each designed for a particular set of uses. The list below will detail some of the more commonly encountered types of woodworking saws and their characteristics.
Crosscut saw

These are the saws that most people will have in mind when they think of a hand saw. They are typically 24-26″ in length, and have 7-10 tpi. The teeth on a crosscut saw will always have a negative rake angle, as shown in the following drawing.
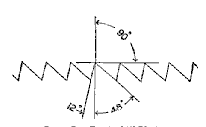
Crosscut saws are used for cutting across the grain of the wood, so they are sharpened so that the sides of the teeth do the cutting. They will typically use a fairly fine set.
Panel Saw
Panel saws are smaller versions of crosscut saws. They range in size from 14-20″, and will usually have more teeth per inch than a normal crosscut saw. Panel saws are also sometimes called box saws, possibly because their smaller size makes them good for making boxes, or perhaps because they can more easily fit in a toolbox.
Panel saws are used for smaller, lighter work, and other tasks for which a larger crosscut saw would not be practical or possible.
Rip Saw
A rip saw is the same basic shape and size as a crosscut saw, but usually have much coarser teeth (4-7 tpi) cut with a zero-degree (or sometimes positive) rake angle, as shown below:
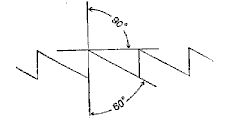
Rip saws are used for cutting with the grain of the wood, so they are sharpened so that the top of the teeth do the cutting. A rip saw cuts very aggressively, but will produce a very ragged cut if used across the grain.
Backsaw

A backsaw is square saw with a rigid piece running along the back of the blade.
The rigid piece provides extra stiffness to the blade (allowing for nice straight cuts), but limits the size of the cut the saw can make (since the back will not fit through the kerf).
Backsaws are usually cut with fine crosscut teeth (10-16 tpi), but you will occasionally find one cut as a fine rip saw (8-10 tpi).
Backsaws are the standard saw for cutting joinery, and come in a wide variety of sizes for different uses. They are also called a bewildering variety of names, as befits their different uses:
- Dovetail saw: A short (8-10″) saw with very fine teeth (14-16 tpi). Used for fine joinery work like cutting dovetails and pins.
- Gents saw: Small, thin saw with a turned handle. Used for general joinery work, and work in tight spaces.
- Carcass saw: A middle-sized saw (10-12″), used for general cabinetry work.
- Tenon saw: A larger saw (12-14″) with coarser (10-12 tpi) teeth, used for rougher joinery work like cutting tenon cheeks.
- Mitre saw: A large backsaw designed to be used in a mitre box. These are usually fairly deep under the back, and are available in quite large sizes (up to 30″ or so).
Coping saw

A coping saw is a U-shaped frame with a very thin blade stretched across it. It is designed for cutting intricate curves and fretwork.
The ease in which the blade can be attached/unattached makes this an ideal saw for working inside closed curves–the small size of blade allows the saw to work from a very small hole.
A coping saw with a very deep throat is commonly called a fret saw. Fret saws are used for larger fretwork and marquetry work.
Compass Saw

A compass saw is designed to cut curves and large holes. It is typically cut with very coarse crosscut teeth and has a pointed blade capable of working a cut starting at a small hole.
Compass saws are designed for rougher work, like cutting floorboards to install plumbing and roughing out curved window openings.
Keyhole saw

A keyhole saw (sometimes called a pad saw) is designed to make cuts starting from a very small hole, such as would be used when making a keyhole. They are equipped with thin, pointed blades, and are capable of fairly fine work.
Choosing a Hand Saw
With the myriad of choices available, what constitutes a good basic set of handsaws? The answer to this question has a lot to do with the operations you plan on doing, but common wisdom usually dictates the following as a good starting point:
Crosscut Saw
A good crosscut saw is the staple of most operations and should find a happy place in any shop. A standard 26″ saw with 8-10 points is an excellent general-purpose saw, and is very readily available on the vintage tool market.
Backsaw
Most woodworkers will have at least one backsaw, and many will have several different saws with various blade and point sizes. For a beginner, a 14-16″, 10-12 point backsaw provides a nice compromise tool–it’s large enough to use with a mitre box, yet small enough to handle the finer joinery chores. These are slightly less common on the vintage tool market, but still plentiful.
Coping saw
Curved cuts are the domain of the coping saw, but these are also invaluable in certain joinery tasks (such as clearing the waste between dovetails). These are fairly delicate tools, so usable vintage versions are tough to come by. You may need to settle for a new coping saw.
Rip saw
If you plan to do any ripping at all, you will want a nice ripsaw. A standard 26″ saw with 5-7 points is a good choice, and is a fairly common saw on the used tool market.
Dovetail saw
An 8-10″ backsaw is very handy for doing fine joinery.
Fret saw
A fret saw allows for much larger work than a standard coping saw, and is very useful for marquetry.
Rip-cut backsaw
Many woodworkers (myself included) like to use a small backsaw filed for ripping to do with-grain joinery cuts like dovetails. These are not commonly available as is, but any reputable saw shop should be able to recut the teeth of a crosscut saw for ripping.
Mitre saw
A larger backsaw is a nice addition and makes using a mitre box much easier.
Buying a Used Hand Saw
Used handsaws are very common items at flea markets and garage sales, and any used tool dealer should be able to provide you with a good basic set of saws at a very reasonable price.
Buying from a reputable antique tool dealer is your safest bet. If you make it clear that you are looking for a user-grade saw, a dealer will be able to provide you with a saw that should require little else but cleaning and sharpening to put to work.
Rescuing a handsaw from a flea market or antique store is a bit more of a dicey business–many of the old saws have flaws which will make them very difficult or impossible to restore to working order.
The prices here will often be much lower than a dealer’s price, though, so the extra effort may be worth it.
When checking out an old saw, be sure to carefully check the following areas:
- Handle
The handle should be sound and in one piece. Small cracks can be OK as long as they are tight and glueable, but you should avoid saws with cracks in the grip portion of the handle. Check the area around the saw nuts carefully, as there are often cracks here.
Many handles will have the “horns” above and/or below the handle chipped or missing. This is nothing to worry about, and will not affect the usability of the saw.
Make sure that the handle feels comfortable in your hand, and is large enough for you to hold it securely. The common grip for a handsaw has the pointer finger extended, so there is often a notch or hole for the finger to rest in. Be sure that your finger fits comfortably in the notch. - Stress cracks
Carefully check the blade for stress cracks at the teeth. These are often hard to detect with the naked eye, but if you apply pressure with a finger behind the teeth, the crack should open up enough for you to see it. If the saw is missing any teeth you should check this very carefully–missing teeth is a good indication of a brittle blade, which would be more susceptible to cracks. - Rust/pitting
Some light surface rust is unavoidable on old saws that have been in storage for years, but you should avoid badly rusted or pitted blades. - Straightness of blade
Carefully sight down both the top and bottom of the blade. The blade should be straight and have no kinks or bends. A kinked blade makes the saw unusable, and it is very difficult (nigh on impossible) to straighten the blade once it gets bent.
Useful Handsaw Jigs
The Bench Hook
Perhaps the simplest and most effective crosscutting jig is the bench hook. It is simply a wide board with a thin strip attached to the bottom front (to hook over the edge of your workbench) and a similar strip attached to the top back (to act as a stop for the piece you are cutting).
Using a bench hook is simplicity itself–you simply hook the bottom lip over the front edge of your bench near the right side, and put the board you wish to cut on top of the bench hook, with the cut line just off the end of your bench.
Using your left hand, you can easily steady the board by pressing it down and back against the top lip of the bench hook, while the right-hand saws.
The Mitre Box
Mitre boxes are another simple and very common jig for crosscutting. A mitre box is used to accurately cut 90 and 45-degree angles in small stock. Commercially available mitre boxes are cheap and readily available in both wood and plastic, or you can make your own relatively simply.
A mitre box is a bench hook with tall front and rear fences that have accurately cut slots for a backsaw to ride in. Commercial mitre boxes will usually have a left and right 45-degree slot, as well as a 90 degree slot. Homemade mitre boxes can be made to cut any angle desired.
You can use a mitre box much as you would a bench hook–hook the bottom of the front fence over the edge of the workbench, hold the stock to cut firmly against the back fence with the left hand, and saw with the right hand. A backsaw is typically used with a mitre box since it is stiffer.
Care must be taken to keep the saw perpendicular to the cut at all times.
Eventually, the slots in the mitre box will become worn from contact with the saw, and the box will no longer be accurate enough for good work. At this point, a new mitre box will have to be bought or made, or a new slot will need to be cut in the existing mitre box.
The Bird’s Mouth
A bird’s mouth is a simple jig used to provide extra support for cutting fretwork on thin stock. Use of this jig prevents chip out and breaking of the thin protrusions common to fretwork and marquetry.
A bird’s mouth consists of a small platform with a deep notch cut in it, supported by a long board held in your workbench’s vise.
To use the bird’s mouth, chuck the long board in your vise so that the platform is high enough for your coping/fret saw to fit underneath it, and level with the workbench.
Set your workpiece on the platform such that the saw cut is right at the point of the notch, and begin your cut.
As the cut progresses, you will need to move your workpiece such that the saw is always positioned as close to the tip of the notch as possible. This provides support for the piece, while still allowing enough room to work the saw.
Shooting Boards
Shooting boards (a.k.a. chute boards) are not really saw jigs (after all, they don’t use saws), but they are very handy things for cleaning up saw cuts.
A shooting board is a jig that uses a plane sliding along a low shelf to trim a board even with the edge of the shelf.
There are many flavors of shooting boards commonly used, but the most useful as far as sawing goes are the end grain shooting boards.
These boards combine the standard idea of a shooting board with a fixed fence to create a jig that can very accurately square or mitre a sawed end.
Perhaps the simplest example of a shooting board is the squaring jig. In this jig, the stop block is set at a 90-degree angle to the plane shelf, as in the drawing below.
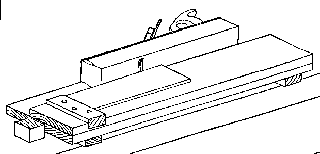
To square a cut end with this jig, the shooting board is attached to the workbench (I’ll normally chuck it between my vise and a bench dog), and the workpiece held against the fence and hanging over the edge of the shelf a tiny bit.
While holding the piece tight to the fence with the left, the right hand can slide a plane along the shelf (always planing towards the fence) to trim the edge.
After several passes, the plane will stop cutting, and the edge can be checked.
If the entire edge has been planed then the board is square, otherwise, nudge the piece slightly over the edge and plane off a little more.
Note that it is very important to always plane towards the fence-this will not only help the board stay in place (since the force is pushing it against the fence), but the fence also provides support for the end of the cut.
If the end of the cut is not supported, the plane will tear off large pieces of wood from the ends.
Another very useful variety of shooting board is the mitre trimmer.
It is very similar to the squaring jig described above, except that the fence is now placed at a 45-degree angle to the shelf, and can be approached from either direction.
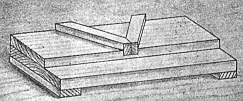
Use of this jig is very similar to the squaring jig, with a twist-half of your cuts should be trimmed from the opposite direction.
The reason for this is simple–if the fence piece used in the mitre trimmer is exactly 90 degrees, then you can get away with the placement of the fence being slightly off 45 degrees by trimming one half of the mitre on the left side of the fence and the other half on the right side.
Any deviation in the alignment of your fence is automatically canceled, and the completed mitre is square and tight.
Saw Vise
A saw vise is a simple jig used to hold a saw steady while sharpening, and dampen some of the noise of filing. Used saw vises are common on the vintage tool market, but it is just as easy to make your own.
The saw vise described here is designed to be held in your bench vise, which will provide the clamping action necessary.
It consists of two long boards hinged at the bottom, with a softwood lip on each. The boards should be about as long as the blade of your longest saw, and the depth should be at least 6″ to accommodate large saws.
Another nice addition to this vise is to contact cement a piece of inner tube to the inside of the lips to provide extra vibration dampening.
To use the saw vise, place the saw to be sharpened between the jaws of the vise, with the cutting edge projecting beyond the edge about 1″ all along the length. The saw is then fixed in place by a couple of well-placed C-Clamps, and the entire assembly is clamped in the bench vise.
After one side of the teeth have been filed, the entire assembly can be turned around to get at the other side (no need to unclamp the saw).
Hand Saw Terms Glossary
“Breasted” Saw
A saw which has the cutting edge filed to a slight convex curve. This is sometimes done on both crosscut and rip saws, and is said to improve the power of the cut at the beginning and end of the stroke.
Coping
The cutting of intricate curves, like those used in fretwork and marquetry. Also the cutting of the end of a piece of molding to simulate a mitre with a butt joint. Crosscut To cut across the grain of the wood.
Dressing
A process sometimes used after sharpening, in which a fine file or sharpening stone is run along the side of the teeth to ensure that all teeth are evenly set.
Jointing
The first step in sharpening a saw, in which all teeth are filed to the same height.
Kerf
The space left by the cut of a saw, which is determined by the thickness of the saw blade and the amount of set used.
Nib
A small bump often found on the back of a saw’s tip. Debate rages about the actual reason for the nib’s existence, with the following commonly offered as explanations:
– Purely decorative
– Used to hold an edge guard in place
– Used for testing the temper of the steel
– Used for starting cuts

While I refuse to take sides in this battle, honesty requires that I point out that in the 1919 Disston catalog it states: “The “Nib” near the end of the handsaw has no practical use whatever, it merely serves to break the straight line of the back of the blade and is an ornamentation only.“
Peg Tooth
A style of tooth cutting in which the saw’s teeth have the same angle on the front and back edge, i.e. they are little equilateral triangles.
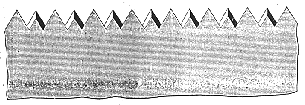
Points
The size of the teeth on a saw is typically reported as the saw’s “points”. The point number is determined by counting the number of teeth per inch and adding one. For instance, a saw with 10 teeth per inch would be called an 11-point saw.
Rake Angle
The angle of the front of a tooth, measured as a deviation from vertical. A positive rake angle means that the front of the tooth points in the same direction of the cut, while a negative rake angle means the front points away from the direction of the cut.
Rip
To cut in the same direction as the grain of the wood.
Set
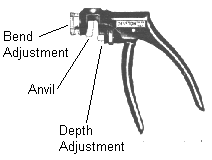
The amount of bend in each tooth. The amount of set in a saw determines the width of the kerf and the quality of the finished cut. A small amount of set will usually result in a smoother cut but may cause the saw to bind in the kerf. A larger set will cut more aggressively, but will generally leave a much rougher surface.

Diagram showing the “Set” of a saw’s teeth.
Also, the tool used to bend the teeth of a saw after sharpening, or the process of bending the teeth.
Skew-back
A saw which has the back of the blade cut in a concave curve. This makes the saw slightly lighter (but more susceptible to kinking) and is preferred by some craftsmen.
Taper-Grinding
A process used on some high-quality saws which makes the blade thicker at the cutting edge than at the back. A taper ground saw requires no set, so it will leave a very smooth cut. This is commonly used on backsaws but is occasionally found on larger saws as well.
Handle
The wooden part of the saw. It comes in two basic varieties: open (the bottom of the handle is not attached at the front) and closed (handle is attached to the front at the top and bottom).
TPI (Teeth Per Inch)
The number of teeth per inch of a saw blade.

I found a few old saws in a tool box that was passed on to me. Where should I go to find their value as I would like to sell them along with some other tools that I found in the chest. Thanks
I like to work with a cordless hand saw. It can be very easy to carry any place at any time. I need some toolbox for adjusting it. What type is well for that?