This list will help you to accumulate all the necessary tools to start a home finishing project.
Dropcloths
Cloth is best inside the house. Paint won’t “pop off” after it dries, creating a potential mess.
Plastic is fine for protecting shrubs, furniture that can’t be moved easily, walls, buffets, fireplaces, etc.
Newspapers combined with masking tape cover mopboards, molding and other trim areas, and prevent splashing.
Paint Scrapers, Wire Brushes, Putty Knives and Sandpaper
To chip, scrape and sand loose, flaky paint away, feather blisters, sand away marks and dirt, and generally make ready for painting.
Pails, Scrub Brushes, Sponges, and Degreasers
To wash down walls inside and outside.
Tri-sodium phosphate is an excellent cleaning aid.
In cases of severe peeling or blistering and heavy soil on outside walls, a power washer, rented from your paint store, may be necessary.
Caulking Gun and Compound
To seal cracks around doors and windows and where boards come together.
A butyl caulking compound will stay flexible in all kinds of weather and is easily applied.
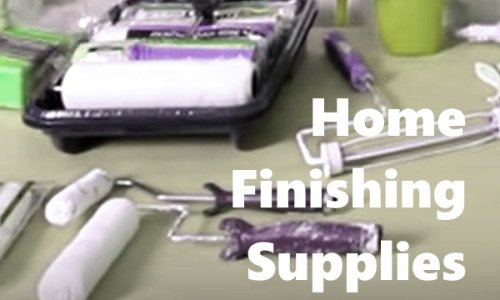
Brushes, Rollers and Other Applicators
Top quality brushes are an excellent investment. Proper care will assure years of service.
Natural bristles are best with oil-based paints.
Synthetic bristles are best with acrylic paints as natural bristles absorb water, become uncomfortable to handle and don’t spread acrylics properly.
A four inch brush is right for cabinets, baseboards, and for people with smaller hands.
A two-inch brush is better suited for wood trim, while a one-inch brush is a must for hard to get at places, such as window sashes.
Straight cut or angled bristles are a matter of personal taste.
For superior results, long bristle brushes are better than short.
The longer bristles hold more smoother paint strokes, for a nicer finish.
The bristles should spring back easily when bent, and be sure to check the space in the middle of the brush.
Cheap brushes have more “air” there.
After painting with latex, always clean the brushes thoroughly in warm soapy water.
Smooth out the bristles and wrap in newspapers or replace in a brush cover.
There are many non-bristle applicators on the market, the most notable being the paint roller.
Here, too, natural covers are recommended for oil-based paints, while synthetic rollers work best with latex paints.
A roller applicator is great for painting ceilings and walls.
Screw in a long handle and the ceiling is easily painted while standing on the floor.
Rollers tend to throw paint if you stroke too quickly, so it’s wise to take extra care in placing your dropcloths.
Other applicator choices might include pads or sponge brushes.
These items are useful both indoors and out, and are a matter of personal preference.
Your basic brushes are still excellent tools if your budget doesn’t allow for the other.
A Note on Cleaning Brushes
Brushes used with oil paints should be dipped in a small quantity of thinner into a large coffee can.
Repeat this process until your brush is clean.
Save the thinner, and when the paint settles to the bottom (this will take several weeks) you can pour off the thinner into a container and dispose of the can full of sediment.
This is a good way to get double use out of increasingly expensive thinner.
Equipment used with latex paint is washed in warm, soapy water until the water in the brush runs clear.
