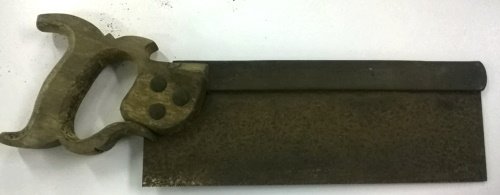
A saw from the flea market will typically be a rusty affair, with years of caked-on grime from improper storage.
In this condition, the saw is not only aesthetically undesirable, but it also is not fit for work.
If you were to attempt to use this saw, it would likely cut slowly and raggedly, and leave the ends of your boards smeared with rust and grime.
A saw like this needs two things to make it usable again–a good cleaning and a sharpening.
Determine Your Cleaning Procedure
The first step in cleaning a saw is to determine what procedure will be used to clean the blade.
If you are going to be doing electrolysis on the blade, you will need to remove the handle, otherwise, you’ll probably want to leave the handle in place.
Disassembling the Saw
Removing the handle can be risky business on an old saw– it will occasionally be very difficult to get the saw back together.
If you need to remove the handle, the first step is to remove the saw nuts. There are typically three to five brass nuts holding the handle to the blade, each with a slotted head on one side.
These come apart as expected, but be careful to use a tight-fitting screwdriver–the brass on these is pretty soft and strips easily.
Certain saws (particularly English makers) will use what is called a “split” nut, where the slotted head of the screw is bisected by the protruding bolt.
Removing these requires a special screwdriver with a slot in the blade. While I am sure these kinds of screwdrivers exist, I’ve never seen one–I use a cheapo hardware store screwdriver with a notch filed in it.
Once the saw nuts are removed, the handle should slide off the blade. Sometimes a good bit of force is needed to break the bond (particularly on a dirty/rusty saw), but it will usually slide off fairly easily.
At this point, each of the components is ready to be cleaned.
Cleaning the Saw Nuts
The saw nuts are the simplest thing to clean.
A nice bath in mineral spirits will remove any gunk and oil on the nuts, to be followed by a quick rubdown of brass cleaner to remove any corrosion.
The large saw nut can usually benefit by a good scrubbing with a soft toothbrush to clean the gook out of the logo, but be careful not to overdo it–it’s not necessary to make the nuts shine, you just need to get them clean.
Excessive scrubbing may damage the fine details of the insignia engraved on the saw nut.
If you are cleaning the nuts while still attached to the handle, you will need to take be extra careful with the brass cleaner.
Brass cleaner is fairly corrosive and may eat the finish on the handle.
Cleaning the Handle
The handle is also a fairly simple thing to clean up.
Again, the aim here is to remove dirt and oil, not to make the handle look new, so some care is in order. Over-aggressive cleaning can ruin the original finish.
I will usually start cleaning with a wipe with mineral spirits. This will remove any oily residue and loosen the caked-on dirt.
A good rub with a damp washcloth (perhaps with a few drops of Murphy’s Soap) will remove the rest of the grime.
On particularly bad handles or handles that have paint spots on them, you may need to use 0000 steel wool to remove the worst spots.
Once the handle is clean, a couple of coats of carnauba or beeswax can be applied to the handle for extra protection, or it can be left as-is.
Cleaning the Blade
Now we come to the interesting part of the cleaning problem–the saw blade.
There are several considerations in cleaning a saw blade. One needs to remove the rust carefully, lest the etched markings on the blade are permanently lost.
It is also important to keep the blade as smooth as possible so it cuts more cleanly. Over-aggressive rust removal techniques can destroy a saw, so it is best to move slowly.
Removing the rust is the first step in restoring the blade, but as mentioned above it is important to not be too aggressive.
Once the etchings on the blade are gone, there is no recovering them.
Penetrating Oil
I like to start with a good bath in penetrating oil. Soak both sides of the blade with good penetrating oil, and wrap it loosely in a towel. Let it soak for a few hours, and then wipe the loose rust off.
Four or five applications of this sort will usually remove even the deepest rust.
A followup of polishing compound may or not be necessary at this point (I don’t usually do this).
If you do need/want to polish the blade, use only extra-fine compounds applied with a cheesecloth, and always work in strokes along the blade.
Electrolysis
Another more complicated but more effective method of rust removal is electrolysis.
This is a commonly used technique in the restoration business which uses an electrochemical reaction to remove the rust from a tool while leaving the unrusted metal intact.
Be aware, however, that there are some potential drawbacks to electrolytic rust removal:
- The electrolysis process is unkind to brass. If you have (or suspect you may have) a brass-backed saw, do not use electrolysis.
- If your saw has an etched logo, this process may remove the etching. (I have actually heard conflicting reports about this, but better to err on the safe side).
To use this method, you will need the following equipment:
- A plastic tub (A wallpapering tub works well for saw blades)
- A 12V automobile battery charger
- A long, thin strip of iron or steel (used as an electrode).
- Washing soda (found in the laundry detergent aisle of the supermarket)
To set this up, fill the tub with a warm water/Washing soda solution (about 1 tablespoon of soda per gallon of water), and immerse the iron strip and saw blade in the solution.
Connect the positive terminal (red) of the unplugged battery charger to the iron bar, and the negative terminal (black) to the saw blade.
Arrange the objects in the tub so they are in close proximity, but NOT touching.
The more of the iron that is close to the saw blade, the faster will be the removal, so you may want to bend the electrode into a U-shape which surrounds the blade.
WARNING! It is very important that you get the polarity right on the two pieces. If these are connected improperly the saw will be the electrode, and it will be slowly dissolved into the solution. The rust will be gone, but so will the saw!
After you are satisfied with the arrangement and are certain of good electrical contact on both the electrode and the blade, plug the charger in.
After a moment, you will see tiny bubbles rising from the blade, which indicate that the process is going. At this point, all you need to do is wait.
After several hours, the saw will look completely black. Disconnect the power from the charger and remove the blade from the tub.
The black residue can be removed with a plastic pot-scrubber (like you would use on Teflon pans) or a rough cloth, leaving a very nice metal surface.
Depending on the amount of rust removed, you may need to repeat the process one or more times–simply make a new solution and start from scratch.
How to Remove Rust from a Handsaw Blade
Rust is an iron oxide that forms on metal surfaces when exposed to oxygen in air. It can cause serious damage to woodworking tools. Here’s how to remove rust from your saw blades.
Clean the Blade with Soap and Water
If you notice rust forming on your saw blades, first clean them off with soap and water. Then use a wire brush to scrub away any remaining rust. Finally, rinse the blades thoroughly under running water.
For Extremely Rusty Blades, Use a Rust Remover.
There are many options for rust removers. Simple acid based options like vinegar, petroleum-based options like WD40, or my preference, evaporative rust remover, such as Evaporust.
Apply according to the directions.
Apply an Oil Based Degreaser.
An oil based degreaser will help prevent rust from forming again. You can apply it directly to the blade using a rag or spray bottle. It should be applied sparingly so as not to cause the blade to become slippery.
Rinse the Blade with Distilled Water.
After cleaning the blade, rinse it thoroughly with distilled water. This will help remove any residue left behind by the degreasing solution.
Dry the Blade with Paper Towels.
Once the blade has been cleaned, dry it with paper towels. This will prevent moisture from building up inside the blade and causing rust to form.
Reassemble the Blade.
After cleaning the blade, reassemble it by placing the handle back onto the blade.
Make sure the blade is tight against the handle so there aren’t any gaps between them. If there are any gaps, use some wood glue to fill them in.
Hand Saw Restoration Videos
Here are a couple of videos on restoring an old hand saw which may be helpful and offer other techniques.
Conclusion
Regardless of how the rust is removed, it is very important that a protective coating is added to prevent new rust from forming.
A thin coat of penetrating oil or wax works well, as do the commercially available rust inhibitors like DriCote.
At this point the cleaning is complete, and you can re-assemble the pieces. Slide the handle back onto the blade, and fasten it tightly with the saw nuts.
Be sure to get the saw nuts (particularly the large nut) back into the same holes they were removed from, and tighten them snugly.
Do not overtighten the nuts, as this can cause the handle to crack.
After everything is re-assembled and snugged up, you can move on to the fun part–hand saw sharpening!