There’s no reason why you have to live with lamps that don’t work properly, and it may be dangerous too.
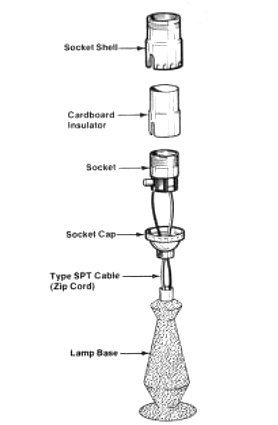
Parts of a Lamp
The plug, cord, and socket, the parts that are probably causing the lamp to malfunction, are easy and inexpensive to replace.
You can get them at any well-stocked hardware store, and certainly at any store that specializes in electrical parts.
Why, for example, should you put up with a plug that’s misshapen or broken, or that doesn’t make a good electrical connection in the outlet?
With a quick-clamp plug, the kind that eliminates the need for fastening wires under terminal screws, you can have a new one on in seconds.
Lamp Rewiring Video
If you’d prefer to watch a lamp rewiring video, rather than read an article, here is a helpful one:
Replacing The Lamp Socket
You can install a new socket almost as easily. Replacement sockets come in various finishes brass or nickel metal, and black or brown plastic.
So you should be able to find a socket that approximates the color tone of the existing socket.
And if you plan to replace a socket, why not put in a three-way socket for greater lighting versatility?
Wiring a three-way socket is as simple as wiring the standard on/off version,
Rewiring The Lamp Cord
Lamp cord is known as Type SPT, but if you ask for zip cord at a hardware or electrical supply store, you’ll get what you need.
The #18 size is satisfactory for most lamp applications.
Zip cord is available in many colors, the most common being black, brown, white, and transparent.
Match the cord color to the lamp, and order a sufficient length for your needs.
The customary length is six feet, but you can use as much cord as you need to reach from the lamp to the outlet, add the length of the cord hidden in the lamp, plus one foot for attachments to socket and plug, and for some slack.
In terms of safety and appearance, it’s better to have an adequate length of cord than to compensate for a short one with an extension cord: but keep all cords as short as possible.
Preparing to Rewire The Lamp
To rewire a lamp, first pull the plug out; never do any work while the lamp is connected.
Disassemble the Lamp
Remove the shade, unscrew the bulb, and squeeze the socket shell at the switch to separate the shell and the cardboard insulator from the socket cap.
Do not use a screwdriver to pry the socket apart if you plan to reuse the socket.
Pull the socket out of the shell as far as the attached wire permits.
If this doesn’t give you enough wire to work with, push some of the cord up from the bottom of the lamp for additional slack.
Removing the Cord
Loosen the socket’s terminal screws, and remove the cord wires from under them.
If the lamp is a small one and the cord goes through in a fairly straight path you should be able to slide the old wire out and easily feed the new wire through from one end or the other.
But if the lamp is large and the cord twists inside it, your job can be more difficult.
If the old cord offers any resistance at all, don’t tug on it check to see if you can disassemble the lamp to make removal easier.
Also check to see if the cord is tied in a knot to keep it from being pulled out at its base.
To remove a tight cord, cut the wire off about 12 inches from the lamp’s base.
Split the cord’s two conductors apart, and strip about an inch of insulation of the ends, do the same to one end of the new length of cord.
Attaching the New Cord
Twist the bare new and old conductor ends together and told the twists flat along the cord.
Then wrap plastic electricians’ tape around the splice in as small a lump as you can with the wrapping smooth and tapered so that it won’t catch on anything.
Pull on the old cord from the top of the fixture and work the new card through push on the new cord from the bottom at the same time to aid the process.
When you have a sufficient length of new cord through at the top, clip the old cord off.
Once you pass the new cord through the lamp. split the end so that you have about three inches of separated conductors.
Strip about 3/4 inch of insulation from the end of each conductor and twist the strands of each together.
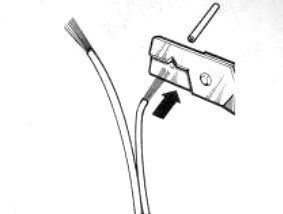
Be very careful not to nick the strands when you strip the insulation–a distinct possibility if you use a knife or electricians diagonal cutters for the job.
Instead, use a wire stripper with the correct size of cutting slots. This tool is designed to remove insulation without damaging the wire.
Bend the twisted end of each wire into a clockwise loop, and place each loop under a terminal screw on the socket, with the loop curled clockwise around the screw.
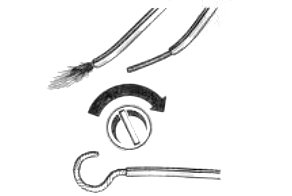
Then tighten the screws.
As each screw is tightened, the clockwise loop will pull the wire tighter under the screw head.
A counterclockwise loop would tend to loosen the wire.
When both screw heads are snugged firmly over the bare conductor ends, clip off any excess bare wire with your diagonal cutters.
It is important that all the uninsulated wire be under the screw heads, with no loose strands or exposed bare wire.
If the bare wire is visible beyond the screw heads unscrew the terminals, remove the wires, and make the connection again.
Now slide the socket shell over the cardboard insulator, and slip shell and insulator over the socket.
Then snap the shell and socket into the cap.
That’s all there is to it at the socket end of the lamp.
Adding A Plug to Your Rewired Lamp
A new cord, of course, requires a new plug.
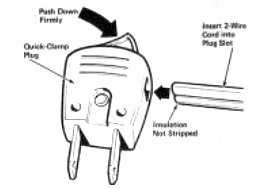
The Quick-Clamp Plug
A quick-clamp plug is the easiest kind to connect; you merely stick the end of the cord into a slot on the side of the plug and push down on the lever at the top.
Metal prongs inside the plug will bite through the cord’s insulation, piercing the copper wires to make the electrical connection.
The Screw-Type Plug
If you use a screw-type plug, however, you must prepare the wire ends just as you did when making the socket screw connections.
Loop each wire around a prong of the plug before tightening the bare end under the screw head.
The loops keep the wires apart and also make it more difficult to loosen the connections by pulling on the cord.
Of course, you should never disconnect a lamp or any other electrical device-by yanking the cord out of the wall socket, but the loops will give some strain support if the card is jerked.
Tighten the wires under the screw heads, and clip off any excess uninsulated conductor before you plug in the lamp.
Another Video on Rewiring a Lamp
In case you still need help with your lamp, here’s another helpful video: