A doorbell or chime that doesn’t work is useless, but it can usually be easily fixed.
Check the Doorbell Button
The button that rings the ball or starts the chimes is often the source of trouble.
Unscrew the cover plate over the button and remove it.
Gently pull the button out as far as the wires allow and loosen the two terminal screws on the back of the button.
Disconnect the two wires and touch the ends of the wires together.
If the doorbell rings, you’ve located the problem.
You simply need a new button.
Replace the old button with a new one, connecting the wires exactly as they were before.
Replace the cover plate over the button.
Check the Bell/Chime Box
If the doorbell doesn’t ring when you touch the bare terminal wires together, check the box that contains the bell or chimes inside the house.
The Bell Box
Remove the cover from the box, pulling it gently off the bell housing.
At this point, to test the box, you’ll need some help
The box of a standard bell or buzzer has two wires connected to screw terminals.
Loosen the terminal screws and disconnect the wires.
Use a 12-volt circuit tester to check the wires, touch the two probes of the tester to the wires in the bell box and have someone push the doorbell button.
If the bulb of the circuit tester lights, you need a new bell box.
Take the old bell box with you when you buy the new one, and buy a model that requires the same voltage as the old one.
It’s safe to install the box without turning the power off.
Following the manufacturer’s instructions, connect the new box exactly the same way the old one was connected.
Replace the cover over the box.
The Chime Box
The box of a chime assembly is more complicated, but it works on the same principle.
Usually, there are three wires connected to three terminal screws.
One for the front door chime, one for the back door bell or buzzer, and one for the transformer that supplies the power.
Tag the wires with masking tape, marked 1, 2, and T for the front door, back door, and transformer terminals.
Then loosen the terminal screws and disconnect all three wires.
To test the chime box, touch the “2” and “T” wires of the box to the probes of a 12-volt circuit tester, and have an assistant push the doorbell button.
If the bulb of the circuit tester lights, the chime box must be replaced.
Buy a new box that requires the same voltage as the old one and connect it exactly the way the old one was connected.
Follow the manufacturer’s instructions.
Check the Transformer
If the bulb of the circuit tester doesn’t light at the bell or chime box, check the transformer that supplies power to the system.
The transformer is located on a junction box or panel near the main power source, usually at the main entrance panel
Locate the transformer, and make sure that what you’re working on is the transformer.
The wires from the bell or chime box are connected to terminal screws on the outside of the transformer.
Caution: The wires inside the junction box that the transformer is mounted on are connected to the main power lines: don’t touch them!
Test only the terminal screws on the outside of the transformer.
Rule Out the Bell’s Wiring System
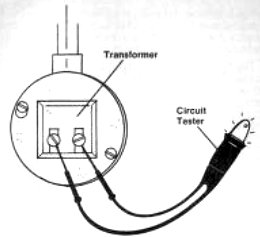
Touch only the outside terminal screws of the transformer with the probes of the tester.
If the bulb lights, the problem is not in the transformer. It is somewhere in the bell’s wining system
Touch the outside terminal screws of the transformer with the two probes of the 12-volt circuit tester.
If the bulb in the 12-volt circuit tester lights, the problem is not in the transformer, it’s somewhere in the bell’s wiring system.
In this case, call an electrician.
Check the Transformer Power Supply
If the bulb doesn’t light, the problem is in the transformer.
Either the transformer itself is defective or the power supply to the transformer is defective.
The next step is to test the transformer.
Caution: The transformer is connected to the main power system. Before working on the transformer, trip the circuit breaker or remove the fuse that supplies power to the transformer.
If there’s no indication which circuit or fuse this is turn off all the power.
With the power off, disconnect the wires from the junction box or panel to the transformer.
Use a lamp socket to test the circuit that supplies power to the transformer.
Attach the wires from the junction box to the screw terminals under the lamp socket and screw a light bulb into the socket.
If the screw terminals are exposed, cover them with a piece of electrical tape for safety.
Turn on the circuit breaker or replace the fuse that powers the transformer.
If the bulb in the socket doesn’t light, the circuit is not delivering power to the transformer.
In this case, call an electrician
Replacing the Transformer
If the bulb in the socket lights when you turn the power on, the transformer is defective, and must be replaced.
Caution: Before removing the transformer, trip the circuit breaker or remove the fuse that supplies power to the transformer, or turn off all the power.
Buy a replacement transformer of exactly the same capacity.
Install it the way the old transformer was installed, following the manufacturer’s instructions.
Caution: Be sure the power is off before you install the new transformer.
Finally, connect the wires from the bell box to the outside terminal screws of the new transformer and turn the power on.