Would you be surprised to know that there are over a hundred different types of woodworking joints?
Of course, there are many that are similar, but each is used to join two pieces of wood together in a special way.
All joints in woodworking are made first by making a layout, then by cutting, fitting, and assembling.
To do these things well, you must learn to use all of the common hand tools.
You will not usually use more than one or two kinds of joints on any one project, but these ought to be chosen wisely, for each has a particular purpose.
Making a Dowel Joint by Hand
A dowel joint on a leg and rail is sometimes used as a substitute for a mortise-and-tendon joint.
Dowels are also used to make an edge, butt, or miter joint, to strengthen the joining pieces.
Dowel Rods
Dowel rod which is used for this joint is made of birch or maple and can be purchased in diameters of from 1/8 to 1 inch, and in 3-foot lengths with either plain or grooved surface.
Dowel rods are not only used for making joints but also to form parts of many modern pieces of furniture or projects which specify a small circular pieces of ornamentation.
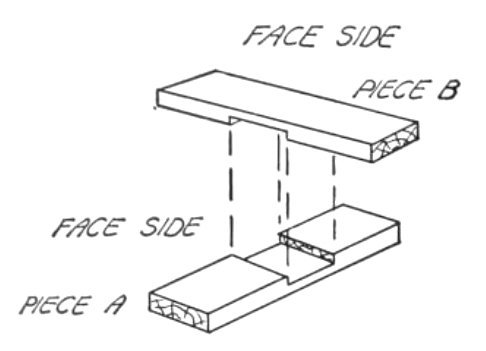
Making an Edge Down Joint
To make this joint, clamp the two pieces to be joined with the edges flush and with the face surfaces out.
With a try square mark across the edge of both pieces at the several points at which the dowels are to be located.
Next set a marking gauge to half the thickness of the stock and mark the center location of the dowel joints.
Make sure that you mark these from the face side.
Select the size dowel you plan to use and the depth to which the dowel is to be inserted.
The diameter of the dowel should never be more than half the thickness of the stock being used.
Usually the dowel should be no longer than 3 inches, and therefore the holes will be drilled about 1 & 5/8 inch deep, providing about 1/8 inch clearance at the bottom on each side.
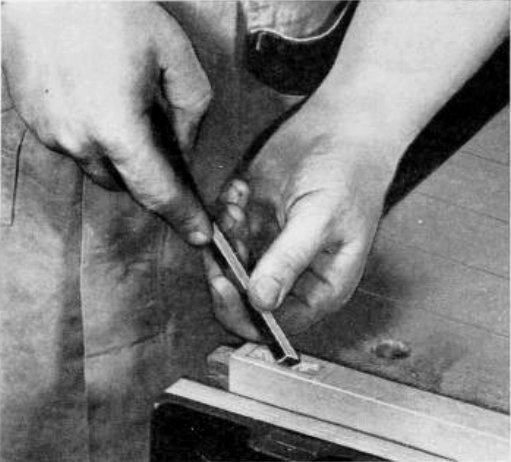
After the points have been located, make a small indentation with a scratch awl.
Select an auger bit the same size as the dowel rod.
Carefully bore the hole to the proper depth, making sure that you are working square with the edge of the stock.
Use a depth gauge as a guide.
A doweling jig should be used if one is available.
With it you will always be able to bore the holes square and in the proper location.
After the holes are bored, cut off the dowel and cut a slight bevel at either end to make the dowel pieces slip into the holes easily.
When gluing, dip the dowels about halfway in glue and drive them into the holes on one edge.
Then coat the other half and other edges and assemble.
Making a Dowel Joint on a Frame
One way to strengthen a butt joint on a simple frame is to install two or more dowels at each corner.
Do this in the following manner:
- Square up pieces of stock that are to go into the frame and carefully saw and sand the ends.
- Lay out the frame and mark the corners with corresponding numbers.
- In a vise, place the two pieces that are to form one of the corners with the butting end and the butting edge protruding, and with the face surfaces of the two pieces out, and the end and edge flush.
- Hold a try square against one of the face surfaces and mark lines across to indicate the location of the dowel rods.
- Set a marking gauge to half the thickness of the stock, hold it against the surface of each piece, and mark the exact location. Mark these points with a scratch awl and bore the holes as described above.
Making a Dowel Joint on a Leg and Rail
Frequently a dowel joint is made on a leg and rail as a substitute for a mortise-and-tenon joint because it is more easily and quickly made.
Square up the leg and rail as for any joint, making sure that the end of the rail is square.
Next clamp the leg and rail in a vise with the butting end and the butting edge protruding and the face surface of each turned out.
Hold a try square against the face surface of the rail and mark the location of the dowels on the end of the rail and the edge of the leg.
Next set a marking gauge to half the thickness of the rail and, from the face surface of the rail, mark the cross-line that will indicate the location of the dowel joints.
Then determine how far you want the rail to set back from the face surface of the leg.
Add this amount to the setting you already have on the marking gauge.
From the face surface of the leg, mark the cross-line that will indicate the exact location of the dowel.
Bore the holes, cut the dowels, glue, and assemble as previous described.
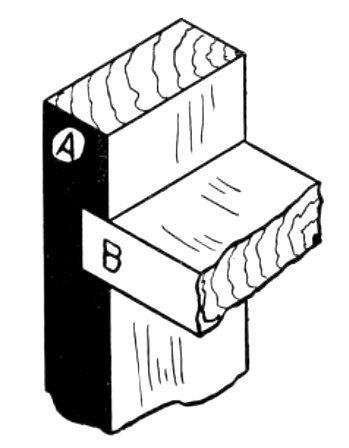
Making a Rabbet Joint by Hand
One of the simplest joints to make is the rabbet joint.
In making this joint, a recess is cut across the grain at the end of one piece in to which the end of the second piece fits.
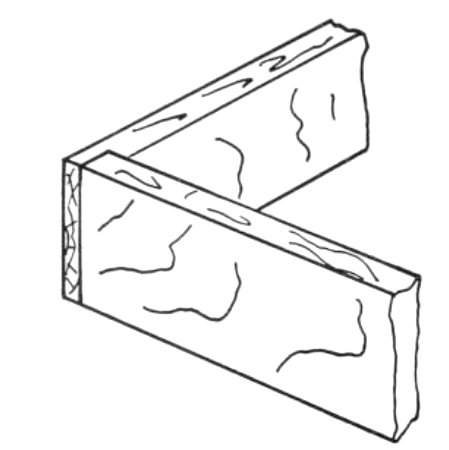
It is made with the end grain concealed from the front.
This type of joint is commonly found in drawer construction, boxes, cabinet frames, and in many types of modern furniture, since it provides great simplicity in both construction and appearance.
Laying Out a Rabbet Joint
Make sure that the end on which the joint is to be made has been squared properly.
Place the board into which the rabbet is to be cut on the bench with the face surface down.

Hold the other piece directly over the first, with the face surface of the second piece flush with the end grain of the fisrt.
This is called superimposing.
You will frequently use this method in laying out many of the different kinds of joints.
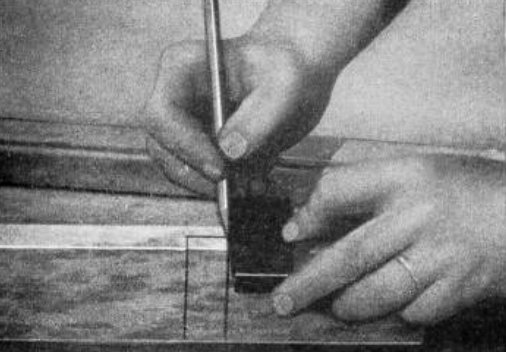
With a sharp pencil or knife, mark the width of rabbet to be cut.
Then remove the second piece and with a try square held on the joint edge, square the line across the surface of the first piece.
Then mark a line down each edge.
From the face surface, mark the depth of the rabbet on the sides and end with a marking gauge.
This type of joint is usually cut half to two thirds the thickness of the stock.
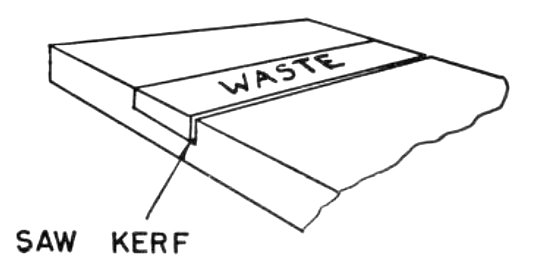
Cutting the Rabbet
In cutting the rabbet joint, the piece should be held firmly against a bench hook or, for a beginner, it is better to clamp the stock directly to the bench top.
Using a back saw to make the cut, make sure that the saw kerf is in the waste stock or inside the layout line.
It is wise for a beginner to take a piece of scrap stock that has a true surface and edge and clamp this directly over the layout line.
Then the back-saw can be held against this edge to make the saw cut.
Cut the joint to the proper depth as indicated by the layout line.
To remove the excess stock from the joint, you can either saw out the remaining stock or pare it out with a chisel.
Regardless of which method you follow, you will need to use the chisel for trimming the joint and making it fit properly.
It is a good idea to mark this joint on both edge with the corresponding numbers, so that, if there are several to be made, they can be easily identified when the project is ready for assembly.
Assembling the Joint
This type of joint will usually be assembled with glue or with both glue and nails or screws.
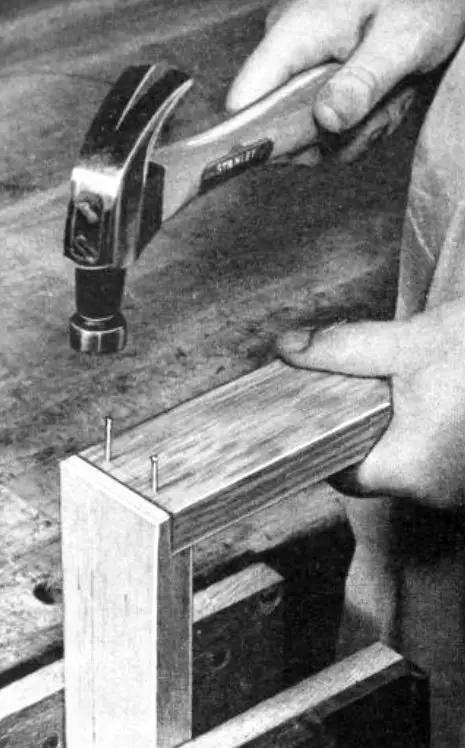
If the joint is nailed, drive the nails in at a slight angle to enable them to fasten the joint more tightly.
Screws should be long and thin, as they will have to go through end grain.
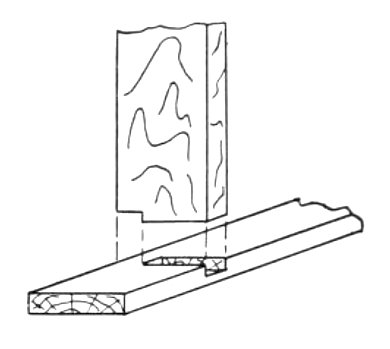
Making a Dado Joint
A dado is a groove cut across the grain of wood.
This type of joint is commonly found in book racks, drawers, cabinet shelves, and things like ladders and steps.
Laying Out a Dado Joint
From the end of the board measure in the correct distance to one side of the dado.
Then square off a line across the surface of the piece at this point.
Superimpose the other piece with one edge directly over this line and, with a sharp knife or pencil, mark the correct width of the dado.
Remove the second piece and square off a line across the surface to indicate the proper width.
Continue both lines down both edges.
Then, with a marking gauge, lay out the correct depth of the dado joint.
Cutting a Dado Joint
Use a back-saw and cut the dado to the proper depth at both layout lines.
Make sure that the saw kerfs are in the waste stock and not outside the layout line.
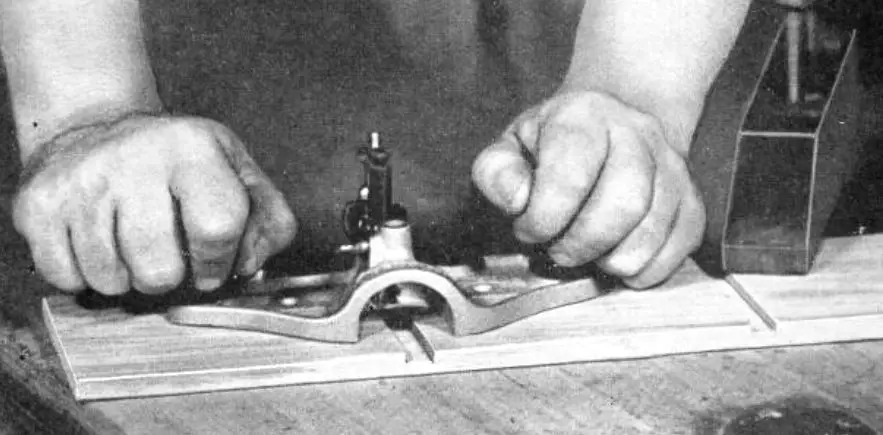
With a chisel, cut and trim the dado to the proper depth.
If one is available, a router plane may be used to trim out the waste stock.
If the dado is a particularly wide one, you may need to make several saw cuts to depth so that the waste stock can be easily trimmed out to make it fit the joint.
Assembling the Dado Joint
The dado joint is usually assembled either with glue or with glue and nails or screws, in the same manner as the rabbet joint.
Making a Rabbet-and-Dado Joint by Hand
A rabbet-and-dado joint is frequently used when additional strength and rigidity are needed as in cased involving drawer construction.
The joint consists of a rabbet, the tongue of which is fitted into a dado.
To make this kind of joint, lay out and cut the rabbet first.
Then lay out the position of the dado joint and, by superimposing the tongue of the rabbet, mark the width of the dado.
Make the dado as previously described and fit the tongue of the rabbet into it.
Making a Blind Dado Joint by Hand
A blind dado joint is one in which the dado is cut only part way across the board.
The piece that fits into the dado is notched so that the joint appears invisible when viewed from the front.
Lay out the width of the dado as described previously.
Mark the depth of the dado on the back edge only.
Also lay out the length of the dado from the back edge to within 1/2 to 3/4 inches of the front edge.
The dado can be cut by boring a series of holes in the waste stock and then trimming it out with a chisel.
Making a Lap Joint by Hand
There are many different types of lap joints.
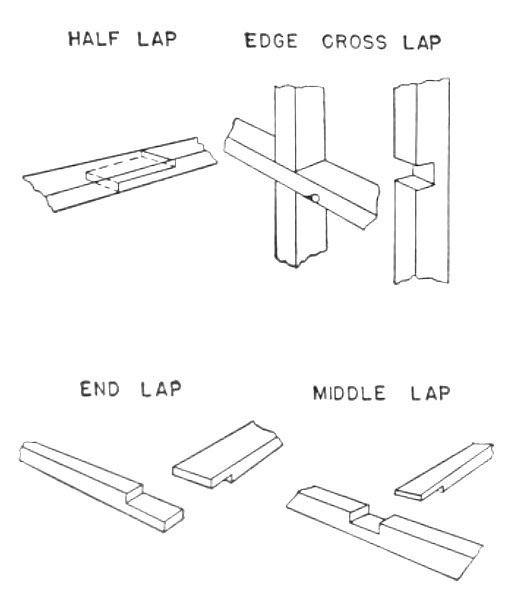
The end lap is found in screen doors, chair seats, or any type of corner construction in which the surfaces of the two pieces, when assembled, must be flush.
The middle lap is also found in screen door construction, in making cabinets, and in framing a house.
The cross lap is widely used in furniture building whenever two pieces must cross and still be flush on the surface.
The cross lap is by far the most common and therefore will be emphasized.
If you need to make any of the other types, follow the same general directions and apply it to the particular way each is made.
Laying Out a Cross-Lap Joint
The cross-lap joint is usually made in the exact center of the two pieces that cross as a 90-degree angle.
The two pieces must be exactly the same thickness and width.
Lay the two pieces on the bench side by side, with the face surface of one, piece A, and the opposite surface of the other, piece B, upward.
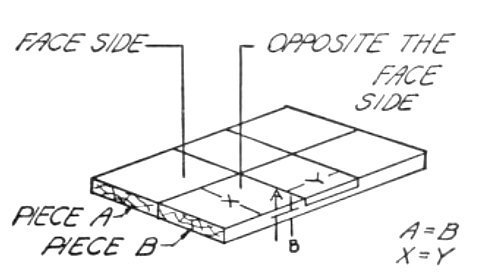
Divide the length of each into two equal parts and lay out center line across the two pieces.
Measure the width of the stock being used and divide this measurement in half.
Lay out a line this distance on either side of this center line.
Now check this measurement by superimposing piece B over piece A at right angles and in the position that the joint will be when assembled.
The layout line should be just barely visible beyond the edge of each piece
Now continue the lines that indicate the width of the joint down the edge of each piece.
Next, set a marking gauge to half the thickness of the stock and from the face surface of each pieces mark along the edge on each side to indicate the depth of the joint.
If you make this measurement from the face surface, the two pieces will be flush when the joint is made because you will be cutting the joint from the face surface of one piece and the opposite surface of the other piece.
Cutting the Lap Joint
Hold the piece in a bench hook or clamp it to the top of the bench and cut with a back-saw to the depth of the joint just inside each of the layout lines, as you do to make a dado joint.
If the joint is wide, it is wise to make several cuts in the waste stock.
This will help remove the waste and will also serve as a guide when you chisel out the waste stock.
Next, use a chisel to remove the waste stock.
Work from both sides of each piece, tapering up toward the center.
If you try to chisel out across the stock from only one side, you may chip out the opposite side.
After you have brought the joint down to the layout line on either edge, continue to pare the high point in the center of the joint.
Complete this on both pieces. Then try to fit them together.
The pieces should fit snugly but should not be so loose that they will fall apart or so tight that they must be forced together.
If the two piece will not slip together, it is better to plane a little from the edge of one piece rather than to try to trim the shoulder.
Assembling the Lap Joint
When assembled, the surfaces of both pieces should fit flush with one another.
In assembling this joint, both glue and nails or screws are used.

If the nails or screws are installed from the underside, they will not be visible and the joint will be very neat.
Making a Miter Joint by Hand
A miter joint is made when it is undesirable to have the end grain showing on the finished product.
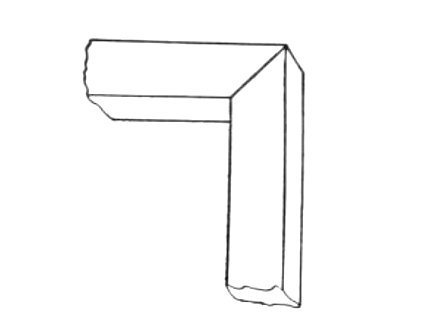
It is not a very strong joint and therefore is used primarily to make picture frames, casings, and decorative edges fro furniture.
Miter Boxes
The metal miter box and saw consist of a metal box in which a saw can be adjusted to any angle from 30 to 90 degrees.
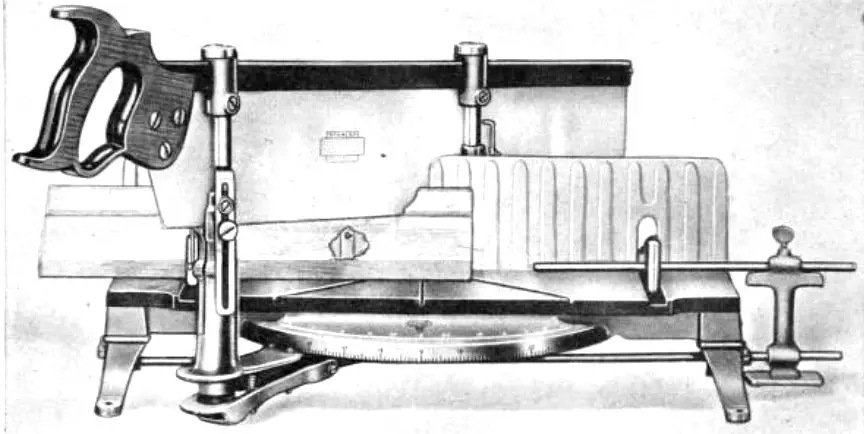
If one is not available, it is relatively simple to make one of your own.
This can be doen by fastening two pieces of stock to a base and then, with a sliding T bevel, laying a 45 degree angle in both directions.
Usually this and a 90 degree angle cut are all that is ever needed.
Since cutting a picture frame or similar device is the most common use for the miter joint, this procedure will be described.
Cutting Miter Joints for a Picture Frame
If a miter box is available, swing the saw to the left and set it at 45 degrees.
If a wood box is used, use the cut that is to the left as you face it.
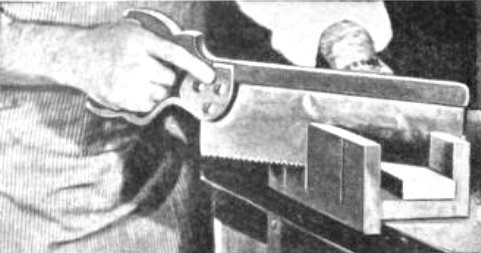
Place the edge of the frame in the box with the rabbet edge down and toward you.
Hold the stock firmly with the thumb of your left hand against the side of the box.
Then carefully bring the miter saw (or back-saw or fine crosscut saw, if the box is home-made) down on the stock and cut the angle.
Be especially careful not to let the stock slip when starting the cut, or you may ruin the surface of the frame.
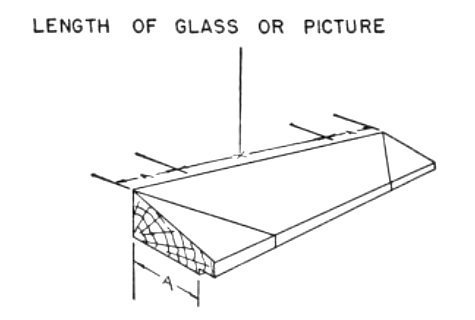
Next, determine the length of the glass or picture.
Add to this length twice the width of the frame, measured from the rabbet edge to the outside edge.
Lay out this measurement along the outside edge of the stock.
Then swing the miter-box saw to the right and set it at 45 degrees.
Hold the stock again firmly with your right hand and cut the stock to length, using your left hand to operate the saw.
If you find this awkward to do, clamp the stock to the box with a hand screw and then operate the saw with your right hand.
Repeat the same procedure for the second side and a similar procedure for making the ends.
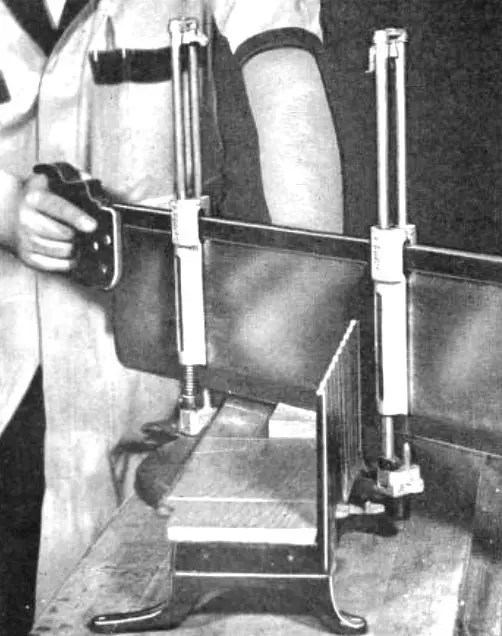
Assembling the Miter Joint
The miter joint is usually assembled by gluing and nailing.
Sometimes dowels are added to strengthen the joint.
To nail a miter joint, drive the nail part way into one piece.
Lock the other piece in a vise in a vertical position.
Hold the first piece over the vertical piece with its corner extending somewhat outside the edge of the vertical piece.
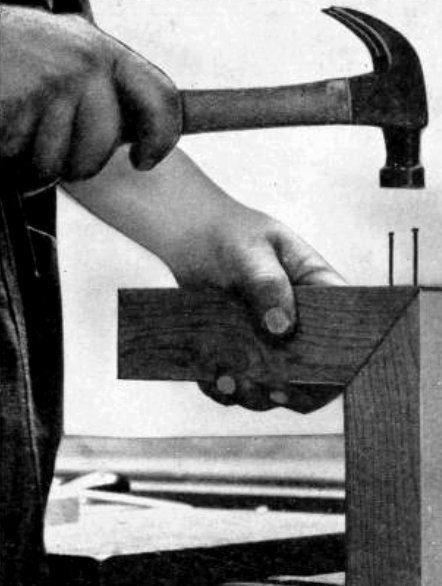
As you nail the corners together, the top piece will tend to slip down until it fits squarely.
If you are using glue only, you can make a little jig to hold the corners while the glue dries.
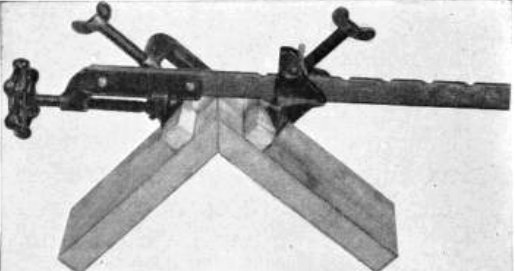
If only glue is used in assembling the frame, it is sometimes desirable to strengthen the corners by inserting a spline across each corner.
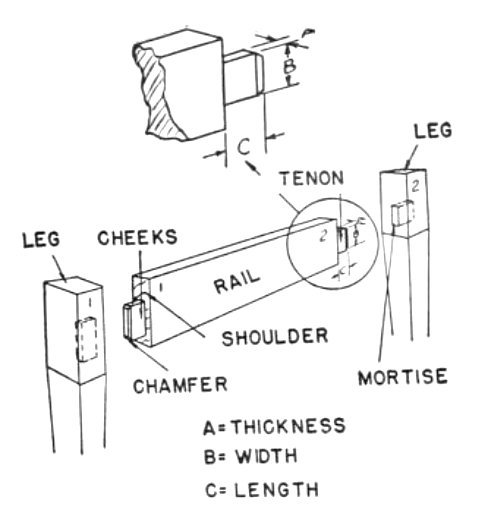
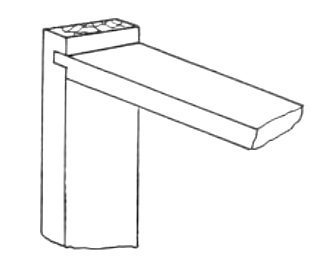
Making a Mortise-and-Tenon Joint by Hand
The mortise-and-tenon joint is found in better furniture construction.
You may have an opportunity to make it, especially if you are constructing a table, bench, or stool.
There are many kinds of mortise-and-tenon joints, but by far the most common is the blind mortise-and-tenon joint.
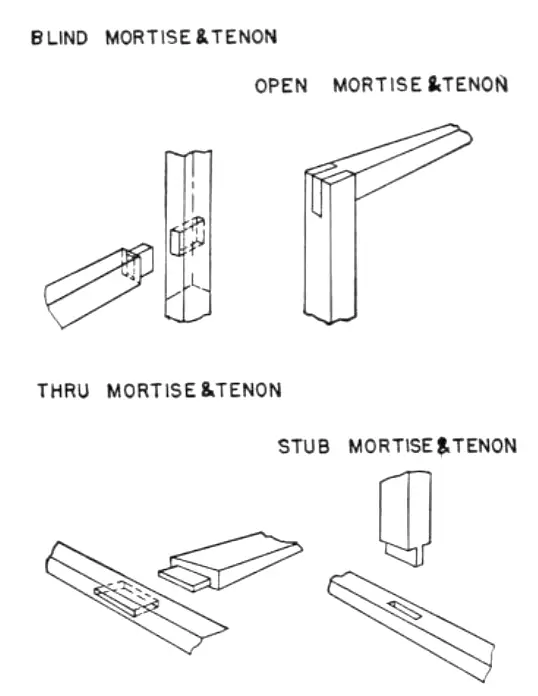
As you will see, this is a rectangular projection on the end of the rail that fits into a rectangular hole in a second piece, usually a leg.
Making a mortise-and-tenon joint by hand requires considerable skill and should not be attempted if another type of joint will fit the needs of the project just as satisfactorily.
Before beginning, note the names and measurements of the parts of the mortise-and-tenon joint, because there will be referred to constantly.
Making the Preliminary Layout of a Mortise-and-Tenon Joint
In most cases, it will be necessary to make several mortise-and-tenon joints in the construction of a single project.
For example, in making a simple table consisting of four rails and legs, eight mortise-and-tenon joints are needed.
Before laying out the joints, hold the several pieces to be assembled in approximately the position they will be when the project is finished.
With the face surface of the rails and the face surface and joint edge of the legs outward, begin at one corner to mark “No. 1” on the adjoining rail, “No. 2” on the next, etc., until you have marked with matching numbers the pieces that make up each mortise-and-tenon joint.
In this way, you will be sure that the pieces will fit together in the proper order when you are ready to assemble them.
Laying Out the Tenons
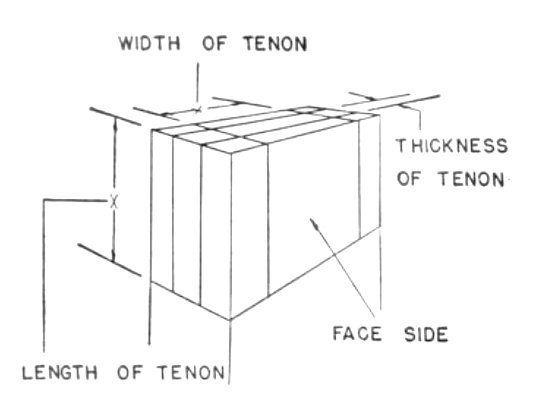
The size of the mortise-and-tenon joint is usually indicated on the drawing and, if so, these measurements should be followed carefully.
However, if they are not specified, the tenon is made half the thickness of the total thickness of the piece and about 1/2 to 1/4 inch narrower than the total width of the piece.
From the ends, mark out the length of the tenon and square a line completely around the end of each piece.
Do this on all pieces and then check to see that all of the rails are of identical length from shoulder to shoulder.
Next, set the marking gauge to half the thickness of the stock to be removed and, working from the face side, mark a line across the end and down the sides.
Subtract the width of the tenon from the total width of the stock.
Divide this amount in half, and set this measurement on a marking gauge.
From the joint edge of the rail, mark a line across the end and down the side.
Next, add to this measurement the width of the tenon and set the gauge again.
Repeat the mark across the end and down the side.
Now you have all of the necessary measurements on the tenon.
If several tenons are to be marked, make sure that you do them simultaneously to avoid error.
Laying Out a Mortise
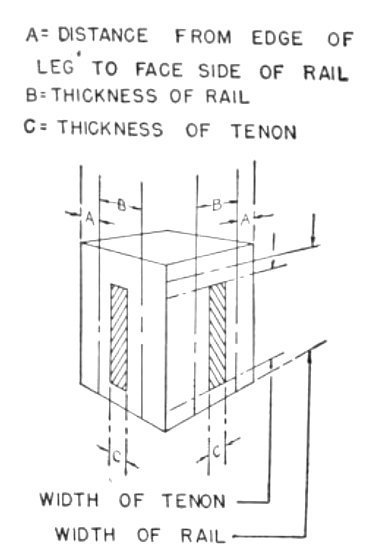
Use a pencil point on your marking gauge to make all lines simultaneously on all four legs.
From the top end of each leg, lay out two lines on the inside surfaces (those opposite the face side and joint edge) that indicate the total width of the rail.
Next, lay out two more lines on these surfaces to indicate the width of the tenon.
Determine how far back the rail is to be set from the outside edge of the leg.
Add to this measurement the thickness of the stock removed from one side of the tenon.
Set the marking gauge to this measurement and, holding the marking gauge against the face side and joint edge, mark a line between the lines that indicate the width of the tenon.
Add to this measurement an amount equal to the thickness of the tenon and mark another line to complete the outline, which will be exactly the same as the thickness and width of the tenon.
If an auger bit is to be used to remove the waste stock from the mortise, lay out a line down the center of the outline.
Cutting the Tenon
Lock the stock in a vise with the marked tenon exposed.
Use a back-saw or fine crosscut saw to make four saw cuts in the waste stock that will shape the thickness and width of the tenon.
Next, remove the stock from the vise and clamp it on the top of the bench.
Make the shoulder cuts to remove the waste stock which forms the thickness and the width of the tenons.
Be especially careful, as it is essential that these saw marks be accurate for a tight-fitting tenon.
The cutting of a tenon can be simplified by using a circular saw.
The tenon must then be trimmed with a chisel.
Cut a small chamfer around the end of the tenon to help it slip easily into the mortise opening.
This must be very slight.
Cutting the Mortise
The most common way to remove most of the stock from the mortise opening is with an auger bit and brace.
Select an auger bit that is the same diameter or slightly smaller than the width of the opening.
Then bore a series of holes to remove most of the stock from the mortise opening.
Use a depth gauge that is set to make the holes slightly deeper than the length of the tenon.
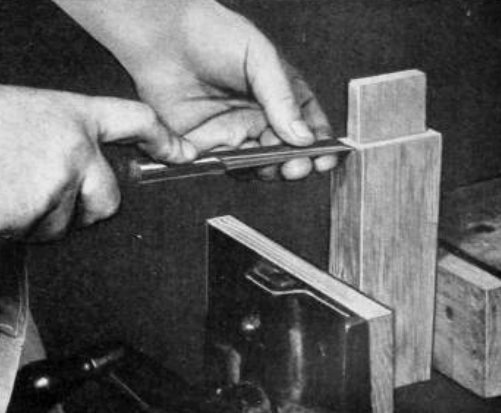
Next, use a chisel to pare out the sides and ends of the opening to the layout line.
To finish the ends, use a narrow chisel.
Some woodworkers prefer to use a chisel to remove all of the stock.
If so, it is necessary to use a mortise chisel, which is a heavy, thick chisel that can stand quite a bit of pounding.
The width of the chisel should be exactly the width of the opening.
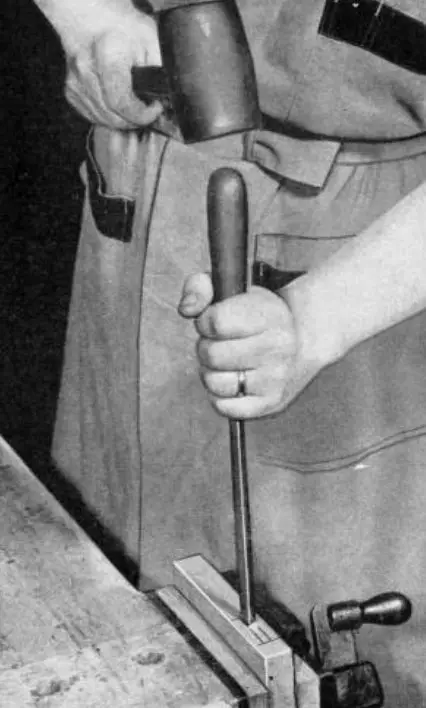
Begin to cut at the center of the mortise, holding the chisel in a vertical position with the bevel side toward the end of the mortise.
Cut out a V-shaped notch to the depth required and then continue to remove the stock by driving the chisel down with a mallet and then drawing down on the handle to remove the chips.
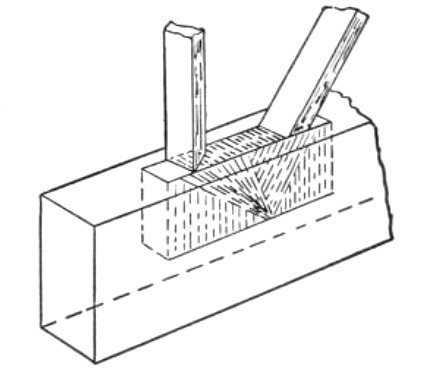
Stop when you are within about 1/8 inch of the end of the opening.
Turn the chisel around with the flat side toward the end of the mortise and cut out the remainder of the stock.
Assembling the Mortise-and-Tenon Joint
After the mortise-and-tenon joint has been cut, it will be necessary to do some fitting before the tenon will fit into the mortise properly.
Use a chisel to pare off stock from the thickness and width of the tenon until you can force the tenon into the mortise with a moderate amount of pressure.
Make sure that the shoulder of the tenon fits squarely against the face of the mortise.
For permanency, this type of construction is usually glued.