It has always been a heart-breaker for me to be invited by a fellow woodworker to check out a finish project and upon close examination discover that every single fastener used in the project was a slotted wood screw!
Just the thought of what the poor paisán had to go through to get each screw in place makes me shudder.
Measure, clamp, pilot drill, countersink, lubricate the screw shaft, hand torque it (or bravely attempt to power torque it) and have it pop out of the slot every few seconds, occasionally gouging the beloved project or his/her hand.
Then if they haven’t totally trashed the slot and made it impossible to torque by now, they finally get it set.
But then they happen to torque it just a fraction of a pound foot to much and the sucker spins in the hole and all efforts were for naught.
(I highly recommend hunting down the inventor of the slotted wood screw, staking him out in the Sahara Desert next to an ant hill and pouring honey all over his body!)
It still never ceases to amaze me at the vast amount of raw woodworking talent and desire there is out there in the cosmos.
But at the same time it amazes me that so little is known about simple basic state of the art fasteners and fastening systems.
It has occurred to me that it just might be a case of mistaken identity.
The term drywall screw is attached to the single most versatile piece of hardware that ever occupied airspace on this earth, and it may be the term “drywall” that is scaring off many confused woodcrafters.
The Drywall Screw

The drywall screw was first developed as part of a system to get drywall partitions up with lightning speed on commercial building developments.
Interior wall partitions in 99% of commercial building are supported with non-load bearing sheet metal stud framing.
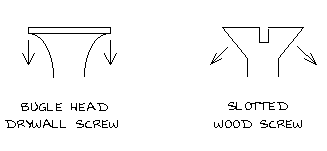
Drywall screws are case hardened and are designed with metal piercing points and a bugle shaped Phillips heads which ingeniously and securely fastens drywall to metal stud work without the heads pulling through the paper surface of the drywall.
The phillips head gives them high speed power drive capability and greatly reduces the possibility of your point jumping out of the head.
One might think that since this system was developed for a specialized commercial purpose, the price tag will be out of this world… Not so,oh financially challenged wood buddy!
This system has become so common that drywall screws are produced by the billions making the average price a mere pittance and for the benefits these little wonders possess they will fit in the typical wood miser budget very nicely!
Somewhere along the line someone discovered that these guys will also work great in wood and the drywall screw started evolving.
The first addition to its design was to make it with a higher (or course) thread to hold better in wood.
Then the broader spectrum of uses demanded a variety of lengths. After that, producers started making them available with weather proof plating for use out doors (i.e. deck screws, etc.) and the list continues to grow!
We can use many of the design features of the drywall screw to great advantage in the creation of our projects.
By virtue of the way it is designed the drywall screw will not only serve as a dependable fastener, but in many cases provide the kind of torque that will make certain kinds of clamping operations unnecessary.
In addition to eliminating some clamping, the creative use of drywall screws (with fillers and solid wood plugs) can many times eliminate the need for complicated, time consuming and sometimes expensive joinery systems like dovetailing, doweling. dadoing and other traditional methods.
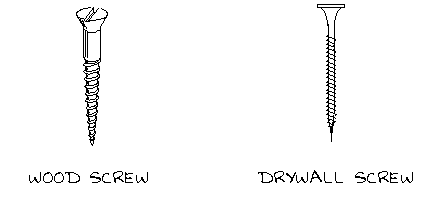
When you compare the shape and design of the common wood screw vs. the drywall screw one of the first things you notice is the wood screw usually has a tapered shank whereas that of the drywall screw is straight.
For the life of me, I will never figure out why the wood screw is designed like this, it has everything working against it!
The physics of the tapered shank and the low thread give it a very low threshold of holding power, especially over the long haul.
Think about it! How many times have you moved an old piece of furniture and found several slotted wood screws lying on the floor underneath.
And then when you try to put them back where they came from and tighten them down they spin like a whirling dervish..
If you don’t happen to pilot your hole just exactly right the wood screw will either spin as mentioned above or the tapered shank (along with the beveled underside of the head), or make for a very efficient “wedge” which will split the dickens out of your solid wood surface!

The straight shank of the drywall screw on the other hand, can more evenly displace the material it’s passing through and regardless of what kind of stress is placed on the in-pocket drywall screw, the pocket maintains its compression around the threads.
Also the bugle shaped head acts like the pad of a c-clamp only in reverse. Instead of separating the material it pulls it more unidirectionally.
Countersinking for the standard drywall screw is a snap!
The heads are exactly 3/8″ in diameter which is not only a common size for dowels, plugs, and buttons but also there are various drill/countersink combinations on the market specifically designed to produce a 3/8″ countersink.
There are various all in one drill/countersink combos available, but my personal favorite is a small 3/8″ countersink bored out through the center for the purpose of fitting over a drill bit.
Once in place, the countersink is secured by two allen head set screws.
This arrangement allows you the freedom to adjust the depth between the bit tip and the countersink where as with the all-in-one arrangement what you see is what you get.
In some of the more forgiving wood species and materials, a drywall screw can be driven and countersunk in one fell swoop (with no prior piloting or countersinking).
But in a visible area of a finished project I wouldn’t risk it because it doesn’t make for a neat hole.
Another reason why I wouldn’t risk it is because of a problem that has arisen from mass production and fierce competition.
Some distributors have begun dealing in cheaper import drywall screws with sub standard case hardening.
Under some torquing conditions the heads of these little suckers will snap right off!
This could be a real problem in that once the head snaps off it could take a couple sticks of dynamite to get the rest of the shank out of there!
Basic Joinery
The feature of the drywall screw that I get the biggest kick out of is the way (when properly set) it can act as a little-bitty high torque clamp, pulling two surfaces permanently together as tight as a drum.
Let’s say that you were to take two scrap pieces of 3/4″ plywood and hold them together with one hand and run a screw through them both using a power drill driver in the other hand.
No matter how tight you try to hold them the two pieces of material will to some degree push apart from each other.
Now you could go get a big ole’ clumsy c-clamp and clamp the pieces together before the next try, or you could take your drill/countersink and create a slip hole in the top piece of material just big enough so the screw will spin but no more.
Now when you hold the pieces of material together, run the screw through the slip hole first.
The screw will spin in the hole of the top layer and grab as it penetrates the bottom layer pulling the two together exactly like a miniature bench vise.
This cool little method is highly useful in just about every joinery application you’ll come up against.
I’m also a big believer in using a modest amount yellow carpenters glue (Elmer’s makes a good one) at every contact joint for strength.
The combination of the two will give your joints an amazing amount of strength and rigidity.
You need to be careful to catch the oozes and gushes of glue during joinery, especially if you plan on staining the project.
Any trace of glue will block the cells of the wood and the stain won’t take.
Pilot Drilling
The above joinery method is presented here mainly with softwoods and plywood in mind.
It’s important to note that when working with the more brittle hardwoods (oak for instance) drilling a pilot hole in the bottom layer of material is highly advisable.
If you don’t, a number of unpleasant things could happen. First, even the thin shank of a drywall screw will more than likely split a number of hardwood materials.
Second, as was mentioned above, you risk snapping the head of the screw off before it’s driven home.
Third, even with a case hardened screw there is a possibility over torquing while power driving and stripping out the head of the screw.
When piloting hardwoods for drywall screws, it is important to select the right size drill bit.
I have a little “no-brainer” method that I’ve been using for years that you might find useful.
Hold your drywall screw up to a light source and lay a drill bit over the shank and look at it through one eye.
If you are able to clearly see the points of the threads of the drywall screw on both sides of the bit you got the right one.
If you can see the points and part of the shank the bit is too small. If the bit covers the entire shank, points and all, it’s too large.
The Biscuit Joiner (or Plate Joiner)
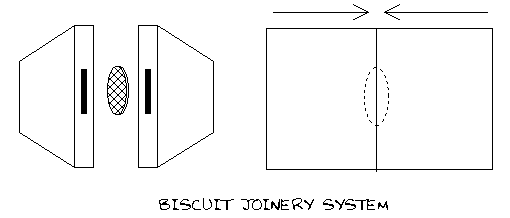
This is a hand held power system that works on the same basic principle as the traditional spline joint.
It employs a small diameter specially manufactured carbide tipped circular cutter which creates a slot in your stock just the right size and shape to receive the small plywood “biscuit”.

The power tools themselves have built-in calibrated fences and guides to precisely align the cutter with the stock for consistently accurate cuts.
Even though the biscuits are manufactured by several different companies, they all had the presence of mind to get together and use the same standards so it shouldn’t matter which brand you buy.
The biscuit joiner system has been around long enough that there are a wide variety of makes, models, and prices on the market.
You can pay anywhere from just under $150.00 all the way to $500.00 and beyond.
This is a great system but it still requires the extra step of clamping the components together and allowing for adequate dry time for the glue up.
The Pocket Cutter
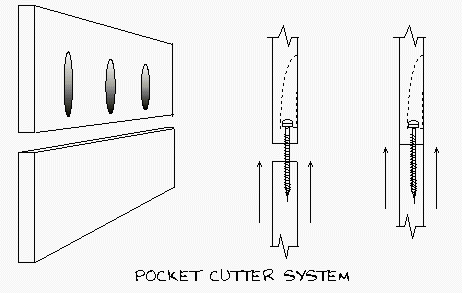
This system works on the basis of creating what can best be described as a deep angle countersunk receptacle (or pocket) in one of two components to be joined.
Then a specially manufactured self drilling screw is power driven into the pocket through to the adjacent component pulling both of them it tightly together, precisely like the slip hole method using the drywall screw we talked about above.
The technology of the self drilling screw has come a long way and it’s OK now to take them seriously.
The screws I’m currently using can be driven in any hardwood species in just about any location without pilot drilling and the wood will not split!

Like the slip hole method, the pocket hole system eliminates the need for several clumsy and time consuming clamping operations as well as the glue curing time required for those operations.
It is in my opinion the most efficient system currently available.
This system first became available to the general public through clumsy clamp-on stock metal jigs and special drill bits for use in standard electric drills.
One of the few draw backs of this system is that after the joinery process you are left to somehow deal with the pockets.
The shape of the pocket makes it very difficult (but not impossible) to use solid wood plugs.
The easiest way is to design your project so that all of the pockets are facing in the opposite direction of the finished surfaces out of the direct line of sight.
For instance, if you used the pocket cutter system to build a cabinet face frame, just make sure that all pockets face the same direction and join that side of the face frame to the carcass so that it faces the inside of the finished cabinet.
There may be a project in which you are unable to effectively hide the pockets.
In projects where the finished surfaces will be painted you can always use your favorite filler, sand it flush, then prime and final coat.
If you’re caught in one of those rare occasions when you plan on a natural stain finish and you have no choice but to face the pocket out, you might have to experiment with fashioning some custom plugs or inserts.
I will have to say that to date I have never run into this problem.
These are just some of my most-used fastening systems.
There are many more to learn about and try, but they will have to wait for another article.
Happy cutting!
