In the best of all possible worlds, every construction project would be done within perfectly square spaces where things line up well.
But the fact is that all too often they just don’t- and this is particularly true when building fences, gates, and the like.
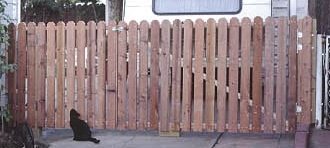
This article describe how we to deal with the odd angles involved–as well as how to build a solid gate, be it at odd angles or not.
Installing the Posts
No matter how far away from the horizontal you choose to make your gate top, you still must make the posts vertical.
If they are not, the gate will always swing toward the slant of the posts.
Also, it’s best to secure the post(s) in the ground with concrete to support the load.
The gate that preceded this one was hung on a post that sat on a 12″ high concrete pier.
Though the pier was solidly embedded in the ground, there was no way to firmly connect the post to the pier, and so it pivoted back and forth.
Even though the post was tied into the exterior wall of the house less than two feet away, it still wobbled badly.
The Steps
Dig a hole with a post hole digger to a depth of 18″.
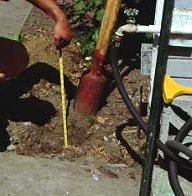
Any post in the ground, be it in concrete or dirt, will be subject to rot from moisture, so it’s a good idea to use pressure treated lumber which, so they say, is good for 20 years.
Prop the post up and be sure it is vertical.
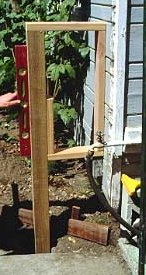
If you aren’t able to secure it to a nearby house as shown here, drive stakes into the ground nearby and secure it to those.
Once the concrete sets it’s “written in stone,” so be sure the post is properly located.
Preparing the Concrete
If you are mixing small amounts of concrete, you can mix it in a five gallon bucket, or in a steel wheel barrow.
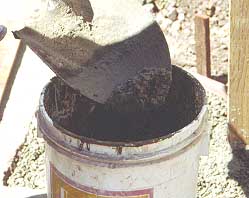
In a bucket do only about a third of a bucket at a time because the stuff is very heavy.
Mix just enough water with the concrete to wet all the dry powder, then add a little more.
The wet concrete should “stand up,” or still be firm enough to hold small mounds on top of the mix.
But as you stir, it should feel soupy and not dry.
The exact amount of water is not critical, but it cannot be too wet (chicken soup) or too dry (corn bread).
Applying the Concrete
Place fences around the post hole to make a boundary for the concrete.
Dig out the area within the boundaries surrounding the hole so that the concrete will be at least 3 inches thick, and tamp down the dirt so the concrete sits on a solid surface.
Pour in the concrete and level the surface with a stick, the ends of which rest on solid ground.

Let the concrete set over night before you apply any stress to it, two days if you will apply serious stress.
Building the Gate
Use a rot resistant wood, such as second growth con heart redwood, which is readily available on the west coast of the U.S.
Ask at your local building supply about wood types that will hold up best exposed to weather.
Build the Frame
Assemble the basic rectangular frame(s) for the gates, by screwing together the joints.
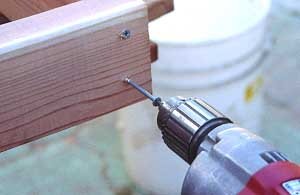
Decking screws hold better than nails, and it’s a good idea to use them throughout your gate.
Use a variable speed drill with a Phillips driver tip to set the screws.
Get a type of screw that is made for exterior use, such as for decks.
They cost more but won’t rust.
Interior drywall screws will rust quickly if used outside.
Still, the screws aren’t going to provide a really strong joint, so it’s best to reinforce the corners with angle brackets.
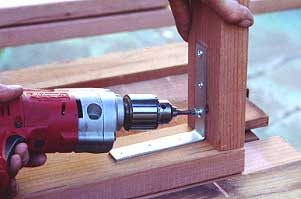
Install the Frame
Place the assembled frame in location .
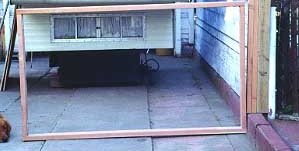
In that photo the rectangle is very close to square- but as you can see there is a serious gap between the frame and the vertical post on the right.
This is due to the slant of the driveway, and we need to make the frame follow this slant.
Screw the frame to the post, and push it down on the outward end until it touches the ground.
Cut to fit, then screw in, a cross brace as shown.
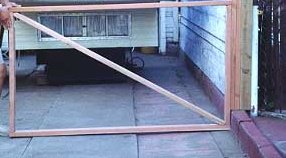
This brace will hold the frame in its slightly distorted position, as well as keep the frame from sinking below that position later.
The brace must go from the lower corner at the post to the opposite- not vice versa- so that it will be in compression when the weight of the gate tries to distort the frame.
Were it in tension the screws would just pull out.
When you distort the frame out of shape this way, you are working against the corner braces.
This will not be a problem so long as you only distort the frame a bit, but in extreme cases you may need to bend the braces before installing them.
Install the hinges with long screws to guarantee a solid grip in soft wood.
Predrill holes for these screws, but in soft wood these pilot holes should be only about three quarters the length of the screw, and half its diameter, depending on the density of the wood.
I used two hinges in the upper position on this side of the gate because it is six feet wide.
For additional support against further distortion, install a cable and turnbuckle.
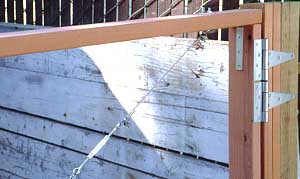
Use U bolts to connect to the wood and cable clamps to tie it all together.
This cable must run the opposite way from the cross brace, so that the cable will be in tension when your kids start swinging on the gate.
The turnbuckle lets you fine tune the exact height of the outward end of the gate, as well as allowing for adjustment after a few years settling.
Attach the Planks
Cut to length your face planks, and decide on a design (if any) to cut into them.
Mitering the corners is easy and attractive.
A simple setup on the table saw makes it fast, using your miter fence.
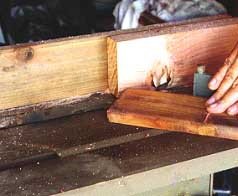
But take the extra time to set up the fence arrangement shown in the photos, or else you may get a surprise from the cut off pieces left between the blade and fence.
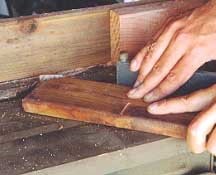
If the fence is directly adjacent to the cut off, once it is severed it can catch between the fence and blade, and be thrown back at you.
The solution is to screw on a piece before the blade as shown.
Use this to align the corners to be cut by simply butting against it.
Then push the board through the blade. The cut off piece will then have a lot of room and won’t get caught. Clear out each piece with a push stick after each cut.
As you screw each of the boards in place, measure the distance from it to the end that you are working toward- both top and bottom.
Keep these distances even as you go, or when you reach the end you may find the boards no longer vertical.
Install a Cane Bolt if Needed
If you have two gates that meet, install a cane bolt on the one that will stay in place most of the time.
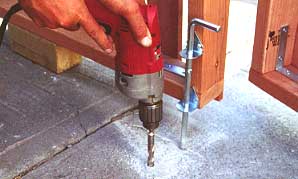
Bore into the concrete below with a masonry bit for the bolt to fit into.
With masonry bits the rule is- let it cut at a slow rate.
Don’t force it or it will force you to go buy a new bit.
If you don’t have concrete below the gate you can pour a pad large enough for a hole.
In this case set a short piece of pipe in the concrete for the cane bolt.
If the area is level, consider using a wheel on a wider gate.