Can you replace cabinet doors only (not the complete cabinet)?
Yes! Installing new kitchen cabinets is a very expensive proposition. A less costly, easy alternative is to replace the doors only.
How to Change Cabinet Doors
One way to save even more money is to replace your doors with custom ordered laminate doors and paint the cabinets behind to match.
RTF Laminated Cabinet Doors
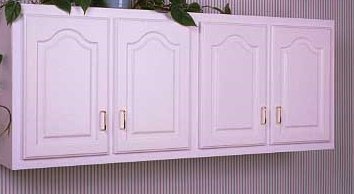
RTF (rigid thermo foil) laminated doors imitate the appearance of wood raised panel doors, require no painting and have a modern, clean look.
Standard laminated doors are flat panels with laminate glued to the surface.
RTF laminate doors are made from flat fiberboard panels that have patterns cut into the surface with computer controlled routers.
The contoured panel is then covered with special laminate foil using a vacuum process.
The resulting doors have no joints to create gaps, and have a hard, durable surface.
Patterns available include raised panel (shown above) as well as multi-light glazed doors and arches.
Standard Custom Cabinet Doors
Custom cabinet door manufacturers will make doors to any sizes you order and ship them ready to install.
However, most will not deal directly with the public so you should either go through a local cabinetmaker or contractor, or contact the manufacturer and ask for a local dealer who can order them for you.
Measure your existing doors very carefully to be certain that you give the manufacturer correct sizes since they won’t pay for your measuring mistakes.
Painting Cabinet Doors to
A good paint job requires careful preparation before you apply the top coat.
Clean the Surface
First clean the surfaces thoroughly to remove dirt and grease.
Sanding before cleaning can drive grease into the surface, rather than remove it.
Use ammonia or a powdered detergent mixed in a solution with water.
Many liquid detergents contain wax which inhibits paint adhesion.
TSP, or trisodium phosphate, is an excellent cleaner but its use is regulated in many areas because of problems it and other phosphates create with waste water treatment plants.
Scrub the surface with a nylon pad such as Scotchbrite brand pads.
Rinse the surface with clean water after using any cleaning product.
Sanding the Surface
Paint adheres better to a surface that has been abraded.
Nylon pads provide adequate abrasion for paint adhesion, as does sandpaper.
If the surface is smooth to begin with, all you need to do is scrub with the nylon pads.
Use sandpaper to level a rough or peeling surface, or if there are many coats of paint on the surface.
Sanding lessens the thickness of the old finish, which reduces the possibility of peeling later.
Sand by hand using a sanding block, or use a power orbital sander.
Begin sanding with 80 or 100 grit paper, depending upon how much material you need to remove to level the surface.
Sanding Safety Tips
Sanding produces prodigious amounts of dust which is unpleasant and unhealthy to breath.
Wear a mask, and consider using an orbital sander with a dust collection device attached.
Some random orbit sanders come with a porous plastic cup-type dust collector on it, which is more convenient to empty than cloth bags.
They may also come with an adapter flange that lets you attach it to some vacuum hoses, which will increase dust removal.
Applying the Undercoat
Kitchen and bath cabinets receive much use and wear, so ensuring that paint adheres well is very important.
Use a good quality enamel undercoater, which will adhere to old finishes far better than top coat alone.
Undercoater differs from primer because it is designed to adhere to other finishes, whereas primers are designed to adhere to bare wood.
Though oil based paints in general still have better adhesion characteristics than latex, this is less a factor for good adhesion than proper preparation.
Be aware that some states have stiff regulations regarding use of oil based paints and their solvents, like paint thinner.
Enamel undercoater also fills minor scratches and pores.
Use one coat only, for adhesion, on surfaces that are already smooth.
Use multiple coats on slightly porous surfaces, or where much sanding was necessary with 80 grit sandpaper, leaving the surface rough.
Sand between coats with 120 grit sandpaper.
Use spackling paste between coats to fill severe holes and large cracks, and sand the areas so filled when the paste is dry.
For extremely porous woods, such as Philippine mahogany, you may need to use a wood filler, available at local paint stores.
Applying the Top Coat
You know the surface is ready for the top coat when it feels smooth to the touch and you cannot see indentations in the surfaces.
Have adequate lighting on hand so that you can inspect the entire surface carefully. Use a top coat paint that is designed for heavy use.
Most latex paints will adhere well to any undercoater, and they will clean up with water.
However, be sure that you get a top coat that will adhere well to the particular undercoater you use.
Some paint manufacturers make color mixes designed to match certain laminate types.
Check with your door supplier to see if they know of such a match for your particular laminate type.
If not, go to a reputable local paint store with one of your doors and have them mix paint to match.
Get and keep the formula they use for future reference. Or, consider using a contrasting color for the face frames and cabinets.
Apply the top coat with a mohair roller to give a texture that approximates that of the laminate surface.
Use the 3″ wide rollers on face frames.
Many different types of smaller rollers are available in paint stores.
Installing New Cabinet Doors
The two basic types of hinges available are exposed hinges which screw to the outside of the face frame, and hidden or “Euro” style hinges which screw to the inside edge of the face frame.
Both screw to the door on the inside face. Exposed hinges are available at most hardware stores, see Source List for hidden hinges.
To install exposed hinges, first determine where you wish to have them located along the door edges and screw them to the doors.
Note that RTF doors are heavy, and for doors larger than two feet in height use three or four exposed hinges per door.
Be aware that exposed hinges do not allow you to adjust the location of the doors after they are screwed on.
Therefore you must very carefully locate the screws to align the doors parallel to each other.
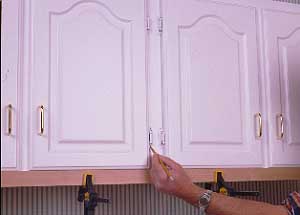
To do so, clamp a straightedge to the lower rail of the faceframe.
Place the doors on the straightedge and use masking tape to secure them at the top.
Move the doors side to side until centered over their openings, then use a pencil to mark the locations of the screw holes on the face frames.
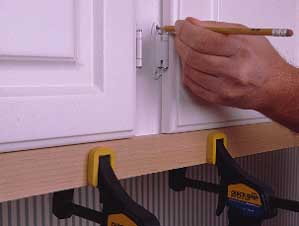
Remove the doors and use a nail as a center punch to create a starter hole exactly centered within the penciled circle. Pre-drill for screw holes and install the doors.
When buying Euro hinges for a face frame application, you must know how far the cabinet door overlays the inside edge of the face frame, as well as the thickness of the door and how many degrees of opening you want.
These hinges require large diameter holes bored in the backs of the doors.
You must obtain a special Forstner bit from the hinge manufacturer to bore these holes.
The holes must be accurately located so that the hinge will hold the door against the face frame with the proper overlay.
Euro hinges have adjustments built into them which allow some alignment of the doors after the hinges are installed. But they don’t allow much, so locate the hinges accurately.
Make a jig for locating the large hinge holes on the back of the doors.
Use the jig to align the hinges at the necessary distances from the top and from the edge of the door.
To determine how far the hinge must be from the door edge, make a test hole in scrap and place a hinge within it.
Use this test to determine how far the hinge hole must be from the door edge, and bore holes in a piece of scrap at that distance from the scrap’s edge.
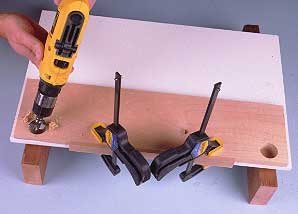
Attach an edge fence to the jig as shown in the photo to align the jig’s edge with the door’s.
Locate the jig along the door’s edge until it is at the correct location from the door top or bottom, then clamp the two together.
Use clamp blocks on the door surface so the clamps do not scuff it.
Bore the holes only as deep as necessary for the hinges.
The Forstner bit will cut only as you apply pressure.
Go a little at a time and measure carefully between cuts so you don’t cut too far and break through the front.
Most Euro hinges come in two parts. Screw the door halves to the doors, then screw the other halves to the face frames. Measure carefully to locate these correctly along the face frame height.
Hold the doors up to the cabinets and attach the two halves of the hinges.
Use the screw adjustments on the hinges to adjust the doors so that they are all well aligned to each other.
