The plane is perhaps the most complicated hand woodworking tool you will use and requires more care, attention, and adjustment than any other tool.
Parts of a Plane
Therefore it is smart to get acquainted with some of the parts so that you can identify them.
The following is an illustration of the major parts:
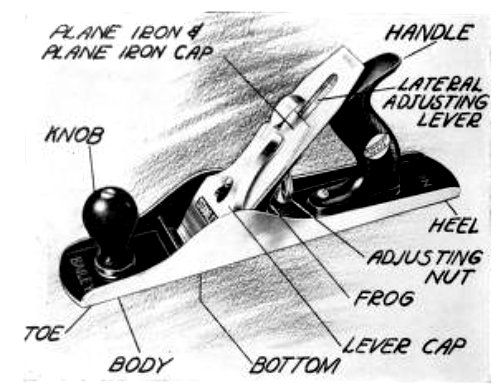
The body of the plane is made of cast steel.
The base (sometimes called bottom) is either smooth or ribbed.
There is no difference between these two plane bases, except that some woodworkers feel that the plane with the ribbed base works a little better.
Right behind the opening in the plane there is a frog that provides the support for the plane iron.
This frog contains two adjustments:
- a brass knurled nut, which adjusts the depth of cut or regulates the thickness of the shavings,
- and a long, slender lever called the lateral adjusting lever, which provides for the side-wise adjustment of the cutter.
The double plane iron consists of the plane iron itself, sometimes called the cutter, and the plane iron cap.
The plane iron fits over the frog, held firmly with a lever cap.
Types of Hand Planes
There are three common types of hand planes, all of which are very similar.
The primary difference is in their length.
The jack plane, (A) which is used most commonly, is from 11 1/2 to 15 inches long.
This tool is for all types of general planing.
The smooth plane (B) is the same, except that it ranges from 7 to 10 inches in length.
The fore or jointer plane (C) is much longer, from 18 to 24 inches in length, and is especially useful for planing a long edge straight, as when fitting large doors.
It is used frequently for jointing long pieces of stock before gluing them up.
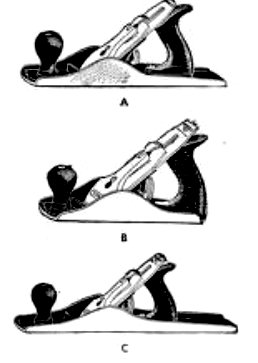
A. This is a jack plane, which has a bed 14 or 15 inches long. It can be used to true the edges of board and for general planing.
B. This is a smooth plane and can be purchased in lengths from 7 to 10 inches. It is good for smoothing and finishing work for which a light plane is desired.
C. This is a fore or jointer plane and is the type used to obtain a true surface on long edges for gluing up stock.
Testing a Plane Cutter for Sharpness
Check the plane iron or cutter to make sure that it is sharp.
One way to do this is to sight along the edge.
A properly sharpened blade will not reflect any light.
Another method is to cut a piece of paper with it. It can also be tested by allowing the cutting edge to rest on the thumbnail and then pushing it lightly.
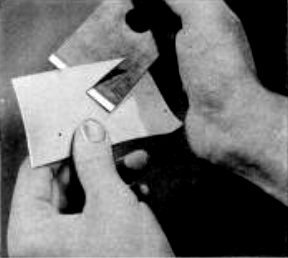
If the blade tends to cling to the nail, it is sharp.
If it slides easily, it needs sharpening or whetting.
You should never use a dull plane cutter. Sharpen it before you assemble the plane.
For a method of sharpening planar blades, check out our How to Sharpen Planer Blades article.
Assembling the Hand Plane
Assembling the Double Plane Iron
Hold the iron in your left hand in a vertical position with the bevel away from you.
Place the plane iron and drop the setscrew into the plane iron through the large opening.
With the plane iron cap still at right-angles, slide it back and away from the cutting edge.
Turn the plane iron cap parallel to the plane iron and slip it forward until it is about 1/16 inch away from the cutting edge for rough work and up the 1/32 inch for finished work.
Make sure that you do not injure the cutting edge of the plane iron by shoving the cap too far forward.
Tighten the setscrew firmly.
The plane iron cap serves two purposes. It helps to stiffen or strengthen the plane iron and serves as a chip breaker.
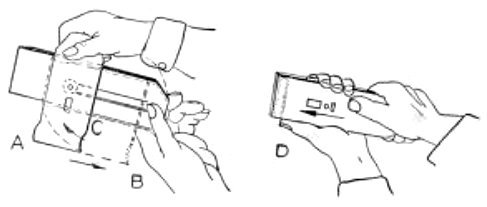
A. Hold the plane iron is your left hand, with the bevel side down. Place the plane iron cap at right angles to it and drop the set screw through the large opening.
B. Slide the plane iron cap back as far as it will go and then
C. turn it so it is parallel to the plane iron.
D. Move the plane iron cap to within about 1/16 inch of the cutting edge. Then tighten the set screw with a screw driver or the lever cap.
Inserting the Plane Iron into the Plane
Insert the double plane iron in the plane with the bevel side down.
There are several things that you must watch when doing this.
First, don’t hit the cutting edge on the body of the plane as you insert it over the frog.
Second, make sure that the slot in the plane iron cap fits over the little Y adjustment.
Third, check to see that the roller on the lateral adjustment slips into the slot of the plane iron.
Next pull the little thumb adjusting cam on the lever cap up at right angles.
Then slip the lever cap over the lever cap screw on the frog.
Push the thumb-adjusting cam down to fasten the plane iron securely in the plane.
If you find it must be forced, it is probably necessary to unscrew the lever cap screw just a little bit.
If it is too loose, tighten it a little.
Adjusting the Plane
The plane should be adjusted before beginning the cutting again several times while the planing is being done.
To make the first adjustment, turn the plane upside down with the bottom about eye level.
Turn the brass knurled nut until the plane iron appears just beyond the bottom of the plane.
Then, with the lateral adjustment lever, move the blade to one side or the other until it is parallel to the bottom.
The experienced woodworker then tries the plane on a piece of scrap stock to see how it cuts, adjusting it to the chip he wants.
For rough planing and when much stock is to be removed, set the plane deeper.
When you are truing up a surface and making it smooth, a light cut that forms a feathery shaving is more desirable.
Review Questions
Here are some questions to test your knowledge of assembling and adjusting a hand plane.
- Name the important parts of a plane.
- Name the three common types of bench planes. What is the major use of each?
- What are three ways to test the sharpness of the plane iron?
- What is the purpose of the plane iron cap?
- To do finished planing, how far should the cap be set from the cutting edge?
- Describe the steps to follow in fastening a plane iron in a plane.
- How do you make a depth adjustment on a plane?
2 thoughts on “Assembling and Adjusting a Hand Plane”