This article examines how to determine if you have a leaky roof and what to do to repair it.
3 Tell-tale Signs You Have A Leaky Roof
Roof leaks often start slowly and can avoid detection for months or even years. There are, however, several telltale signs that your roof is leaking slowly, including:
1. Water Spots
Water spots may seem like an obvious sign that something is wrong, but there are numerous ways that they can be misinterpreted, which can lead to a much bigger problem at a later date.
One of the most common misinterpretations occurs when people move into a home with a pre-existing leak.
While full disclosure of structural issues is required upon the sale of a home, slow leaks are often difficult to find and/or may only occur during heavy rains, which can lead to the mistaken presumption that the leak has been fixed and is no longer a problem.
While water stains may be the result of a plumbing issue, any growth in size or darkening of the common brown and yellow coloring of a water stain in conjunction with rainfall will indicate that there is a problem with the roof that needs to be handled immediately.
2. Peeling paint around skylights or the area where the chimney comes in contact with the ceiling
A high percentage of roof leaks happen where the deck is penetrated by structures connecting the interior of the home to the exterior.
Penetrating structures include chimneys, skylights, vents, etc., so if you’re seeing cracking or peeling paint around these types of structures, you may have pinpointed the source of your roof leak.
3. The scent of mildew
Mildew and its close relative, mold, are made up of microscopic organisms that thrive in damp, humid environments.
Left untreated, mold and mildew can start the process of decomposing wood and drywall in the attic and sidewalls, while also releasing microbes into the home which can lead to severe health problems.
If you pick up a scent of mildew in your home, especially if it is accompanied by water spots and/or peeling paint, you probably have two problems; a slow leak in your roof as well as the potential for a serious health issue.
At this point, its time to call a roofing contractor as well as a mold mitigation professional.
While not as obvious as the roof leaks that fill up buckets on the floor of your home, slow leaks can cause extensive damage and create a serious health hazard.
If you experience any of these telltale signs, take action immediately as the problem will only become worse and more dangerous over time.
How to Fix a Leaky Roof
Here’s a video which demonstrates how to fix a leak in asphalt shingle roofing:
The hardest part of fixing a leaky roof is finding the leak; once that’s done, the job is easy.
You can’t fix the roof while it’s wet, but try to locate the leak while it’s raining.
If the leaky roof is above an unfinished attic or crawl space, climb into the attic.
Shine a flashlight along all the beams in the general area of the leak to see where the water comes in; watch for the shine of the water in the light.
In daylight, examine the roof for wet spots and discolored patches.
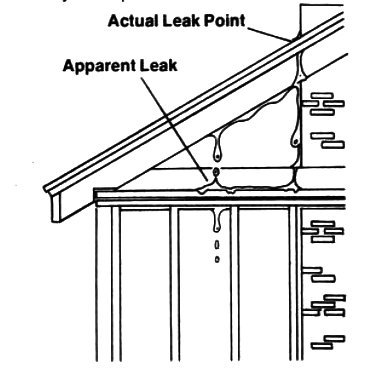
Water coming in through a pitched roof usually runs down the beams before dripping through into the rooms below, so trace every wet spot or stream of water back to its source.
When you’ve located the leak, mark it.
On the inside, draw a circle around the bad spot with chalk. If you can, force a stiff wire up through the outside.
The wire will flag the leak outside so you can spot it when you can do the repair work.
If the attic is finished, you can only make an educated guess as to where the leak is.
Draw a rough plan of the roof above the leaky area and mark chimneys, dormers, vent pipes, ridges, valleys, and flashing on the sketch.
These are all potential trouble spots; any such situation anywhere near the leak inside might be the source of the problem outside.
When the rain has stopped an the roof has dried out completely, assemble your tools and set up an extension ladder to give you access to the roof.
CAUTION: Make sure the ladder is firmly braced against the house; the top of the ladder should stick up above the edge of the roof.
Wear old clothes and rubber-soled shoes.
Asbestos Shingle Roofs
In the leak area, look for missing or torn shingles, curled-up shingles, or around the chimney or some other interruption breaks in flashing joints or gaps in joints finished with roofing compound.
If you can’t find any evidence of damage, call a professional.
To refasten a curled-back shingle, gently straighten the edges of the shingle.
This is easy in hot weather; in cold weather you may have to soften the shingle first.
To soften a brittle shingle, carefully place the diffused flame of a propane torch over the curled edges.
Apply only enough heat to soften the shingle, not enough to ignite it.
Apply roofing compound generously to the bottom of the loose shingle with a putty knife and press the shingle firmly into place.
To replace a torn or rotten shingle, remove it carefully from the roof.
Lift the edges of the shingles that overlap the damaged one and carefully pry out the nails that hold the damaged one in place; use a pry bar.
Slide the old shingle out from the surrounding ones and scrape out any roofing compound left in the opening.
If possible, replace damaged or missing shingles with matching shingles, saved from the original installation.
If you don’t have any of the original shingles and can’t get shingles that match, use non-matching shingles or cut shingle-size patches from sheet copper or aluminum.
They won’t look as good, but they’ll do the job.
Round the back corners of the replacement shingle slightly with a sharp utility knife or, for sheet metal, tin snips.
Slide the shingle into place, its front edge aligned with the other shingles in the row, its back edge under the overlapping shingles in the next row up.
If you’re using a sheet metal patch, apply roofing compound to the back of the patch before sliding it into place.
Nail the new shingle into place under the overlapping edges of the shingles above it. Gently lift the overlapping corners.
Drive a roofing nail through each top corner of the new shingle and cover the head of each nail with a dab of roofing compound.
Smooth the lifted edges of the overlapping shingle into place.
Follow the same procedure to replace rows of shingles.
To replace ridge shingles, use the same technique, but before nailing the new shingle into place, coat the back of the shingle with roofing compound.
Nail the corners into place and cover the heads of the nails with roofing compound.
Examine flashing, valleys, and coated vent pipes for damage.
If the metal flashing around a chimney or dormer is pulling loose from the mortar that holds it, it must be replaced; otherwise, apply roofing compound to questionable areas with a putty knife or small trowel.
Cover any exposed nails with roofing compound. Clean up with mineral spirits and rags.
Fixing Leaky Flat Roofs
Damage to flat roofs is usually easy to see.
Look for blisters of roofing felt that have cracked.
Cut the blister open with a sharp utility knife, being careful to cut only the blistered layer of felt.
Lift the sliced edges back from the middle of the blistered spot.
If there’s water inside, press the surrounding area to force it out to the top: then use a propane torch, very carefully, to dry the inside of the blister.
If the day is dry and sunny. let the blister dry naturally
Apply roofing compound to the bottom edges of the loose flaps and press them down firmly.
Nail the cut edges down with roofing nails and coat the entire blister with roofing compound.
Cut a patch of 15# roofing felt to cover the blister area.
Set it into place and nail it down with roofing nails, spacing nails 1/2 inch apart around the edges of the patch.
Coat the entire patch with roofing compound, making sure the heads of the nails are well covered.
To repair a hole in a flat roof, measure and mark an even patch around the hole.
Cut out the damaged area carefully with a sharp utility knife, keeping the edges of the cut even.
If the hole is a deep one, work through one layer of roofing felt at a time, cutting out and removing each layer that is visibly damaged.
Remove all damaged layers, but don’t cut deeper than you have to.
Let the cutout area dry thoroughly or, if necessary, dry it very carefully with a propane torch.
Cut a patch of 15# roofing felt to replace each damaged layer of felt you’ve removed.
Cut patches carefully to fit the hole.
Apply roofing compound to the bottom of the hole and set a roofing felt patch into the hole; coat the top of the patch with roofing compound.
Repeat to replace each cutout layer of roofing felt.
Coat the top patch layer with roofing compound, extending the compound 2 inches past the patch on all sides.
To seal the repair, cut another patch 4 inches longer and wider than the filled-in hole.
Set this patch carefully onto the surface of the roof over the patch and nail it into place, spacing roofing nails 1/2 inch apart around its edges.
Finally, coat the heads of the nails with roofing compound.
Examine joints and flashings for damage and apply roofing compound to questionable areas.
Cover any exposed nails with roofing compound.
If the entire flat roof surface is badly worn, and you can see many worn spots or fine cracks, coat the entire roof with liquid roofing compound.
Spread the compound with a large stiff brush or a broom you’ll have to throw away the brush or broom, so don’t use a good one.
Clean up with mineral spirits and rags.
Here’s a video on Repairing a Leaking Shingle Roof:
Fixing Leaky Wood Shake or Shingle Roofs
Replace split shingles or shakes with new ones of the same type; replace ridge shingles with specially mitered shingles.
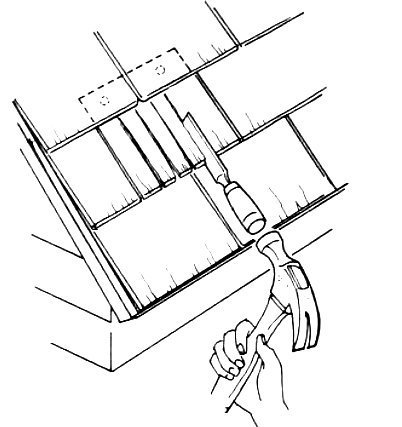
To remove the damaged shingle, split it!
Carefully with a sharp wood chisel and a hammer, holding the chisel up into the shingle at the slant of the roof and being careful not to damage the surrounding shingles.
Pull the broken pieces of the old shingle out of the roof.
Measure the opening to be filled and cut a new shingle 3/8 inch narrower with a fine-toothed handsaw.
Before setting the shingle into place, cut off the nails that held the old shingle.
Slide the blade of a hacksaw carefully under the overlapping shingles and saw off the heads of the nails, cutting as far down the nail shaft as you can.
Slide the new shingle into place, under the overlapping shingles and over the sawed-off nails.
Secure it in position with two roofing nails, one on each edge of the shingle that’s covered by the overlapping shingles above it.
Set the heads of the nails with a nail set and cover them with roofing compound. Replace each damaged shingle the same way.
To remove a damaged shingle, split it carefully with a sharp wood chisel and a hammer, holding the chisel up into the shingle at the slant to the roof being careful not to damage the surrounding shingles.
Pull the broken pieces of the old shingle out of the roof.
Your right I found out the leak thru the smell of mold, I was so shocked when we found out about it since it’s not that noticeable, we call on the roofer to fix the problem immediately and everything is fine now.
I’m glad you mention that peeling paint around the structure signifies a leak. My dad noticed his skylights and chimney have watermarks running dow. I better warn him os he can contact a roofing company.
I found it interesting when you said that the scent of mildew and mold can lead to bigger damage on your roof. My dad told me that after the raining season, he found out that his roof has mold. I will recommend him to contact a professional so that they can repair the roof.
Thanks for mentioning that your roof may have a slow leak if you notice a mildew odor paired with paint that is starting to peel. My wife and I have noticed that our attic has been smelling like mildew ever since it rained last week, and we are worried that water may begin to leak onto our antique furniture if we do not fix the leak. We’ll hire a professional to help us immediately.
I am in search of the best roofing contractor, I learned a lot by reading your worthy words. Thanks a lot for helping us. I wish you the best of luck for more amazing work