Like painting, hanging wallpaper is a skill that’s easily acquired. What you may lack in expertise you’ll make up for in care.
Purchasing Wallpaper to Hang
When you buy wallpaper, figure dimensions carefully.
A roll of wallpaper, whatever its width, holds about 36 square feet of this, allowing for waste, you can use about 30 square feet.
Double rolls–the way most paper is sold-are usually more economical, because they minimize waste.
To figure the number of rolls of paper needed, calculate the square footage of the walls of the room to be papered, and divide by 30.
Subtract one roll for every two doors or windows, but always buy at least one extra roll.
Make sure the wallpaper’s edges are pre-trimmed.
Preparing the Room for Wallpaper Hanging
Before starting work, remove all furniture, rugs. drapes, and pictures from the room.
If you can’t move large pieces of furniture out push them together in the middle of the room.
Cover the entire floor surface, including the pushed-together furniture, with plastic drop-cloths, and secure the edges with masking tape at the baseboards.
Remove all switch and outlet cover plates.
Before you can paper, the walls of the room must be clean and smooth.
Ideally, any old paper should be removed, but if it’s sound and undamaged, you can paper over it.
Fill cracks and holes in painted walls with patching plaster, smoothed on with a putty knife or paint scraper.
Let the patches dry and Sand them smooth with fine-grit sandpaper repeat if necessary.
Vacuum the room thoroughly and go over the walls with a dry wall-cleaning sponge to remove dirt and dust.
If the walls are very dirty wash them down with a strong cleaning solution and let dry.
Wallpaper Hanging Video
If you’d prefer to watch wallpaper hanging video, rather than reading a text article, here’s a helpful one:
Wallpaper Sizing
Sizing is used for two reasons: It makes wallpaper paste stick better, and it makes later wallpaper removal easier.
Use the sizing recommended by your wallpaper dealer for use with your wallpaper and paste.
Paint the walls with sizing, using a large brush instead of a roller, apply one or two coats, as recommended.
Let the sizing dry completely
Start Papering
With the walls patched and sized, you’re ready to paper.
Start at a corner and work from left to right, or if you’re left-handed, from right to left.
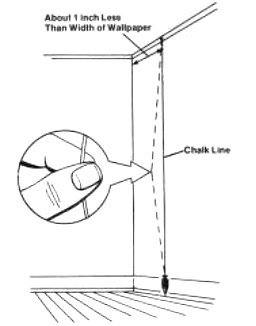
Along the top of the wall, measure a distance about 1 inch less than the width of the wallpaper.
Set a nail and drop a chalked plumb line from this point, from ceiling to floor.
Snap the line to mark the edge of your first wallpaper strip
Cut strips of wallpaper to cover an entire wall before pasting them up.
Measure the wall from baseboard to ceiling to determine the length of paper that you need.
Add about 4 inches to this to allow for trimming and slippage.
Cover your work table with a clean plastic drop-cloth and unroll the paper on it.
Measure off the length needed and cut the first strip: leave it on the table, face up.
The other strips of paper for the wall must be pattern-matched to the first one Calculate the number of strips needed.
Roll out a second strip of paper on the table, matching the pattern to the first strip: you may have to waste some paper to match the strips
Cut the second strip 4 inches longer than the measured wall height and move the first strip out of the way, leaving the second strip on the table.
Repeat this matching-and-cutting process, each time moving one strip farther along the wall, until all the strips for one wall have been cut.
Be sure to keep them in order.
Cut short strips, still in order, as needed to work around doors and windows, make sure both the overhead and underneath strips match the surrounding paper.
Cut these strips about 4 inches longer than measured as well.
Pre-Pasted Wallpaper
If your wallpaper is pre-pasted, fill the water tray.
Roll the first strip of paper loosely and set it in the water, let it soak for the recommended time before proceeding.
Non-Pasted Wallpaper
For non-pasted papers, mix the paste, following the manufacturer’s instructions.
Lay the strip face down on the work table, with one end hanging over the table end.
Spread paste on the table end of the strip smoothing it on with the paste brush, to cover about half the strip.
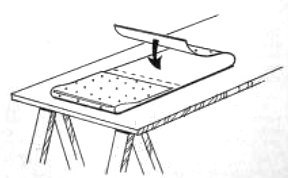
Fold this pasted end over on itself, paste to paste, and slide the folded strip down the table so that the other end of the strip can be pasted.
Spread paste on the other end of the strip and fold this end, too, back on itself, paste to paste. forming a folded-in U of paper.
Keep the edges even, and don’t crease the folds or the finished wall will have creases in it
Move the stepladder into the marked corner and stick the smoothing brush in your pocket, ready to use.
Picking Up The Pasted Wallpaper
To pick up the strip of pasted paper or moistened pre-pasted paper, slide your fingers under the edges of the folded-in strip, at the center of the U Lift the paper carefully, holding the top edge with your thumbs and forefingers.
Catch the other end of the paper with your ring and little fingers if it starts to slide.
Applying The Wallpaper to the Wall
Climb the stepladder to start the paper at the ceiling.
The long edge of the paper strip must line up exactly with the snapped chalk line on the wall.
Leaving about 2 inches extra above the ceiling line, unfold the top half of the paper strip, lining up the right edge on the chalk line.
Smooth the paper with your hand, working back from this edge toward the corner of the room.
Fold the extra inch of paper at the far side of the strip around the corner and onto the other wall.
When the top part of the wallpaper strip is securely in place, carefully untold the rest of the strip and smooth it onto the wall, making sure it lines up exactly with the snapped chalk line.
Smooth the paper slowly and firmly with the smoothing brush to remove air bubbles and excess paste, working toward the edges of the strip.
The paper should now be firmly in place if it has slid a little correct its position with a firm pressure on the brush.
A strip that’s badly out of place must be peeled off and re-positioned.
Dealing with Corners and Edges
Here’s a useful video on wallpapering corners:
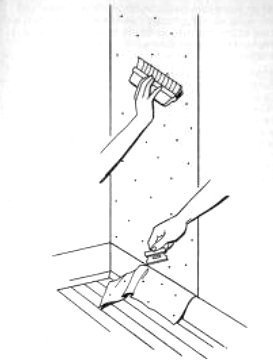
To secure the wallpaper around the corner and along the ceiling and the baseboard, use the edge of the smoothing brush head-on, as a pounding tool.
Strike the ends of the bristles against the edges and into the corner of the wall to push the paper firmly into place.
More Application Tips
Leave the edges untrimmed until the next strip of paper is hung, Repeat this basic procedure all across the wall, making sure each new strip of paper is matched to the one before it
To place each strip correctly match the pattern near the top edge, set the paper against the wall next to the previous strip and slide it to butt exactly against the already pasted paper.
Correct small mistakes in placement with the smoothing brush peel off very badly set strips and re-position them Smooth each strip with the brush as you go.
As each new strip is set into place and smoothed, pound its top and bottom edges into place.
Then trim the excess from the top and bottom of the last strip, using a sharp utility knife and following the wall-ceiling joint carefully.
Replace the knife blade as soon as it begins to get dull.
Press each new seam carefully with a seam roller, and wipe the roller frequently with a clean rag.
To work around a door, window, or a similar interruption, set the pre-cut short strip into place above the opening, handling it exactly like a full-length strip.
Repeat, being careful to match the pattern with strips under windows.
Trim the edges and roll the seams as before.
Use the same technique to hang paper all around the room, matching and trimming as you go.
Paper right over outlets and switches, and then go back and cut out the paper covering these areas.
The switch plates will conceal any ragged edges.
If a strip of paper ends exactly in a comer, fold the next strip around to overlap it slightly.
Cut closely along the overlapping edge with a sharp utility knife and a steel straightedge, told back the top layer of paper, peel off the trimmed-off strip beneath it, and re-stick the new edge
Finally, when papering and trimming are complete, pick up the drop-cloths and replace switch and outlet cover plates.
Here’s another video on wallpaper hanging which might come in handy:
If you have more than one complete roll of paper left over, save one roll for patching and return the rest to the dealer.
I found it helpful when you mentioned that it is important to thoroughly vacuum a roof before applying wallpaper. My wife and I want to renovate our room a little bit, and we think it would be a good idea to change the wallpaper so that it matches our furniture. I think it would probably be best if we hired a professional company to help us with this project so that we know it will be done correctly.
I have been thinking about making a feature wall in my living room this May. I would love to use a nice textured wallpaper for it. Thanks for pointing out that I will want to use firm pressure no the brush when applying the paper.