Hand saw sharpening is fast becoming a lost art.
It used to be that every craftsman knew how to sharpen a saw, and it was done with regularity.
In more recent times, the saw was taken to a saw shop for sharpening, but it was still done carefully.
Today, it is getting difficult to find a sharpening service that will do hand saws at all, and many of the ones that still do handsaws do not do them well.
It is not unusual to get a saw back from a saw shop in an all-but-unusable state.
Fortunately, handsaw sharpening is a skill easily mastered, and with minimal investment.
Any handsaw user can learn to maintain his own saws in peak form, and save the time and expense of dealing with a saw shop.
Tools Required
The only tools required are:
- Saw vise (commonly available used, or make your own)
- Small triangular file
- Fine mill file
- Saw set (common as dirt in the used tool world. Any flea market should have some)
The saw vise is used throughout the process to hold the saw steady, and dampen the vibration of filing the blade.
Nothing fancy is required here–anything that holds the saw still along its entire length will do.
The sharpening process for a handsaw is broken into three basic parts:
- Jointing – making all teeth the same height
- Setting – bending each tooth slightly to widen the kerf
- Filing – putting a sharp edge on each tooth
Each of these processes is discussed in detail below.
Jointing the Blade
Before you sharpen a saw, you should first carefully examine the teeth to be sure they are all of uniform size and shape.
Saws that have been resharpened many times or poorly maintained may show gross irregularities in this area, which need to be fixed before the saw can cut well.
This process is called jointing the saw.
Note that jointing is not necessary with every sharpening, and overzealous jointing or jointing too often can shorten the life of your saw.
I will normally joint a saw when I sharpen it for the first time, and very sparingly thereafter.
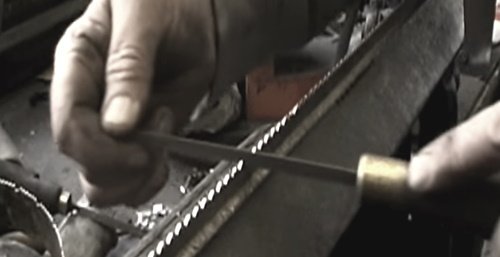
The process of jointing involves using a fine mill file to knock off the tips of the higher teeth, until all teeth are the same height.
Jointing should be done in a series of light file strokes along the entire length of the blade, until each tooth has a shiny tip (indicating it has been touched by the file).
The file should be run lengthwise across the blade to keep the cut as flat as possible.
It is very important that the file is held perfectly square to the teeth to prevent rounding the points over, so a jig of some sort is commonly used.
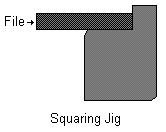
Commercial saw jointers are commonly available on the used tool market, but I have had good success with a very simple jig made from an 8″ long block of wood with the following profile:

The file rests in the rabbet on the top of the jig, and the face of the jig is held against the saw.
The chamfered corner gives clearance for the saw teeth, allowing the jig to hold the file straight and square to the edge.
Setting the Teeth
Now comes the great handsaw controversy: Set and file or file and set?
These two steps can be done in either order, and each way has its adherents.
I personally prefer setting first, as having the teeth at the proper angle makes me more likely to get a uniform edge on each tooth when sharpening.
On the other hand, having teeth of varying heights makes getting an even set very difficult. In reality, it really doesn’t matter–try it both ways, and see what you prefer.
Setting is another optional step in sharpening–It does not need to be done every time.
I will always set a saw the first time it is sharpened, and again as rendered necessary by repeated sharpenings.
If your saw is binding in the kerf after sharpening, it usually means it is time for a setting.
The actual process of setting the teeth involves using a tool called a saw set to bend the tops of alternating teeth slightly to the left or right.
The purpose of this is to provide clearance for the blade in the kerf, which keeps the saw moving smoothly and not binding.
The amount of set to use for a saw depends on several factors (one of which is personal preference).
In general, a light set is preferred for smooth cuts in seasoned wood and a wider set is better for very soft or green wood.
No set at all is also an option on some saws-small backsaws and saws designed for use in mitre boxes work very well with no set.
Adjusting a Saw Set
Note that there are two components which affect the amount of set in a tooth: Where the tooth is bent, and how far it is bent over.
A typical saw set will have separate adjustments for each of these, which need to be set for the particular saw you are setting.

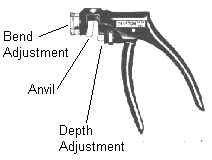
A pistol-style saw set works by using a small point to press the tooth against an angled anvil. The anvil is typically a small disk with a chamfered lip.
The width of the chamfer varies around the circumference of the anvil to accommodate different point sizes.
While the anvil is often conveniently marked with various point sizes, these markings should usually be ignored.
They often represent positions that bend the tooth much too far. Instead, align the anvil such that the edge of the chamfer is lined up with the middle of a tooth–this way, only the top half of the tooth will be bent.
Moving the bend lower on the tooth makes it likely that a tooth will break off during setting while moving it higher will limit the amount of set you can impart.
Adjusting the amount of bend imparted to each tooth is accomplished by adjusting the stop rod on the set. The further out the stop rod is, the more each individual tooth will be bent.
To adjust the stop rod, loosen its lock nut and “hang” the set on the saw. Move the rod inwards or outwards until the chamfered part of the anvil is parallel to the face.
From this point, move the rod out one half to one turn (depending on the amount of set you want), and fix it in place with the lock nut. At this point, the set is adjusted for this particular saw.
Using a Saw Set
Once the set has been adjusted, using it is quite simple.
Starting with the saw in the vise, find the first tooth which points away from you.
Position the saw set such that the point of the plunger is lined up directly behind that tooth and the tip of the stop rod is resting on the blade of the saw.
Now, gently squeeze the set’s handle until the plunger forces the tip of the tooth into contact with the anvil.
This process is then repeated for every other tooth along the entire length of the blade, being careful to use equal pressure on each tooth.
When all of the teeth have been set from this side, flip the saw in the vise and repeat the process on the remaining teeth. When you are finished all teeth should have been bent the same amount, half to the left and half to the right.
Sharpening (Filing) the Saw
Finally, after all of this preparatory work, we get to the real meat of the problem–putting an edge on those uniform-sized, evenly set teeth!
At this point, it is a good idea to re-adjust the saw in the vise such that the gullets of the teeth are just above the lip of the vise, maybe 1/8″ or so. This prevents the file from chattering as it cuts and also helps dampen the “screaming” sound.
A small triangular file is the main tool used for sharpening.
The size of the file is pretty irrelevant (as long as it is triangular in cross-section), but it is easier to maneuver a smaller file (4″-6″).
Whatever file you use, be sure to put a comfortable handle on it to make it easier to grip and control.
Filing a Crosscut Saw
When filing a crosscut saw, you need to file the front of each tooth set towards you (and conversely the back of each tooth set away from you) at an angle, such that the *side* of the tooth has a sharp edge.
To accomplish this, the file must be held at an angle to the blade.
To get the file in the proper position for filing a crosscut saw, place a point of the file in the gullet of the first tooth set towards you and parallel with the benchtop.
Rotate the file horizontally such that the tip of the file is pointing towards the handle at about a 45-degree angle.
This is the filing position for the saw–every tooth on this side will be filed in the same angle.
With the file in this position, make 2-3 light passes in the gullet. The front of the tooth should now have a uniform bevel with a sharp edge.
Repeat this procedure on all the teeth set towards you ( i.e. alternate teeth) all the way down the blade.
The number of passes per tooth and the pressure used should be kept constant throughout the process in most cases.
Only in the case where you have non-uniform teeth from a previous sloppy filing job should you need to file one tooth more than another.
After filing all of the teeth on one side, flip the saw in the vise and repeat the process for the remaining teeth.
Try to keep the same relative filing angle (of course it will be in the opposite direction since you flipped the saw), and the do approximately the same amount/pressure of filing as you did on the other side.
Filing a Rip Saw
When filing a rip saw, you need to file the face of each tooth straight across, such that the *top* of the tooth has a sharp edge.
For this reason, the file needs to be run perpendicular to the blade, rather than at an angle to it.
Other than the difference in filing position, the sharpening of rip teeth is identical to that for crosscut teeth.
Note that even though rip saws are sharpened straight across, you still need to file alternate teeth, flip the saw in the vise, and file the remaining teeth. The reason for this is that no sharpener can hold the file absolutely perpendicular–a slight tilt is inevitable.
If all teeth were filed from the same side, this tilt would cause the saw to “lead” right or left while sawing.
If teeth are sharpened from both sides with the same relative tilt, the two leads offset and the saw will cut straight.
Hand Saw Sharpening Videos
Here are a couple of sharpening videos which may be useful:
Testing the Cut
After all of the above steps comes the moment of truth— testing the saw cut.
The saw should be able to follow a straight line and should leave a smooth surface on the cut.
If the saw does not cut perfectly, all is not lost, however. Here are some common problems and their solutions:
The Saw is “Leading” Left or Right
This is an indication that the saw has not been evenly set or filed. This can be addressed by “dressing” the side which is leading.
To dress the blade, drag a fine sharpening stone over the sides of the teeth on the side the saw is leading towards.
Don’t overdo this, though– one or two passes should take care of the problem.
The Saw is Binding in the Kerf
If the saw is following a straight line well (i.e. not leading) and it still binds in the kerf, the saw needs more set.
Adjust the stop rod on the set outwards a small amount and reset the teeth.
The Cut Has Ragged Edges
This is typically caused by an over-aggressive set or dull teeth (since you just sharpened the teeth, you can probably rule that out).
Since there’s no way to “un-set” teeth, this is a condition you will need to live with until the saw has been sharpened enough to remove most of the set.
In a really bad case where the saw is unusable you can resort to dressing both sides of the teeth, but this is a last-gasp measure.

One thought on “Sharpening a Hand Saw”