Because you care more about how a finished room will look, painting a room is one job you can do better than the professionals.
Thorough preparation is the key to a good paint job, and containing the mess is the way to keep the rest of your home livable during the process.
Preparing the Room for the Paint Job Ahead
Paint one room completely before beginning work on another, and keep a clean pair of shoes near the door so that you don’t track paint elsewhere.
Protecting Your House From the Paint
First, clear the room. Remove all drapes, carpeting or rugs, light fixture covers, and pictures.
If you plan to put pictures back in the same places, leave the nails or fasteners in the walls; otherwise, remove them.
Pack loose items and move as much furniture as possible out of the room.
Large pieces that you plan to leave in the room should be pushed together in the middle of the room.
Cover the entire floor surface, including the furniture in the middle of the room, with plastic drop-cloths and spread newspapers along the baseboards.
Tape the newspapers and drop-cloths in place.
The walls and ceiling must be clean before painting.
Scrape them to remove any loose or flaking paint, being careful not to gouge the plaster.
Remove dust and cobwebs from the ceiling with a dust mop.
If the old paint is very dirty, wash the walls and ceiling with household detergent or some other strong cleaning solution, using a large sponge.
Let them dry completely before proceeding
Apply masking tape to protect edges of woodwork and trim that are not to be painted.
Drive in any loose nails.
Remove switch cover plates and outlet covers.
If you want the covers to match the walls, set them aside to be painted separately.
Loosen all light fixtures, and let them hang clear of the ceiling Cover dangling fixtures with plastic bags.
If possible, you should work by daylight: use a trouble light if you need more light.
Room Painting Video
If you’d rather watch video instructions than read an article, here’s a quick helpful video:
Surface Preparation
Interior walls should be as smooth as possible.
After loose paint has been removed, most small flaws can be repaired with patching plaster.
Apply the compound with a putty knife, using quick, firm, even strokes to fill dents and small holes.
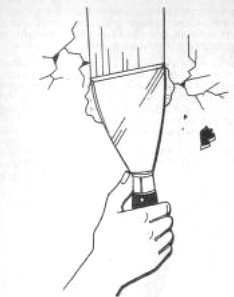
To keep the surface even in areas where patching is extensive, use a wide paint scraper
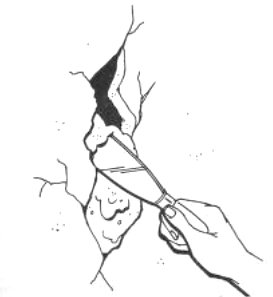
Long cracks need more work.
Scrape along cracks with the sharp edge of the putty knife to break out any loose plaster and paint chips.
Vacuum the crack to remove loose material and press patching plaster into the crack with your finger, following the line of the crack.
Apply more compound sparingly, using the wide scraper to cover and smooth the compound all along the crack.
Fill nail holes in painted wood trim the same way, applying patching plaster with your finger and smoothing it with a putty knife.

Let the patches dry completely, preferably overnight.
The compound will be bright white when it dries.
Using fine-grit sandpaper and a sanding block, smooth the patched areas carefully to blend in with the surrounding wall area.
The patching compound shrinks as it dries, so you will probably have to re-patch large nail holes and deep cracks at least once.
Follow the same procedure, sanding the new patches smooth when they are dry

To complete your preparations, go over all wall and ceiling surfaces with a special, dry wall cleaning sponge to remove all loose plaster dust Vacuum the room to eliminate as much dust as possible.
Priming
Finally, prime all patched areas with a light coat of paint, applied with a medium-size brush.
Let the prime coat dry for several hours or Overnight
Start Painting!
With ceiling and wall surfaces clean and smooth you’re ready to paint.
Stir the paint thoroughly following the directions on the can.
Paint all corners and edges that adjoin masked trim by hand: use the tip of the brush to produce a clean edge next to a surface that isn’t to be painted.
Paint ceiling edges first, then wall edges and door and window frame edges. Set the brush aside, but don’t clean it yet, you may need it for touch-ups
Now pour some paint into the roller pan, filling only the deep part of the tray, clean the edge of the paint can with the stir stick as you stop pouring.
Dip the roller into the paint and roll it up and down the slope of the pan to load it evenly
Paint the ceiling first.
If you have strong arms, you can use a roller extension handle or a wooden mop handle to let you reach the ceiling without a ladder, but this requires firm control.
If you’re doubtful, use the roller without an extension.
Set up a scaffold with two stepladders and a wide plank to give you a solid footing.
You must paint the entire ceiling at one time or it will streak.
Starting at one edge, apply paint to a 2 or 3-foot-wide area of ceiling, using even zigzag strokes.
Fill in with cross-strokes, keeping the strokes close together.
Keep the roller well loaded with paint but not dripping.
Repeat this procedure across the entire ceiling, covering one area at a time and using cross-strokes to blend each area into the ones painted previously
Use the same technique to paint the walls, working in vertical strips from left to right (if you’re left-handed, you may want to work from right to left).
Use cross-strokes to smooth and blend vertical strokes, and don’t stop in the middle of wall.
Turn the roller, if possible, to paint the horizontal strips above doors and windows
If you want switch plates and outlet cover plates to match the new paint, place them on newspaper.
Roll paint on the cover plates and let them dry.
Let all new paint dry completely, and replace fixtures. switch plates, and cover plates
Woodwork can be painted with regular flat interior paint or semigloss enamel trim paint.
The semigloss is more durable and easier to keep clean.
After the paint has dried, remove all masking tape from baseboards and other trim, being careful not 10 mar the new paint.
Stir the paint thoroughly Paint the trim with a medium-size brush, brushing along the grain.
Hold a sheet of light cardboard butted against the trim to protect the newly painted wall, painting with one hand and moving the cardboard mask with the other to keep the mask in place as you work along the trim.
Finally, paint window frames, door frames, and doors. Mask window glass with tape, and open the windows about 3 or 4 inches.
After painting, move the sash to keep it from sticking.
Do not forget to mask doorknobs and lock plates before painting
Clean-up
Clean the brush, roller-paint pan, and other tools with cool, soapy water, and rinse them thoroughly.
Fold the drop-cloths paint side in.
Here’s another video which might come in handy for a beginner at room painting:
Congratulations, you’ve painted your room!
