Have a broken wall switch or outlet that needs replacing?
You’ve come to the right place!
Replacing an Electrical Wall Switch
A malfunctioning wall switch can be a real problem, but it’s simple to replace the switch yourself.
Caution: Before starting to work, turn off the power to the switch: remove the fuse, or trip the circuit breaker that controls the outlet.
Step 1: Identifying the Type of Switch
You must, however, use the right type of switch.
The most common type is the single-pole switch; it controls a light or a wall outlet that has no other switch control.
If the light is controlled by two switches-at both the top and the bottom of a stairway, for instance-the switches used are three-way switches.
Be sure you get the right type. The instructions given here are for single-pole switches only
Step 2: Removing The Old Switch
With the power turned off, remove the switch’s cover plate.
If it has been painted over, cut carefully around the edge of the plate with a single-edge razor blade. Remove the screws and lift the plate off.
The switch is attached to the switch box with two screws. Remove these screws and pull the switch carefully out from the box, just far enough so that you can get at the wires.
Now examine the wiring.

If the switch is at the end of an electrical cable, it uses a switch loop, two wires are connected to the switch, one white and one black.
If the switch is somewhere in the middle of a run of cable, you’ll see two cables in the box, each with a white and black wire.
In this situation, a black wire from each cable is connected to two terminals on the switch, and the two white wires are connected to each other.
Don’t touch either of these connected white wires or any bare or green ground wires that may be visible.
Now disconnect the old switch Loosen the two terminal screws on the switch and disconnect the two wires connected to them Discard the old switch.
Step 3: Installing the New Switch
Examine the new switch and you may discover that it has push-in terminals, as well as screw terminals like the old one.
With these you connect the switch by stripping about 1/2 inch of insulation from the wires and pushing them into holes in the rear of the switch.
To disengage the wires, you insert a narrow screwdriver blade into slots adjacent to the holes
If the new switch has terminals only, loosen the same two terminal Screws on the new switch and set the switch into the box, holding it in place.
To install the switch, connect each black wire (or the one white and one black wire) to the proper terminal.
To make the connections, set the loop at the end of each wire around the correct terminal screw, with the loop facing clockwise so that it can be screwed in neatly and tightly.
Tighten the terminal screws.
Place the new Switch into the switch box and secure it with its two mounting screws.
Replace the switch’s cover plate and secure it with its screws.
Finally, restore power to the switch’s circuit.
Replacing an Electrical Outlet
An electrical outlet that doesn’t work is more frustrating than no outlet at all, but it’s easy to fix
Caution: Before starting to work, turn off the power to the outlet, either remove the proper fuse or furn the circuit breaker off at the main entrance panel or box.
Step 1: Identifying the Old Outlet Type
Replace the dead outlet with a new one of the same type, either ungrounded or grounded.
Un-grounded outlets have slots for two-pronged plugs, grounded outlets also have holes to accept three-pronged plugs.
Examine the old outlet and buy a new one of the same type to replace it
Step 2: Removing the Old Outlet
To replace the outlet remove the plate that covers it, unscrew the center screw and lift the plate off.
If the plate has been painted over, cut carefully around it with a single-edge razor blade before removing
Remove the two screws, one on each end, that hold the outlet in the electrical box.
Carefully pull the outlet out of the box, as far as the wires inside will extend, don’t force the wires out.
Look at the wires carefully to see how they’re connected: you must connect the new outlet exactly the same way.
To remove the outlet, disconnect the wires from the terminal screws where they’re attached.
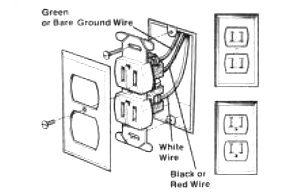
On an ungrounded outlet, there are two wires to disconnect, a black or red one and a white one, on a grounded (three-prong) outlet, there’s also a green or bare wire.
If you’re not sure you can remember which wire goes where, tag the wires and their connections on the old outlet with labels made from masking tape.
Lift the outlet out of the box.
Step 3: Installing the New Outlet
To install the new outlet, connect the wires in the box exactly as they were connected to the old outlet.
One difference is that the new outlet will most likely have push-in terminals as well as screw terminals.
Push-in terminals are easy to hook up.
You simply strip about 1/2 inch of insulation (or straighten out the loops that wrapped around the old terminals) and push the bared wires into holes in the rear of the new outlet.
Inserting a narrow blade screw driver into slots adjacent to the holes releases the wires. Instructions on the package and on the outlet itself explain where to connect black, red, and green wires.
If your new outlet doesn’t have push-in terminals, or you prefer to use the screw terminals, connect the black or red wire to the dark screw on the outlet the white wire to the silver-colored screw.
For a grounded (three-prong) outlet, connect the green or bare grounding wire to the brass or green marked screw on the outlet and then to the electrical box.
Connect each wire by looping it clockwise.
Under the correct screw, tighten the screw firmly over the wire loop.
If bare wire shows near the screw head, loosen the screw, disconnect the wire, and cut off the extra length with diagonal wire cutters, reconnect the wire.
After connecting the wires to the new outlet, set the outlet in place in the electrical box, folding the wires carefully in behind the outlet.
Be careful not to pinch the wires behind the outlet.
If the outlet is a grounding outlet and is set vertically in the wall, set it in with the holes for the third prongs toward the floor.
Replace the two screws that hold the outlet in the box
Finally, replace the outlet cover plate and the screw that holds it in place, and turn the power on.