Cuts, Scratches, holes, and worn spots in resilient vinyl sheet flooring are easy to repair.
How to Fix Cuts and Scratches in Vinyl Flooring
Make a patching compound to fill deep cuts, scratches and dents in resilient flooring.
You can do this by bending a small piece of scrap flooring sharply, top surface out.
Holding the bent piece of flooring over a shallow pan, scrape the bend with a sharp utility knife to produce a fine powder.
Scrape only as deep as the surface color, rebend the scrap flooring as you work to keep the scrapings a uniform color.
Scrape enough powder to more than fill the hole or scratch.
Here’s a video showing how to repair cut/torn vinyl:
Add a few drops of clear nail polish to the scrapings and mix to a thick paste.
Use masking tape to cover and protect the area around the scratch or hole to be filled
Apply the vinyl paste to the scratch with a putty knife, smoothing the surface carefully.
Let it dry for about an hour, and then remove the tape around the patch.
Using grade 000 steel wool buff the patch to make it shiny.
Fixing Large Holes in Vinyl Flooring
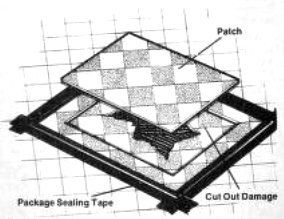
Patch large holes and worn spots with scrap pieces of flooring.
Choose a piece larger than the hole and set it over the bad spot.
Align the pattern of the patch exactly with the pattern on the floor, then, being careful not to move the patch, tape it firmly to the floor all around the edges, with package sealing tape-not masking tape.
Using a sharp utility knife and a steel straightedge, cut a rectangular patch from the taped-down piece of flooring.
The patch must be larger than the hole underneath it.
If the floor has a pattern of bricks or other regular shapes, cut along joints or lines as much as possible.
The utility knife will not cut completely through the flooring at the first stroke.
Keep the straightedge in place and cut along the same score lines, being careful not to cut a ragged edge, until both the patch and the vinyl sheet flooring beneath it are completely cut through.
Untape the patch sheet and pop out the newly cut patch.
Cover the marked-off worn spot in the floor with aluminum foil, shiny side up, and spread a clean rag over the toil.
Using an electric iron set at moderate heat, warm the floor to soften the adhesive under the bad spot.
Remove the damaged patch with a putty knife-be sure the corners are cleanly cut.
Let the adhesive that is left in the patch area harden for about an hour and then scrape it completely out.
Tape scrap flooring material over the damaged area carefully matching the pattern.
Cut through patch and floor layers at the same time to obtain a patch that fits precisely.
Before you get the patch into place, make sure it fits the opening in the floor.
Sand the edges of the patch slightly if necessary.
Using a notched trowel. spread floor tile adhesive on the floor where the patch will go.
Set the patch carefully into place in the opening, butting one edge against the surrounding flooring and then lowering the entire patch.
Remove any excess adhesive.
Finally, seal the edges of the patch.
Do this by covering the edges with aluminum foil, spreading a clean rag on the toil, and pressing with a hot iron.
Press firmly, but don’t hold the iron in one place for more than a few seconds.
Remove the foil and cover the patch with a piece of scrap wood.
Weight it with a can of paint or some other heavy object for the entire curing period of the adhesive.
Don’t wash the floor for at least a week
Replacing Vinyl Floor Tiles
Damaged vinyl tiles are easy to reglue or replace.
Tiles that are loose or curled up at the corners can be reglued.
First, however, cover the loose tile with aluminum foil and spread a clean rag or small towel on the foil.
Using moderate heat, press the edges of the loose tile with an iron to soften the old adhesive.
Carefully lift only the edges of the tile with a putty knife and scrape off the old mastic
To reglue the tile, spread a thin layer of mastic on the cleaned area, scraping any excess adhesive off.
Press the tile back into place, smoothing it from center to edges.
Cover the entire tile with a piece of scrap wood and weight it with a gallon can of paint or other heavy object.
Leave the weight in place for the entire curing period of the new mastic as recommended by the manufacturer.
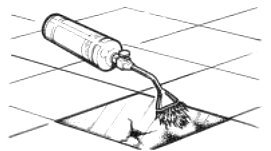
To remove a tile, warm it with a propane torch fitted with a flame-spreader nozzle.
Be careful not to damage surrounding tiles.
Pry up the edges and off the tile off.
Allow mastic under the tile to harden before scraping it off
Damaged or badly stained tiles are removed entirely.
Warm the damaged tile carefully with a propane torch, or press with an iron over a clean rag and aluminum foil.
Being careful not to damage surrounding tiles, pry up the edges of the damaged tile and lift it off.
Allow the mastíc left under the tile to harden and then scrape it off.
If heat doesn’t loosen the damaged tile, you can use cold.
Wearing work gloves, cover the damaged tile with dry ice and allow it to stand for 5 to 10 minutes, then remove any remaining dry ice.
The damaged tile should be cold and very brittle Starting in the middle of the tile, use a hammer and chisel to split the tile and pry out the pieces.
Work from the center to the edges, being careful not to chip surrounding tiles.
Scrape the floor under the tile to remove all old mastic
Before gluing down the replacement tile, make sure it fits the opening precisely.
If it binds at the edges or overlaps the surrounding tiles, smooth the edges carefully with sandpaper.
Mark matching edges with a goase pencil to make sure you replace the tile correctly.
With a notched trowel, spread a thin layer of mastic in the opening for the new tile Set one edge of the tile in place and lower it into the prepared opening.
The new tile should be level with the rest of the floor
If it’s too high, press firmly to squeeze out excess mastic.
If it’s too low, lift the tile and apply more mastic and weight the new tile for the full curing time of the mastic
I have a question, not a comment
My home had “wood looking” lanoleum or vinyl flooring.. honestly not sure.
But I know that they are sheets and not tiles.
I do not have any scrap pieces…
There is a big hole in the flooring. How do I fix it? I also notice all kinds of dents from
heavy items that have been placed there and also dents from like dropping an object
with a pointy edge and where ever there is a dent that dirt gets really stuck in it
Do you have any suggestion on fixing the holes or the dents??
Thanks
Rena