When you begin to make larger projects, one of the first things you are confronted with is the necessity for gluing up several pieces of stock to form a larger surface area.
Sometimes this will mean gluing stock edge to edge to form a large surface.
This could be for making anything from a cutting board to a table top or ends of a desk.
Types of Glue Used
There are five common kinds of glue that may be used in the shop. They may be purchased under a variety of brand names.
Checking the description of the glue will tell you which type it is.
1. Animal Glue
This is made from hoofs, hides, bones, and other refuse of animals which have been refined and purified and then made into sticks or ground into powder.
There are many grades, depending on the quality and kind of wood for which it is intended.
Animal glue makes a strong-than-wood joint but is not waterproof.
If it is used in the dry form, it is necessary to have a glue pot or double boiler for preparing it.
For many years, it has been used as an all-purpose furniture glue.
It is also available in liquid form, which eliminates the necessity for heating and mixing.
If stick or powder glue is used, it must first be soaked in cold water from six to twelve hours.
While there are strict manufacturer’s specifications as to the amounts of glue and water, a satisfactory mixture can be made by soaking the glue in just enough water to cover.
The glue will absorb this water and then, when the heating is done, a small amount of water can be added as needed.
After animal glue is soaked, place it in the top of a double boiler or a regular gluepot and heat it to steam temperature.
The glue will dry out too much if heated directly over a flame.
Animal glue is ready to use when it runs off the brush in a light stream.
Before applying hot animal glue, the wood must be brought to a temperature of about 80 to 90 degrees F.
This type of glue must be applied rapidly, as it sets very quickly after cooling.
Cold liquid animal glue, which can be bought, eliminates these disadvantages.
2. Casein Glue
Made fro milk curd, casein glue is available in powdered form.
It is mixed with cold water to the consistency of cream and applied to the wood cold.
It is easy to mix and makes a stronger-than-wood joint. It is not completely water-proof.
Some types stain oak, mahogany, and other acid woods and must be bleached off.
It is excellent for all indoor and outdoor gluing with the exception of things which require complete waterproofing.
Do not mix more than you need at one time, as it loses its strength in a few hours after mixing.
To mix it, pour the powder in a container and add a small amount of water, stirring until it becomes a heavy paste.
Add more water until the mixture is about the consistency of thick cream.
Allow the glue to age about fifteen minutes before applying it with a stick or brush.
3. Plastic Resin Glue
Plastic resin glue is made from urea resin and formaldehyde.
It comes in powder form and is mixed with water to the consistency of cream.
It does not stain woods, is waterproof, and dries to a light color.
It is used in the same general manner as casein glue, but the manufacturer’s directions must always be followed for mixing and drying.
It is used for cabinetwork and is a type of glue commonly employed in bonding plywood.
4. Resorcinol Resin
This glue is made by mixing liquid resin with a powder catalyst.
It comes in a can divided into two compartments and should be mixed only as needed, according to the manufacturer’s directions.
It does not require much pressure and will fill gaps and can be used for gluing poorly fitting joints.
It provides complete protection from both fresh and salt water and is therefore ideal for all outdoor sports equipment.
5. Fish Glue
Fish glue is made from tissues and scales of fish and comes in a liquid form.
It is convenient to use and provides strong wood joints, but is not waterproof.
It is used primarily for small assemblies and for repair jobs.
This is more expensive glue and therefore would not be satisfactory for larger projects.
Ten Tips for Successful Gluing
- Make sure the surfaces are clean and dry.
- Prepare well-fitted joints.
- Select the correct glue.
- Mix the glue to the proper consistency.
- Mark the pieces to be glued for correct assembly.
- Have the proper clamps ready.
- Apply the glue to both surfaces of the joint.
- Clamp parts together properly.
- Remove excessive glue from the joint before it dries.
- Allow the assembly to dry properly.
Types of Clamps Used
1. The Cabinet or Bar Clamp
This clamp is used for gluing up larger surfaces edge to edge and for clamping parts together when assembling projects.
They are made in various lengths of from 2 to 8 feet and in several styles.
One end is adjusted to length by friction or by catches, while the other is moved in and out by a screw.
When using the cabinet clamp, the screw is turned out completely and then the catch or friction end moved in until the clamp is slightly wider than the total width of the stock to be clamped.
In using cabinet clamps on finished stock, protect the surface of the wood by placing small pieces of scrap stock between the clamp jaws and the wood.
2. Hand Screws
These are wooden parallel clamps with jaws that range in length from about 6 to 20 inches and open to distances of from 4 to 20 inches.
When using hand screw, the center screw is grasped in the left hand and the outside screw in the right hand.
The clamp can then be opened and closed by twisting the handles in opposite directions.
The hand screw is for gluing stock face to face or for clamping together any work that is within the range of the clamp jaws.
3. The C Clamp
Available in many sizes, the C clamp is all metal and is usually used in assembling and clamping odd or irregular shaped pieces on which the cabinet or hand screws cannot be used conveniently.
Making and Gluing Up and Edge Joint
1. Select and Cut the Stock
Select the rough stock that will form the larger surfaces.
If it is wider than 8 to 10 inches, it is usually ripped into narrower strips so that the total surface will not warp too much when the pieces are glued together.
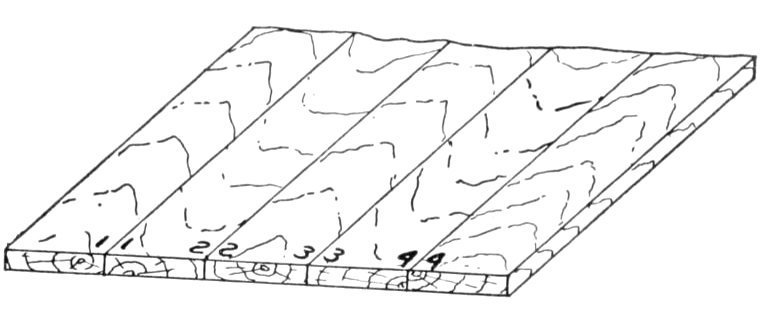
After the pieces have been cut, try to arrange them in their correct order, taking into consideration the following:
Note that the annular rings on the ends are faced in opposite directions on every other board.
This is done so that, if there is any warping, the boards counteract each other.
- Make sure that the grain of all pieces runs in the same direction, so that, after you have glued up the pieces, it will not be difficult to plane.
- Arrange every other piece with the annular rings on the end, faced in opposite directions.
This will help to prevent the surface from warping unduly. - Try to match the pieces to form the most interesting grain arrangement.
When these have been done, mark the end of each matching joint with corresponding numbers in a place where the marks can be easily seen.
2. First Planing
Plane one surface of each piece to take out any wind or warpage.
This will also help to determine the direction in which the grain runs.
If you have any pieces running in opposite directions, reverse them and re-mark the ends.
It will not be necessary to plane this surface accurately now because the assembled stock will have to be planted again.
3. Plane Both Edges Until They are Square wit the Face Surface
In planing an edge, the center should be slightly lower than the ends.
When the two matching edges are planed, clamp one piece in a vise and set the other piece over it edge to edge.
Then observe if a little light is coming through the crack toward the center of the joint and make sure that the ends are tight.
This is called the spring joint construction.
If this is not done, the ends will tend to separate after the pieces have been glued together.
As additional checks, hold a straightedge against the face surfaces of all the pieces to make sure that these surfaces do not bow.
Also, tap the top piece with your finger to see that it does not rock.
Finally, slide the top piece along the bottom one to see if it tends to have a suction action.
Continue to plane one surface and the two edges of each piece and match each of the joints.
4. Adding Splines
When joints with additional strength are desired, splines can be added to each joint.
To make a spline joint, cut a groove on the circular saw that is about one third as wide and deep as the thickness of the stock.
Then cut and fit splines into these grooves.
Allow a small clearance at the bottom of each spline for glue.
5. Make a Test Assembly of the Stock
After all the joints have been constructed, place the pieces in position again on the top of a bench.
If the pieces are extremely long, place them over two sawhorses.
If they are placed on top of a bench, use a jig to hold the bar clamps.
Select three or more cabinet or bar clamps, depending on the length of the stock.
There should be a clamp for about every 15 inches of stock.
Carefully set all cabinet clamps to the proper openings, so they will be ready to clamp the stock as soon as the edges are glued.
6. Gluing up the Stock
Hold the two matching edges together so they are flush, and apply the glue with a brush or stick.
Make sure that the edges are completely covered but do not apply too much glue, as this will squeeze out of the joint when it is put together, giving you extra trouble in removing it later.
When all edges have been glued, rapidly lay the pieces on the lower clamps until all are in place.
If possible, rub the two pieces together to work the glue into the pores.
Use a rubber mallet to tap the ends or the face surfaces to align them properly.
Tighten the outside clamps lightly.
Then place another clamp upside down on the stock at the mid-point and clamp this lightly.
Check all the joints to make sure that the face surfaces are flush and that the ends align.
Use a mallet to strike the pieces to bring them into place.
Then turn up each clamp until it applies firm pressure.
Don’t attempt to squeeze the wood too tightly.
If the joint is not constructed properly it will never draw into place.
Place a wood cleat above and below the surface at either end and clamp these in place with hand screws or clamps.
A piece of paper under the cleats will prevent them from sticking.
This will tend to keep the surface true and free from warpage.
Before the glue begins to harden, wipe off the excess from the outside of the joint.
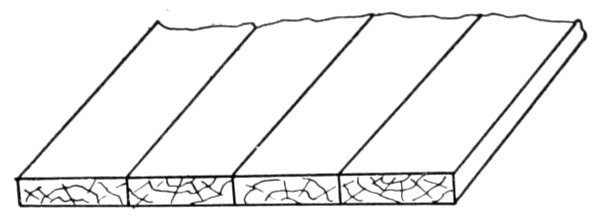
Gluing Up Stock Face to Face
Select and cut out several pieces of stock that will make up the correct size when glued together.
Arrange the pieces with the annular rings alternating in direction.
Also make sure that the grain of the pieces runs in the same direction.
Mark the ends so that you will know how the pieces should be arranged for gluing.
Plane the face surface of the two outside pieces true and smooth.
If more than two pieces are glued together, the center pieces must be planed to thickness.
Select several hand screw or C clamps and open them slightly wider than the stock to be clamped.
Apply glue evenly to the proper surfaces of the pieces and then clamp them together.
When you tighten the hand screws, you must take care that the jaws are parallel, to assure even distribution of pressure.
Review Questions
- Name the five types of glue and what they are made from.
- Which of these glues are waterproof?
- Which glue is best for a small repair job?
- What are cabinet or bar clamps used for and how are they used?
- What are hand screws made of?
- For what gluing jobs are C clamps helpful?
- Why and how is large board, wider stock ripped into narrow strips?
- What three things should be considered before gluing up stock?
- Describe a spring joint.
- What checks should be done when making a spring joint?
- What is the purpose of making a test assembly before gluing a joint?
- How much glue should be applied to edge joints?
- What kind of mallet should you use to pound wood surfaces?
- How can you keep surfaces true and free from warpage while clamping a glued joint?
- Why should the jaws of hand screws be parallel?