How many ways do you know to dry wood?
Do you want to learn another technique?
Do you sometimes feel under pressure to get wood dried and then turned in a hurry?
Well not to fear!
Now you can use your pressure cooker to take some of the pressure off of you.
Pros and Cons of Drying Wood with Your Pressure Cooker
Using your pressure cooker and forced hot dry air you can dry wood very rapidly.
The system is very inexpensive and most of it can be made from scrap supplies you can find in your and your friends junk piles.
This system can dry wood to about 12 to 14 percent moisture content in about 2 days.
The size of the pieces of wood that you can dry is limited by the size of your pressure cooker and the 4 inch diameter steel pipe that you will used for the forced hot dry air.
Preparing The Equipment
There are 3 different major components to this system:
- Pressure cooker
- Air drier
- Steel pipe for forced air dryer.
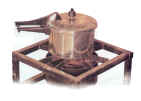
The pressure cooker is just a regular pressure cooker used for cooking meals.
I suggest that you find a used one from a garage sale instead of using your wife’s. (Photograph #1).
You can buy one new for about $30.00 or one from a garage sale for about $5.00.
The second component of the system is an air dryer.
The air that comes out of your air compressor contains a tremendous amount of moisture.
You want to dry this air as much as possible.
You will do this in 3 steps.
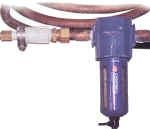
The first step is to use a water trap to remove water as it comes out of the air compressor. (See photograph #2.)
You probably already have one on your compressor so you do not need to buy one.
The second step in drying air is by using a condensing coil. (See photograph #3.)
Make this from a piece of scrap copper tubing.
(I had some left over from when I plumbed my shop.)
Carefully bend the copper into a fairly tight coil.
You will need a plumber’s bender for this or you can use a 12 inch diameter circle to bend the copper around. Try not to put kinks into the copper.
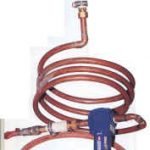
3. The condensing coil and water trap. Air from the air compressor goes through this coil which is sitting in water to cool it. Water condenses out at the bottom and the dry air goes to the steel pipe to be heated.
Take this coil to your plumbing supply store and get them to put connections to go from the coil to your air compressor line.
This is mixing two systems (air and water) so they may have to spend a few minutes figuring out how to make the transition.
Add another water trap to the bottom of the coil. (See photograph #3.)
This entire apparatus will be placed in a tub of cold water.
Air from the air compressor will go into the top of the coil. (See photograph #4.)
The air will be chilled and moisture will condense out at the bottom.
This additional water will be caught in the second water trap at the bottom of the condensing coil.
This is the most expensive part of the process.
The fittings and the water trap will cost about $30.00.
However, this air drier can be used for other projects where you need dry air such as putting on spray finishes.
Although the drier is not very pretty it is a whole lot cheaper than a commercial direr like the one I have at my dental office which cost about $500.00.
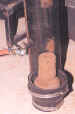
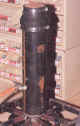
The third step in drying air is heating it in a 4 inch steel pipe. (See photograph #5.)
(Because it was necessary to reshoot photographs for this article, I painted it red so that it would show up in a photograph. The original black steel pipe was basically invisible to the camera. But not to my foot when I walked into it.)

4. I painted the steel pipe red so that it would show up in a photograph. The dry air enters through the tire vale just above the neoprene gasket.
This heated dry air will flow around and through your wood to dry it.
Again look around scrap piles or used metal collection centers for a four inch piece of steel pipe that is about 24 inches tall.
Wield one in off with a flat piece of steel.
It would be good to make this piece of steel about 6 inches square.
This would make a stable platform when the steel tube is placed on your fish cooker or heating plate.
(Mine has been ground off flush round because I originally used it for something else.)
Install an air nozzle for an automobile inner tube about 8 inches up from the bottom of the tube.
These cost about 25 cents a piece so you might as well buy a couple in case you lose one.
To install the air valve first drill a 5/8 inch hole (if the diameter of the valve is just barley over 5/8 inch).
The steel wall of the 4 inch pipe is too thick for the valve to nest in here properly.
To make the valve seat well it is necessary to counter sink the hole with a one inch drill that goes about half way through the steel. (See photograph #6.)
Next push the valve stem through from the inside. This will be a low pressure system, so the requirements of the fit are not terribly crucial.
The dry air comes out from the bottom of the condensing coil.
Run the dry air from your condensing coil into the 4 inch steel pipe by connecting to the inner tube valve.
Set your air regular valve so that only about 4 to 6 pounds of air pressure comes through the line.
You will experiment with this setting later to make sure you have the proper air flow.
Next you must buy a neoprene plumbers collar that goes from 4 inches to 3 inches. (See photograph # 7.)
The large end of the collar fits over the open end of the steel pipe.
The 3 inch end holds the 3 inch piece of green turned wood that you will dry.
See photograph #8 for the way the wood fits into the neopream gasket.
The Drying Procedure
5. Air goes in the bottom. The air is heated and travels up and through the wood that is held by the gasket at the end of the pipe. The air is very dry because it went through the condenser and is then heated.
The first step of the procedure is to turn a 3 inch diameter piece of wood that you want to dry.
It must be able to fit into your pressure cooker, so the length is determined by the width of your pressure cooker.
Check with your calipers to make sure that the wood will fit snugly inside your neopream plumbers gasket.
The second step is to place the wood in the pressure cooker and fill it almost full with water.
Place the pressure cooker on your fish cooker or heating plate.
Cook under pressure for several hours.
The only major concern here is that your pressure cooker not run out of water.
The super heated water will dissolve a lot of the tars and resins that fill the tubles of the wood.
Having the tubles open and free of tars will make it easier to dry the wood.
When the wood has been thoroughly cooked (at least 2 hours) carefully remove it from the pressure cooker.
Cool the pressure cooker under running water before opening it. Handle the wood with thick leather welder gloves to ensure protection.
Now apply the large end of the neoprene gasket to the upper end of the 4 inch tube.
Tighten the 4 inch end of the gasket with the hose clamp that comes with the gasket.
Next insert the 3 inch tube of wood into the 3 inch end of the gasket.
Note that one end of the wood must be 3 inches in diameter and about 2 inches deep to make an adequate seal with the gasket.
The rest of the wood can be narrower if you desire so that the wood will dry more quickly.
Lightly tighten the metal gasket around the wood.
It is important the clamp around the 3 inch end is not too tight.
Air must be able to escape from around the wood, but it must be tight enough so that the wood does not fall through.
6. Steel tube with air hose connected.
Hook up your cooling coil and place it in a tub of cool water.
Hook up the dry end of the air to the 4 inch tube steel.
Put your hand over the wood to make sure that a little bit of air is escaping from around the wood.
Now place the 4 inch steel tube with air attached on the fish cooker.
Make sure that the fish cooker is set to low temperature.
The low heat of the cooker will warm the air making it able to hold even more water.
The heated dry air will rise and flow around the wood. In about 48 hours the wood should be quite dry.
Safety Considerations
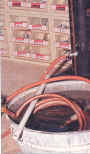
7. Condensing coil in water to cool the air. Air hose is connected to the steel drying tube.
It is necessary to think about what you are doing and be careful.
Your are working with a pressure cooker, a heated steel 4 inch tube, and a fish cooker or heating plate, all of which can be dangerous. Wear leather gloves whenever you are handling anything hot.
Make sure that there is no saw dust or anything else that is combustible around your fish cooker or heating plate.
Make sure that if your 4 inch tube turns over that it can not cause anything to catch on fire.
Do not try to force steam under pressure through the 4 inch steel tube.
This can make a steam cannon with enough force to kill someone.
I tried this and the resulting explosion was quite remarkable.
Fortunately I knew that this was a possibility and had built a containment enclosure around the system.
Results
This technique will allow you to dry small pieces of wood to about 12 percent moisture in 2 days.
If your wood is not dry enough just allow it to dry additional time in the forced air steel tube.
Wood of about 1 ½ inch diameter will be extremely dry in 2 days.
The 3 inch diameter wood will have a little higher moisture content toward the center.
At 3 days the 3 inch diameter wood is very dry in the center.
I used the Wagner moisture meter for this article because I already owned one, but it really is not necessary.
Hard, dry, dusty, wood is dry enough.
.One word of caution if you are not used to working with dry wood, it is hard and dusty.
There are some exotic oily woods that you will not want to use this technique on.
After all you paid a lot of money for that expensive oil and you do not want to boil it away.
Conclusion
This might be a fun project for you to build.
You will develop an additional technique for drying wood and will have made an air drying system for your air compressor.
There will be times in your turning future that you will enjoy being able to dry your wood in a short period of time.
Be careful and have fun.
