You would find woodworking pretty dull if everything were made in flat, straight planes.
Curves, geometric designs, and shapes in the form of animals and other representations of nature add beauty to your projects and interest to the making of them.
There are also many things that depend for their usefulness on a curved or molded shape, such as archery bows, canoe paddles, or boat hulls.
In this article, you will work with saws and other cutting tools especially suited to the development of irregular, molded, curved, and formed designs.
Laying Out and Transferring Curves and Designs
Many projects contain pieces with irregular designs or geometric shapes that must be transferred to the wood from a drawing before further work can be done.
If it is a geometric design, the layout can usually be made directly on the wood.
However, if it is an irregular design, it is first necessary to draw a full-size pattern on paper and then to transfer it to the wood.
Dividers
A divider or an ordinary pencil compass is used for laying out small circles
The divider is more accurate and has other uses in layout work, such as dividing space equally, transferring measurements, and drawing arcs.
To set the dividers, place one leg over the inch mark on the rule and then open the other leg to a distance desired.
Lock the thumbscrew.
On some dividers, there is an additional spring nut that is used to make fine corrections in the setting.
Drawing Circles
Set the dividers to equal half the diameter of the circle.
Place one leg over the center of the circle, tip the dividers at a slight angle, and, working from left to right, draw the circle.
When drawing circles on finished wood, place an eraser from the end of a pencil over the point of the divider’s leg which is to act as the center.
To lay out larger circles, use a set of trammel points or tie a piece of string to a pencil and use this as a compass.
Laying Out a Rounded Corner
The corners on many projects are rounded for appearance and utility.
To lay out these corners, first determine the radius of the arc from the drawing.
Then mark this distance from the corner on the adjacent side and end/
Then, with a try square held against edge and end, draw two lines that intersect, to indicate the center of the arc.
Set the dividers to the proper radius and draw the arc.
Laying Out an Octagon
An octagon has eight equal sides and all angles are equal.
Determine the distance across the octagon from one side to the other and lay out a square of this size.
Next, set a pair of dividers or compass to equal half the diagonal length across the square.
Set the point of the compass at each corner of the square and strike an arc from one side of the square to the other.
Do this from each of the four corners.
Join the points where the arcs intersect and the sides of the square.
Laying out a Hexagon
A hexagon has six equal sides and all angles are equal.
Determine the length of one side.
Set a compass or divider to equal this measurement and draw a circle with this radius.
Begin at any point on the circle and without changing the setting draw a series of arcs, moving the point to the place where the preceding arc has intersected the circle.
The last arc should intersect the circle at the first point made by the compass.
Join these points with a straightedge.
Drawing an Ellipse
An ellipse is a regular curve that has two different diameters.
Lay out the two diameters at right angles to each other (AB and CD).
Set the dividers equal to one half the longest diameter.
Place the point of the dividers on point D and strike an arc to intersect the longest diameter at points X and Y.
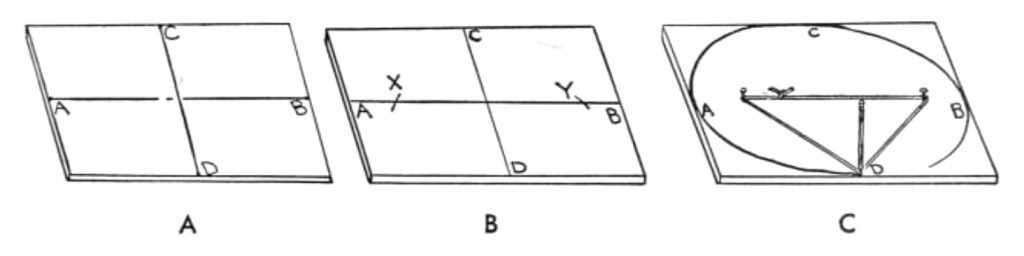
Place a thumbtack at these two points and another at one end of the longest diameter.
Tie a string around the two outside thumbtacks.
Remove the outside thumbtack and place a pencil inside the string.
Hold the pencil at right angles to the paper and carefully draw the ellipse.
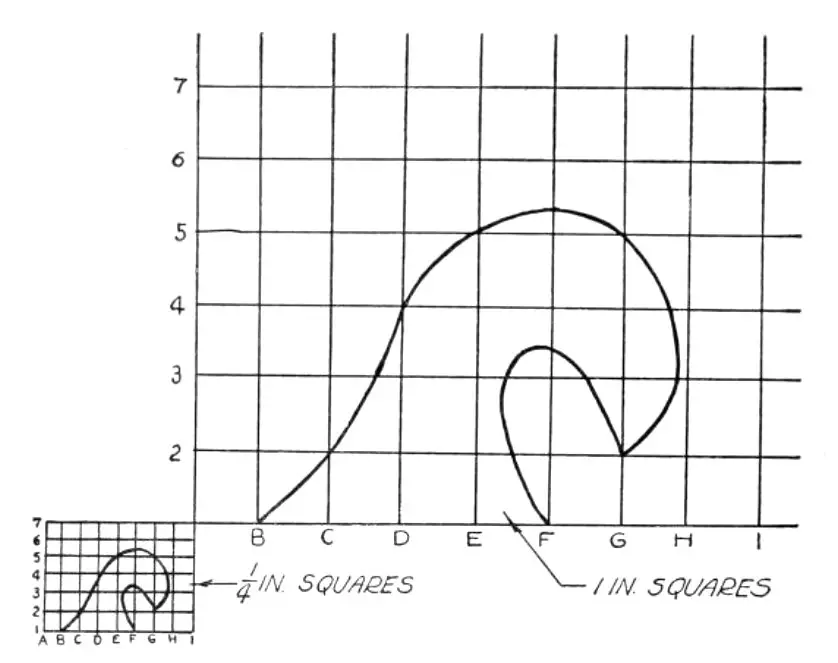
Enlarging Irregular Designs
Frequently a project that is found in a book or magazine will not be drawn to full size.
If the project contains irregular parts, it will be necessary to make an enlarged drawing to use as a pattern in making the layout on the wood.
You can do this in the following manner:
- Determine how much the original drawing is reduced from full size.
Usually drawings in books or magazines will be one half or one fourth of full size.
If the original drawing is not already on squared paper, lay out squares over the print representing the amount of reduction.
For example, if the pattern is one fourth of full size, draw 1/4″ squares. - On a large pieces of wrapping paper, carefully lay out 1″ squares.
From the lower left-hand corner of both the original drawing and the layout paper, letter all horizontal lines A, B, C, etc.
Using these letters and numbers, locate a position on the original drawing and then transfer it, to the full-size pattern.
Continue to locate and transfer positions until enough points are showing to outline the full-size pattern. - With these points located, sketch the full-size pattern. Use a ruler to connect points that represent straight lines.
On curved sections, a pieces of wire solder can be bent to serve as a template, or pattern gauge, in drawing these lines.
Now examine your design.
A little change here and there may smooth out the curve and give it the attractive appearance you desire. - If the piece is symmetrical, you need to lay out only half the design, then fold the sheet of paper down the center and cut out the full pattern.
- Place this paper pattern on your pieces of stock and trace around it.
You may need a little transparent adhesive or masking tape to hold it in place.
Care is essential at this point. - If you are making a large number of parts of the same design, make a template of thin wood or sheet metal from the paper design and use this template to make the layout.
Cutting Out Curves
Many projects contain curves or irregular shapes that must be cut to form the design.
To saw curves, the saw must have a thin blade.
The two most commonly used are the coping and compass saws.
This work can also be done on the jig or band saw.
The Coping Saw
The coping saw has a handle and a U-shaped frame into which a removable blade is fastened.
The more inexpensive type has a wire frame in which the blade is held taut by the spring of the frame itself.
Some are more practical for general woodworking because the blade is tightened by a screw in the handle.
It has the added advantage of permitting the blade to be turned at any angle to the frame.
Coping-saw blades have ripsaw-like teeth and are made with several different numbers of points to the inch.
For most work, a blade with sixteen points or fifteen teeth to the inch is good.
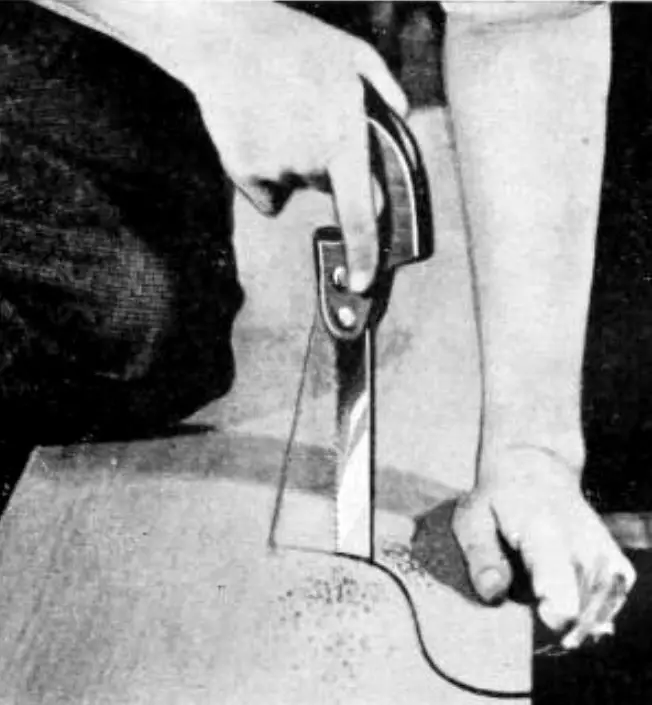
Coping Saw Cutting with the Work Supported on a Saw Bracket
Mount the blade in the frame with the teeth pointing toward the handle.
If the opening to be cut is internal, drill a small hole in the waste material just large enough for the blade to pass through.
Slip the blade through the hole and fasten it into the frame.
Hold the work to the bracket with your left hand.
Grasp the handle of the coping saw in your right hand and move the saw up and down.
The cutting action takes place on the downward stroke, with the pressure released as the saw is pushed upward.
The saw must be worked freely and therefore very little pressure should be exerted.
Hold the work firmly.
As the cutting takes place, it is better to move the work, keeping the saw blade inside the V cut of the bracket.
If it is hard to cut the material, apply a little soap or wax to the blade.
Keep the blade moving at a steady pace of about twenty to thirty strokes per minute.
At sharp corners, turn the handle slowly in the direction of the line and keep moving the saw up and down without applying any pressure to the blade.
Begin cutting again as the blade is turned.
Twisting or bending the blade at the corners will usually break it.
Coping Saw Cutting with the Work Held in a Vise
Insert the blade in the frame with the teeth pointing away from the handle.
Lock the work on the vise with the place to be cut near the top of the vise jaws.
Begin the cutting in the waste stock and keep your strokes uniform as you bring the blade to the cutting line.
Make sure that the saw kerf is in the waste stock and that the blade is held perpendicular to the work at all ties.
While the cutting is being done, the saw can be supported with both hands, or, if the stock is very light, you may support the work itself with your left hand to prevent vibrating.
The Compass Saw
The compass saw looks like any other handsaw except that it is much smaller and has a thin, tapered blade.
Usually a compass saw has several different-sized blades that fit into the same handle.
The narrow point at the end of the saw makes it possible to start the tool in a small opening and to cut small curves and circles.
The saw is made in lengths of from 10 to 18 inches with eight points to the inch.
An average size compass saw is 10 to 14 inches long.
A keyhole saw is very similar to the compass saw except that it is even smaller and is named for its most common use.
Cutting with the Compass Saw
Drill a hole in the waste stock large enough for the saw point to enter.
Insert the point of the saw in the first hole and take several short, quick strokes to force more of the blade to pass through the stock.
Cut a curve by twisting the handle of the saw a little to follow the pattern.
Forming and Smoothing Curves
After the curve has been cut, the edge is rough and requires the removal of some excess stock to smooth the edge and to bring it down to the finished line.
Also, it is sometimes necessary to form or mold a curves surface.
These can be done either with some kind of cutting tool such as a spokeshave or drawknife or with a scraping tool such as a file or rasp.
A homemade scraper made from an old hack-saw blade is also a good tool for forming and smoothing curves.
The Spokeshave
A spokeshae consists of a frame with two handles which hold a small cutting blade.
It is used to plane convex and concave edges.
The depth of cut can be regulated with one or two small thumbscrews.
The spokeshave was originally used for shaping the spokes of wheels but since has come to be a common tool for finishing the edges of curves and molding irregular shapes.
Cutting with a Spokeshave
Place the piece in the vise with the edge to be smoothed near the surface of the vise.
Grasp the tool with both hands.
In cutting, you can either draw the spokeshave toward you or, if more convenient, put your thumbs behind the frame and push it as you would a small plane.
Place the cutting edge on the wood and apply even pressure.
Work with the grain of the wood.
Your experience in using a plane will tell you if the proper chip is being formed.
If the blade is set too deep, the tool will chatter.
When concave curves are being planed, the cutting is done from the top of the curve downward.
Remember, use the spokeshave as you would a small plane.
The Drawknife
The drawknife is a U-shaped tool with a blade 8 to 10 inches long with a handle at either end.
This tool is very effective for removing large amounts of stock rapidly and for doing molding work such as shaping a canoe paddle or building a model boat, airplane, or other cylindrical model.
Be especially careful in using this tool, as the long, exposed blade can be dangerous.
Cutting with the Drawknife
Clamp the work in the vise in such a way that the cutting will take place with the grain of the wood.
Grasp the tool in both hands, holding the blade firmly against the wood with the bevel side down.
Turn the blade at a slight angle to the work and carefully draw it into the wood until a thin chip forms.
Then draw the knife steadily toward you.
Do not try to take too deep a cut at one time, as this will split the wood.
Homemade Scraper
For forming and molding curves which you might do to make an archery bow, the best tool is a scraper that can be made by grinding the teeth off an old hack-saw blade.
If possible, secure a larger half-hard blade, the kind used in automatic hack saws.
Grind off the teeth and cover the ends of the blade by wrapping them with friction tape, to protect your hands.
Using a Homemade Scraper
Fasten the stock in the vise so that the piece to be molded extends away from the vise jaw.
Grasp the scraper in both hands and hold the blade against the wood at a slight angle, with enough pressure to bend the blade slightly.
Now begin to draw the blade toward you.
Continue to draw the blade toward you in long, sweeping strokes to form the stock to the desired shape.
The File or Rasp
A file or rasp is a scraping tool and should be used only as a last resort.
Too often the inexperienced woodworker prefers to use one of these tools when a cutting tool will do a much better job.
There are so many kinds of files and so many shapes and sizes that it would be impractical to describe even a few of them here.
The two files used most often, however, are a 10 to 12 inch half-round cabinet file or a 10 to 12 inch rattail file.
A rasp is very similar in appearance to a file except that the face is cut with individually shaped teeth.
The rasp removes large amounts of stock quickly and leaves a rough surface, while the file produces a smoother finish.
Always put a handle on the rasp and file when using them because the tang can injure your hand severely.
Smoothing with a File or Rasp
Clamp the work in the vise securely. Hold the handle in your right hand and the end of the tool in your left.
Apply pressure on the forward stroke, making a slight shearing cut across the edge of the work.
Release the pressure on the return stroke.
When you are using a half-round or rattail file for finishing a convex curve, twist the tool slowly as the forward stroke is made.
Don’t rock a file or rasp as this will round off the edge of the work.
These tools should be cleaned often with a file card.