You picked the style of furniture for your house very carefully.
But do your interior moldings match that style or conflict with it?
Most modern homes are trimmed with minimal, economical moldings that are uninspiring.
But with careful planning and a minimum of tools you can replace existing trim and add more in a style that matches your furniture more closely and gives your rooms a balanced, coordinated appearance.
Contents
- Selecting Your Moldings
- Preparation
- Installing the Molding
- Make Crown Moldings and Crown Molding Joints
- Cope Joints for Inside Baseboard Joints
- Installing Molding Around Arched Windows
- Dealing with Gaps
- Fastening Moldings to the Wall
- Finishing the Molding – Paint
- Finishing the Molding – Varnish
- Spray Finishing
- Whipe on Oil Finish
- A Brief History of Classical Interior Molding
Selecting Your Moldings
Plan carefully what moldings you will use, and accurately tally the total lengths of each profile you will need.
Moldings are expensive, so cut costs by minimizing waste.
Buy short pieces of the profiles you plan to use, and build mock-ups of intersecting corners for crown molding, fireplace surrounds, and door or window treatments.
These mock-ups will show you what the moldings really look like in place far better than sectional drawings or lineal molding on a lumber rack.
Try different combinations of moldings on your mock-up to find what pleases you the most.
To make wide molding profiles, stack moldings together
Choosing a Style
Traditional wall treatments use various molding profiles arranged on the wall in a classical design scheme.
Modern wall treatments tend to follow this basic design scheme, but with less fancy detail and generally not as much molding.
For a contemporary look use painted trim, with a greater proportion of wide, flat trim pieces and a lesser proportion of molded trim.
For a country appearance use stained knotted 1x flat trim, such as 1×4 or 1×6 pine, and adorn to taste with moldings of the same wood.
Considerations for Painted Moldings
Interior moldings that are intended to be painted are made of woods such as poplar or pine which do not have open pores.
Don’t try to paint open porous woods such as oak or Philippine mahogany because filling the pores to achieve a smooth surface is very time consuming.
Beware of stripping existing painted moldings with the intention of staining them because the paint grade wood underneath may not be very beautiful, and may have much filler putty in holes which doesn’t look good stained.
Stripping is time consuming and can take longer than replacing the moldings.
Many paint grade moldings are made from finger jointed stock, which is made of many short pieces of wood glued end to end.
This is less expensive, but the finger joints sometimes become visible through the paint because the two pieces of wood on either side of the joint expand and contract at different rates with seasonal airborne moisture variations.
Use finger jointed stock in lower profile areas of the house or on baseboard where it is less visible.
Consideration for Stained / Clear-Coated Moldings
Any wood can be used with stain and\or clear varnish.
Some woods such as cherry and maple may not absorb stain uniformly and will appear blotchy, so with these use no stain and only clear varnish topcoat.
Oak and walnut will stain uniformly.
All stain grade hardwood moldings will be significantly more expensive than their paint grade counterparts.
Preparation
Remove old moldings carefully with small pry bars, being careful not to damage adjacent areas.
Observe whether door and window jamb edges are flush with adjacent drywall.
If not, reduce a wood jamb edge with a block plane or taper protruding drywall to the jamb edge with a surform.
Your new moldings must lie flat against the wall and jamb edge.
Preparation for a Remodel
If you are remodeling and installing new wall studs where moldings will go, check that the studs and headers are straight and well aligned before installing drywall.
Use a power plane to straighten bowed studs, but don’t hit nails with the blades.
Use a hammer and chisel to taper protruding ends of headers or studs where they intersect.
The flatter the drywall lies, the easier it is to install moldings on top with tight joints.
Pre-Painting Moldings
Consider painting your moldings before installing them because it is easier to do so on sawhorses than on the wall.
After installation, fill nail holes with spackling compound, sand lightly and touch up the paint with a small brush.
Varnished wood is harder to touch up and is best varnished after installation.
Paint or varnish the back, unexposed side of all moldings before installing them.
This sealing step reduces warping that occurs with humidity changes.
Installing the Molding
The first step is installing trim on doors and windows.
Other trim such as baseboard and chair rail butts against these trim and must be fitted after.
Trace onto the edges of door and window jambs where you want the moldings to lie for a uniform reveal on all jamb edges.

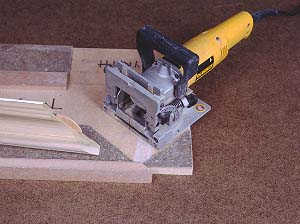
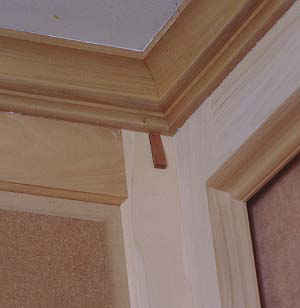
Join plinth blocks and molding, as well as mitered moldings, with biscuit joints.
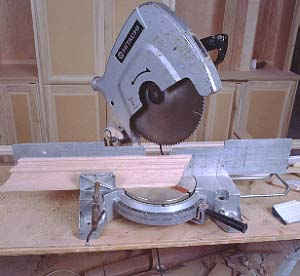
Cut the miter joints with a power miter saw and carbide cross-cut blade, or hand miter box, then cut biscuit joints.
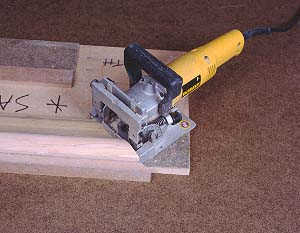
Make a custom jig on each job to hold the biscuit joiner and molding together for an accurate cut.
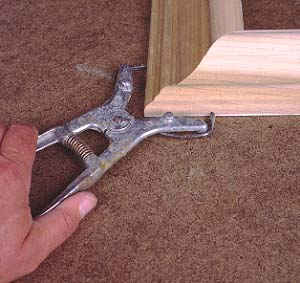
Glue the joints together with yellow woodworkers glue, and clamp miters together with spring miter clamps for one hour.
When a miter joint does not fit tightly, try adjusting the angle of cut on your miter saw to compensate.
Or, when the gap is due to an out of flat wall, try undercutting the miter edge by sanding with a grinder fitted with 60 grit sandpaper.
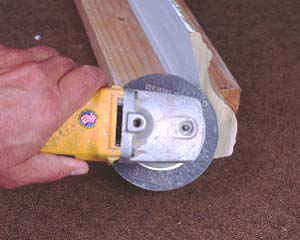
Alternatively use a rubber sanding wheel mounted in a hand drill.
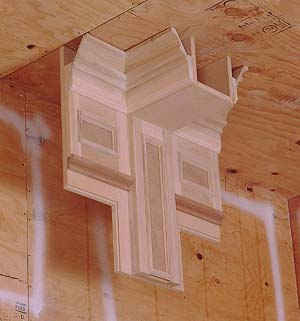
Make Crown Moldings and Crown Molding Joints
Make crown molding by stacking two or more molding profiles together.
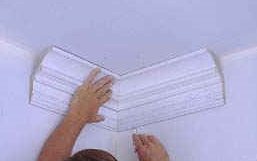
Apply the moldings to the wall in sequence; first all of one profile, then all of the other.
To guarantee that the second profile will align correctly with the first, make a mock-up jig of the two profiles and use it to scribe onto the wall where the edges must lie.
Use the clamp on your miter saw as an adjustable guide to hold angled crown molding at the correct angle in the saw for an accurate cut.
To tighten gaps at inside crown mold joints, undercut by sanding, then use small wedges to force the joint together as the glue dries.
Cut the wedges off after the glue dries with a sharp chisel.
Cope Joints for Inside Baseboard Joints
Use a cope joint rather than a miter for inside baseboard joints, because you cannot wedge the bottom of an inside baseboard miter together if it gaps.
To cut a cope joint, first cut a 90 degree joint on one piece of baseboard, and butt it into the corner.
Cut a miter onto the other piece as though you were making a miter joint.
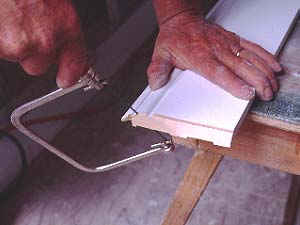
Use a coping saw to cut along the edge of the profile at a 10 degree undercut.
Point the blade teeth downward so they won’t tear the edge of the cut on the up stroke.
Make straight cuts with a larger hand saw.
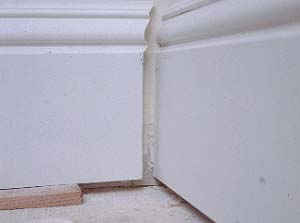
The cope cut fits neatly over the face of the first piece.
Use a round file to make any adjustments necessary.
Installing Molding Around Arched Windows
Many factory produced arched windows come with curved interior trim.
When buying such a window, be sure you can obtain straight molding of the same pattern to fit below the curve.
Align your cuts on the ends of the curved molding by first scribing a horizontal line across the wall on the line of the joint on both sides of the window with a long straight edge.
Then he holds the curved molding in place with a single nail, and marks on the molding where it intersects the horizontal line.
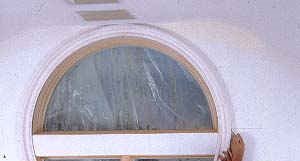
Use these marks to align the molding on the miter saw.
Putty and sanding cause the intersection to appear smooth.
Dealing with Gaps
Since no wall, floor, or ceiling is perfectly flat gaps will appear between these and the moldings.
Taper the bottom of baseboards with a block plane to fit irregular floors.
Align crown molding to the lowest part of the ceiling, and use drywall taping compound to taper the ceiling to the top of the crown molding.
For smaller gaps, use caulking to fill.
When a molding must be bent slightly, cut kerfs at 90 degrees to the length of the molding on the back.
Cut them half way through the molding or more, and space them an inch apart.
The kerfs allow the wood to bend easily.
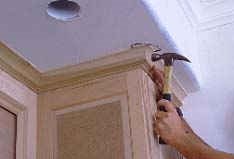
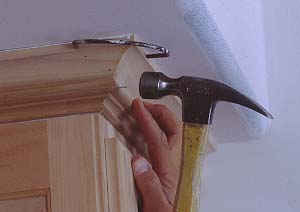
Fastening Moldings to the Wall
Fasten moldings to the wall with finish nails that are just long enough to pass through drywall and enter the wood behind a half inch at least.
Be sure the nails enter studs or jambs, not drywall alone.
Set the nails below the molding surface 1/8″ with a nail set to provide a hole large enough for filler to adhere.
Power nailers make the work go much faster than using a hammer.
Air powered nail guns require a compressor.
Very small portable compressors are relatively inexpensive and any of these will power a finish nailer.
Consider purchasing these if you plan to do more than two rooms.
Electric finish nailers are also available.
Finishing the Molding – Paint
Proper sanding and filling before painting and between coats is the key to a smooth, attractive painted finish.
Begin by filling nail holes with spackling paste, and gaps at joints and drywall with caulk.
When the fillers are dry, sand the bare moldings with 80 to 120 grit to eliminate mill marks (from molding knives) and other irregularities.
Prime coat with interior bare wood primer that is slightly thinned.
Thinning causes it to dry harder faster so you can sand sooner.
Sand the prime coat with 180 grit after it is dry and look for any depressions you missed with filler the first time.
Fill these, let dry, sand smooth, then apply a top coat.
Sand once more when this is dry, and apply the final coat.
By always sanding between coats you remove unwanted fibers or dust that stand up in the wet finish, as well as identify any depressions that still need filling.
Finishing the Molding – Varnish
Use a similar procedure for a varnished finish.
Do all filling before applying any finish.
Use a colored putty that matches your stain color, or slightly darker if an exact match is not available.
With porous woods such as oak, avoid smearing filler onto adjacent smooth areas that don’t need to be filled, because the filler will fill pores and make them appear different than the surrounding wood.
If you are using stain, be sure it is compatible with the top coat you will use.
Water, alcohol, and lacquer based stains can be redissolved by the solvent in the top coat and smeared.
Petroleum based stains (paint thinner) will not do this.
Use thinned varnish for the primer coat (unless the manufacturer says not to thin) and sand lightly between coats with 320 grit sandpaper.
Spray Finishing
Some spray equipment is priced low enough that it is a viable alternative for home application.
It takes time to mask off all adjacent areas so that they won’t be painted or varnished, but overall the process takes less time because spraying goes fast.
As well, a properly applied spray finish is smoother because it lacks brush marks.
When first using a sprayer, use test pieces and deliberately spray too much finish causing it to run.
This will quickly teach you what not to do on the real thing.
Use even, regular strokes and learn how to use the gun adjustments to best apply the finish you are using.
Thin the finish only enough so that it will spray.
Whipe on Oil Finish
Consider wipe on oil for a stain grade finish.
It is faster and easier to use than varnishes, and has a natural appearance.
Some brands have stain in them so that you color the wood simultaneously.
Apply oil only until the wood will absorb no more, then wipe off excess with a clean cloth.
Usually a second coat is necessary for maximum absorption.
Wipe on oils are not as abrasion resistant as varnishes, and do not resist staining as easily.
Use water based polyurethane varnish where the moldings will see a lot of use such as kitchens and halls, and save the natural appearing oil finish for your private reading nook.
A Brief History of Classical Interior Molding
Traditional American wall treatments from the 18th Century onward were laid out according to a general scheme developed by the Greek and Roman builders.
The three main components of this scheme are the pedestal, which is a base for a column, the column itself, and the entablature which rests upon the column.
Ancient builders used molded edges at the joints of these stone components to hide the joints and provide a certain appearance.
The classical revival in European and American culture of the 18th and 19th Centuries used this basic breakup of interior walls as a basis for many of numerous specific styles (such as Georgian, Federal, Victorian etc.).
Variations in these styles amount to different use of these components, not use of different components.
Earlier Georgian styles used moldings with circle curves, later styles (Federal onward) also used elliptical styles.
Base molding, wainscot and chair rail constitute the pedestal.
Chair rail and wainscot are frequently omitted.
Raised panel wainscot is time consuming and expensive to make, but you can use special plywood paneling to give a similar appearance.
Border the paneling at the top with chair rail.
Locate chair rail at a height above the floor where chair backs will strike it and not the wall.
The area between the baseboard or chair rail and the crown molding constitutes the column, and is called the field.
This area was usually left bare, though picture rails (from which picture wires were hung with hooks) were often used to define the top.
Sometimes rectangular molding frames were used in the middle of the field as border surrounds.
The Victorians often papered the field.
Crown molding constitutes the entablature.
Many different combinations of moldings were used for crown treatments, from a single wide piece to large numbers elaborately arranged for maximum visual effect.
Use this scheme as a basis for door and window molding treatments, too.
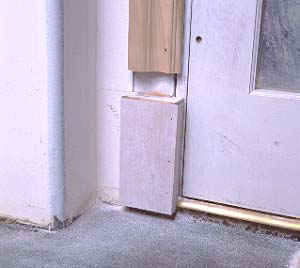
On doors the plinth block constitutes the pedestal, and the vertical trim the column.
On windows use a thick stool and molded apron below to give the heavy appearance of a pedestal.
At the top of doors and windows, simulate an entablature with crown molding that returns at the ends with miter cuts and short pieces that butt to the wall.
Or, find a picture of a door or window head that you like and copy it as closely as you can with available moldings.