No matter how well your home is built, it must also be well caulked if it is to function properly.
Contents
The Purpose of Caulking
Caulking serves three important purposes: it finishes the joints where outside surfaces meet, it prevents drafts and heat loss, and it prevents water, dirt, and insects from entering and damaging your home.
Caulking is important everywhere two outside surfaces meet.
To make sure your home is sealed against the elements, you should inspect it yearly for missing or damaged caulking, and recaulk as necessary to repair the damage.
Types of Caulking and Uses
There are several types of caulking compound. Oil-base caulks are the least expensive, but also the least durable.
For most applications, acrylic latex or silicone caulk is better. Acrylic latex, an all-purpose caulk, can be painted over.
Silicone caulk is far more durable, and is very easy to work with, but it’s also very expensive, and it usually can’t be painted over.
For masonry-metal joints, where pipes go through the foundation wall, for instance–use butyl rubber caulk.
Polyvinyl acetate (PVA) caulk is also available, but it’s less durable and less widely used than other types.
For caulking wall-to-roof or chimney-to-roof joints, use roofing compound.
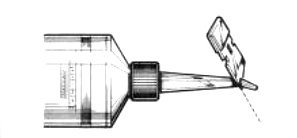
All of these types of caulk are sold in bulk tubes, to be used with an inexpensive caulking gun.
Many caulks are available in white, gray, black and clear forms.
Preparation for Caulking
When you buy caulking compound, read the label to estimate how much you’ll need. it’s a good idea to buy one or two tubes extra.
Environmental Conditions
Plan routine caulking for dry, warm weather.
Caulking should not be done when it’s very cold or very hot.
If you must work in very cold weather, warm the caulk to room temperature before you start.
If you must work in very hot weather, chill the caulk briefly in the refrigerator to keep it from getting runny.
All surfaces should be dry when you apply caulking compound,
Caulking is not a difficult procedure: all it really requires is patience and attention to detail.
Determine Where You Will Be Applying the Caulk
When you’re ready to work, inspect your home carefully to find the places that need caulking.
In general, there should be caulking along every joint where two outside surfaces meet-around windows and doors, at the point where the house walls meet the foundation, where porches or steps are attached around air conditioners, pipes, and vents.
Every corner seam should be caulked, and every seam between sheets of siding.
On the roof, there should be caulking where the chimney meets the roof and along every flashing edge, at the chimney surface and at the root surface.
If caulking is missing or damaged at any of these points, you should recaulk the entire joint
Removing Old Caulk
Before you can apply new caulk to a joint, you must remove the old caulking.
Sometimes you can peel the old caulk out in long strips.
If you can’t, and if it’s hard to dislodge the caulk with a putty knife, use a sharp utility knife to cut the old caulk out, forming a clean, square joint.
Be careful not to damage the joint surfaces.
For joints along glass carefully scrape the glass with a single-edge razor blade or a glass scraper, and then clean and dry the glass.
After removing the old caulk, go over the joint with a dry paintbrush to remove dust and other debris
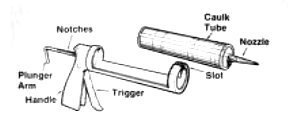
Setting Up the Caulking Gun
Once you get the feel of it, caulking is very simple.
With a sharp utility knife, cut off the tip of the caulk tube’s nozzle, cutting at an angle.
Most tubes have cutting guidelines marked on the nozzle.
The open tip of the nozzle should be roughly the same diameter as the width of the narrowest cracks to be caulked; the bead of caulk must be wide enough to overlap both sides of the joint.
For larger cracks or joints, you’ll have to recut the nozzle to make a wider bead of caulk.
With the nozzle cut to correct width, pull out the plunger of the caulking gun and set the tube of caulk into the gun, base first, so that the nozzle of the tube sticks out through the slot on the end of the gun.
Then turn the plunger of the gun to point up, and push it in just until it engages.
Finally, break the seal between the tube and the nozzle: push a piece of stiff wire or a long nail into the nozzle to puncture the foil or plastic seal.
Applying the Caulking
To use the caulking gun, hold the nozzle at a 45 degree angle to the joint you want to fill.
With the plunger of the gun engaged and the seal of the tube broken, squeeze the handle firmly.
In a few moments, caulk will begin to flow out of the nozzle.
The caulk is forced out of the tube by the pressure of the plunger, as you squeeze the handle of the gun, the plunger moves in, notch by notch, and the caulk flows out.
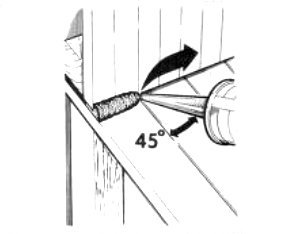
Draw the nozzle of the tube slowly along the open joint, with the tip slanted in the direction you’re caulking.
The caulk should flow out behind the nozzle as you go, don’t try to push it ahead of the nozzle.
As you work with the caulking gun, let the caulk flow at its own rate: don’t try to hurry it.
The gun releases caulking compound at a steady rate, one click at a time.
You can’t speed it up by squeezing the handle harder-All you can do is adjust your rate of movement to use it well.
Fill each joint with one steady movement from end to end, adjusting your speed as necessary to the flow of caulk.
The caulk should fill the joint completely, overlapping both side surfaces, with no gaps or bubbles.
At the end of the joint, twist the nozzle out and turn the gun nozzle up to minimize the flow of caulk.
Don’t expect it to stop flowing instantly, the caulk released by the last click will keep coming.
If caulk builds up on the nozzle between joints, wipe the excess off the nozzle with a paper towel.
When you’re finished caulking, stop the flow of caulk by turning the plunger to point down and pulling it out to disengage it from the tube of caulk.
Finishing Up
Let the caulk cure as directed before you touch it.
To clean up remove as much excess caulk as you can with paper towels, and finish the job with the appropriate solvent.
Fresh acrylic latex caulk can be removed with soap and water.
Dried silicone caulk will peel off your hands like rubber cement.
Use leftover caulk as soon as possible, it will eventually harden in the tube.
More Caulking Tips
Before you begin to caulk, make sure that the seam or the crack that you are filling is clean of any dirt, old deteriorated caulking or dry paint.
You can use a putty knife or a large screwdriver to scrape the opening clean.
There should be no moisture in the crack before applying the caulk, or it will be trapped inside once the caulk sets up (dries).
Be sure to cut the tip of the caulk at a 45-degree angle, the same angle you will be applying the caulk to the surface.
This will help the caulk to flow neatly and evenly along the wall or area you are cutting.
Hold caulk gun at an angle.
If you want to draw a good steady bead of caulk you may need a little bit of practice.
Hold the gun at a consistent angle and draw the bead continuously rather than a stop start motion.
Just before pulling the gun away, release the trigger to avoid excess caulk from oozing out.
Use a damp sponge to force caulk into crack.
Then take a damp sponge to wipe away the excess.
The sponge is also forcing the caulk into the crack. Follow these simple quick tips and you’ll be caulking away in no time.
It is important to remember that caulk is a material that forms a flexible seal to stop air and moisture infiltration.
Caulk comes in a variety or types depending on the chore.
You can use it in your bathroom, to seal windows and winterize your home, you can caulk your walls, fireplaces and even your rooftops.
Caulk is used on window and doorframes, siding, corner joints, foundations, and almost any area in which you find a seam or crack.
Some of the better types of caulk will last up to 20 years. Although these are more expensive, they will save you the time and expense of re-caulking later.
Since there are many types of caulk for various uses, be sure to check with your home center to find out what type will work best for your particular needs.
Generally, you will apply caulk from a tube with a caulking gun or from a pressurized can.
You can also purchase rope caulk, which comes in a coil and is simply unwound and stuffed into cracks and crevices.
However, rope caulk only lasts a year or two. If you are using it to winterize your home you will probably have to do it again next fall.
Since caulking is a major part of getting your home ready for the winter, access to an air compressor or power drill would come in very handy.
Fitted with a caulking gun attachment the air compressor or drill allows a smoother, almost effortless application in all areas needing caulk.
If you are trying to cover both sides of a crack of seam with a singlewide bead of caulk, make sure it adheres to both sides.
The joint between the door frame and the exterior and interior walls can be as much as an eighth of an inch gap.
This must be carefully and completely caulked to seal it against energy loss.
If you live in an older home, caulking the outside of the window frame where it joins the overall structure of the house will halt a steady flow of air.
This space between the windows usually contains the weights for the older double hung window and is not insulated.
By caulking this area properly you will save energy and cut your heating costs.
Note: Never caulk the little openings in storm windows.
They have a very specific purpose; that is, allowing moisture to escape and not condensing on the glass.
Cracks in the foundation or basement walls can be terrific energy losers.
You’ll want to be certain the crack is very clean. Remove any loose mortar and moisture.
You may even want to go over it with a primer if the material is porous.
Smaller cracks can be sealed off with just a liberal bead of caulk forced smoothly into the crack.
Extra deep cracks should be stuffed with polyethylene foam, fiberglass, or oakum to within 1/2″ of the top surface.
Then caulk over this to provide a seal.
On roofs or siding, repair areas around flashing with caulk or a sealant recommended for exterior metal.
Seal flashing around roof stacks and vents, between roof valley flashing and shingles, and around roof additions and skylights.
There are also types of adhesive caulking that will mend split or loose roofing shingles as well as splits or cracks in siding.
(These are available in a variety of colors.)
Exposed roofing nails should also get an application.
Keep all gutters, downspouts, soffits, and eaves clean and in good repair.
Caulk them to prevent rot decay, basement flooding, mildew, and dampness problems.
If you are not using your fireplace plug up the flue with insulating fireplace baffle (damper) to prevent warm air from doffing up and out of your home.
More on Types of Caulking and Glazing Compounds
The following is a list of types of Caulking and Glazing Compounds
Silicone Rubber lasts 12 to 30 years or more and offers the best adhesion for use in seams, cracks, and gaps up to 1/4″.
It adheres very well to all clean surfaces. Pure silicone does not allow paint to adhere, so impurities are added for adhesion in some formulations.
It is available in many colors and clear.
Butyl Rubber lasts 8 to 10 years, has some shrinkage and is for use in seams, cracks, and gaps up to 1/4″. It is available in many colors.
Acrylic Latex Silicone Blend lasts 12 to 20 years and features easier application than the preceding rubber caulks.
It is intended for use in seams, cracks, and gaps up to 1/4″. Depending on the manufacturer, it may not take painting.
Acrylic Caulk lasts 8 to 10 years. It features easy water clean up and is for use in seams, cracks, and gaps up to 1/4″.
It goes on easily and has no offensive odor. It is available in many colors.
Latex Caulk lasts 2 to 10 years, features water clean up and is intended for use in seams, cracks, and gaps without expansion or contraction up to 1/4″.
Most are paintable.
Many are available in colors.
Oil Base Asphalt Caulk lasts 1 to 4 years.
It is dispensed as a soft and tar like compound for use in seams and gaps on the roof around chimneys, stacks and pipes to 1/4″.
It hardens rapidly.
Caulking Cord is usually considered a temporary weather-stripping product.
It lasts 1 to 2 years, peels from a roll and then pushed into place.
It is usually a temporary filler around air conditioners.
It comes in rolls and unused portion can be stored for years.
Oakum is twisted hemp treated with tar. It is cut to needed length and pushed into place.
It is used to stuff large gaps before using caulking over the oakum.
Glazing Compound lasts indefinitely.
Application requires some practice with a putty knife, and is used as a seal between the window glass and frame, an often-overlooked area needing repair.
Thank you for your details article for using a caulk like a professional.
My question is: Is there any safety need to be followed to using a caulk gun?